---
title: Advanced network configuration
url: https://documentation.cluedin.net/operate/configuration/advanced-network
content_type: how-to
section: Deploy & operate > Configuration
---
# Advanced network configuration
> how-to: Steps to accomplish one task.
In this article, you will learn about advanced network configuration options that are available to you during CluedIn installation.
## Default network configuration example
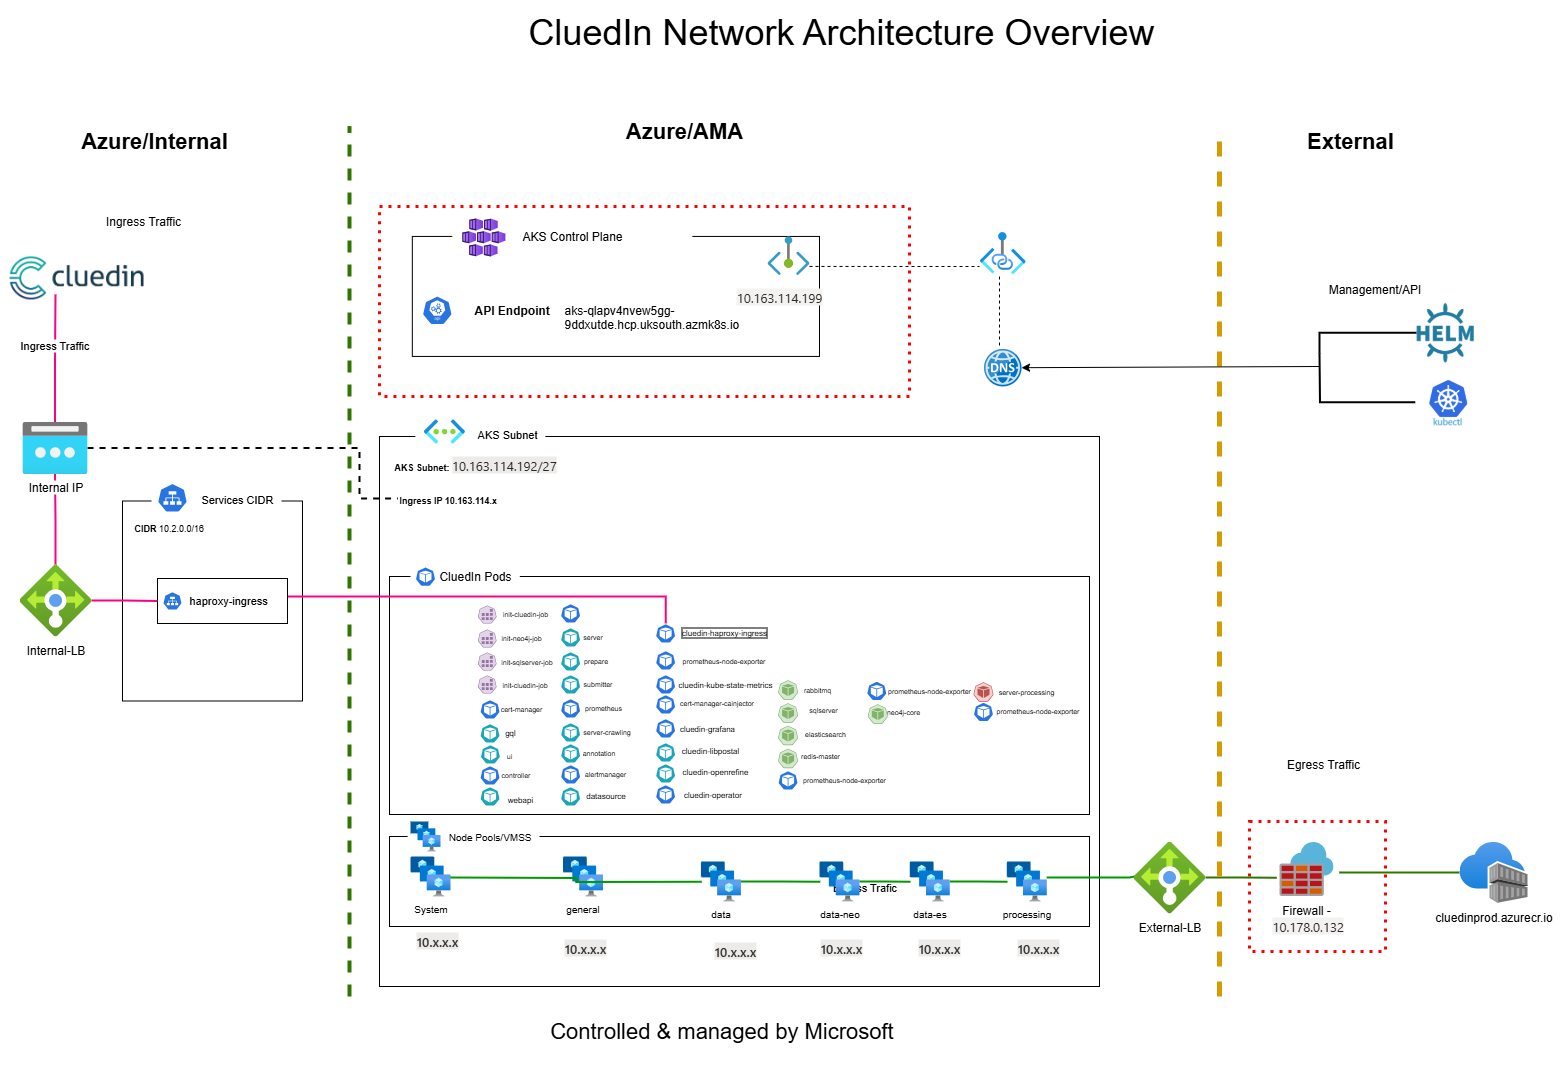
The following diagram shows the default network configuration of CluedIn after installation.
{: width="800"}
## Advanced network configuration example
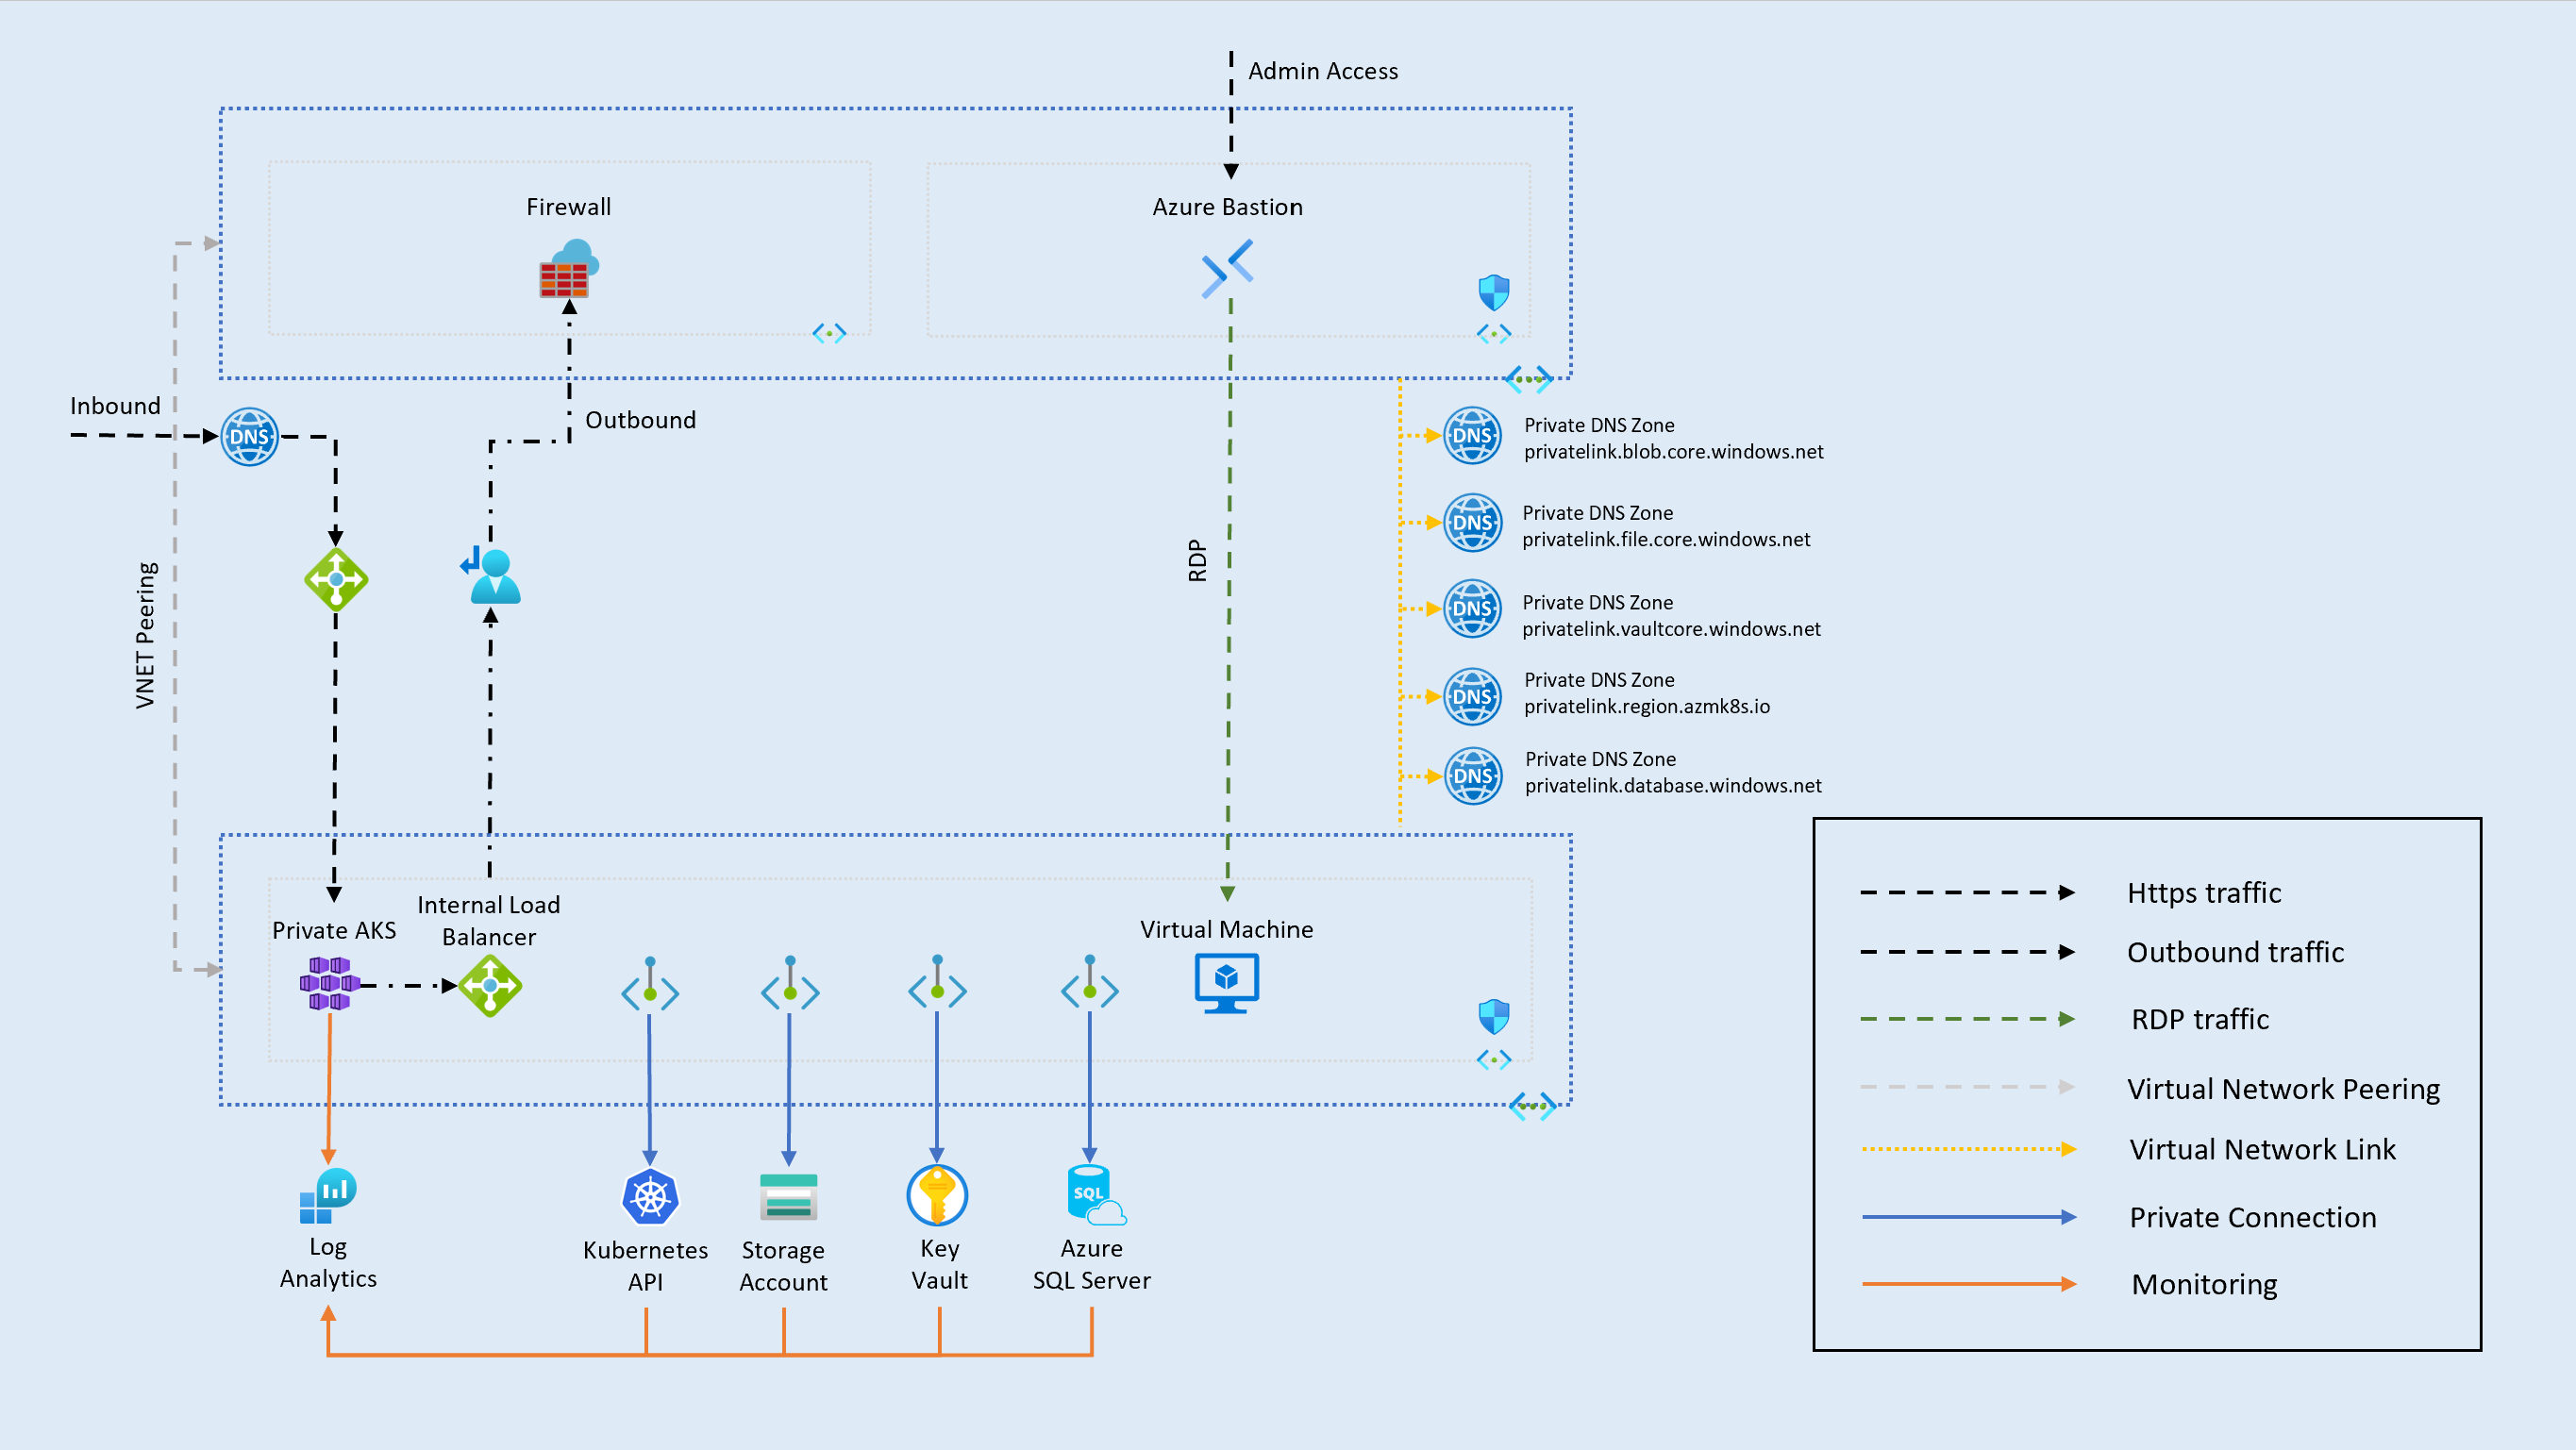
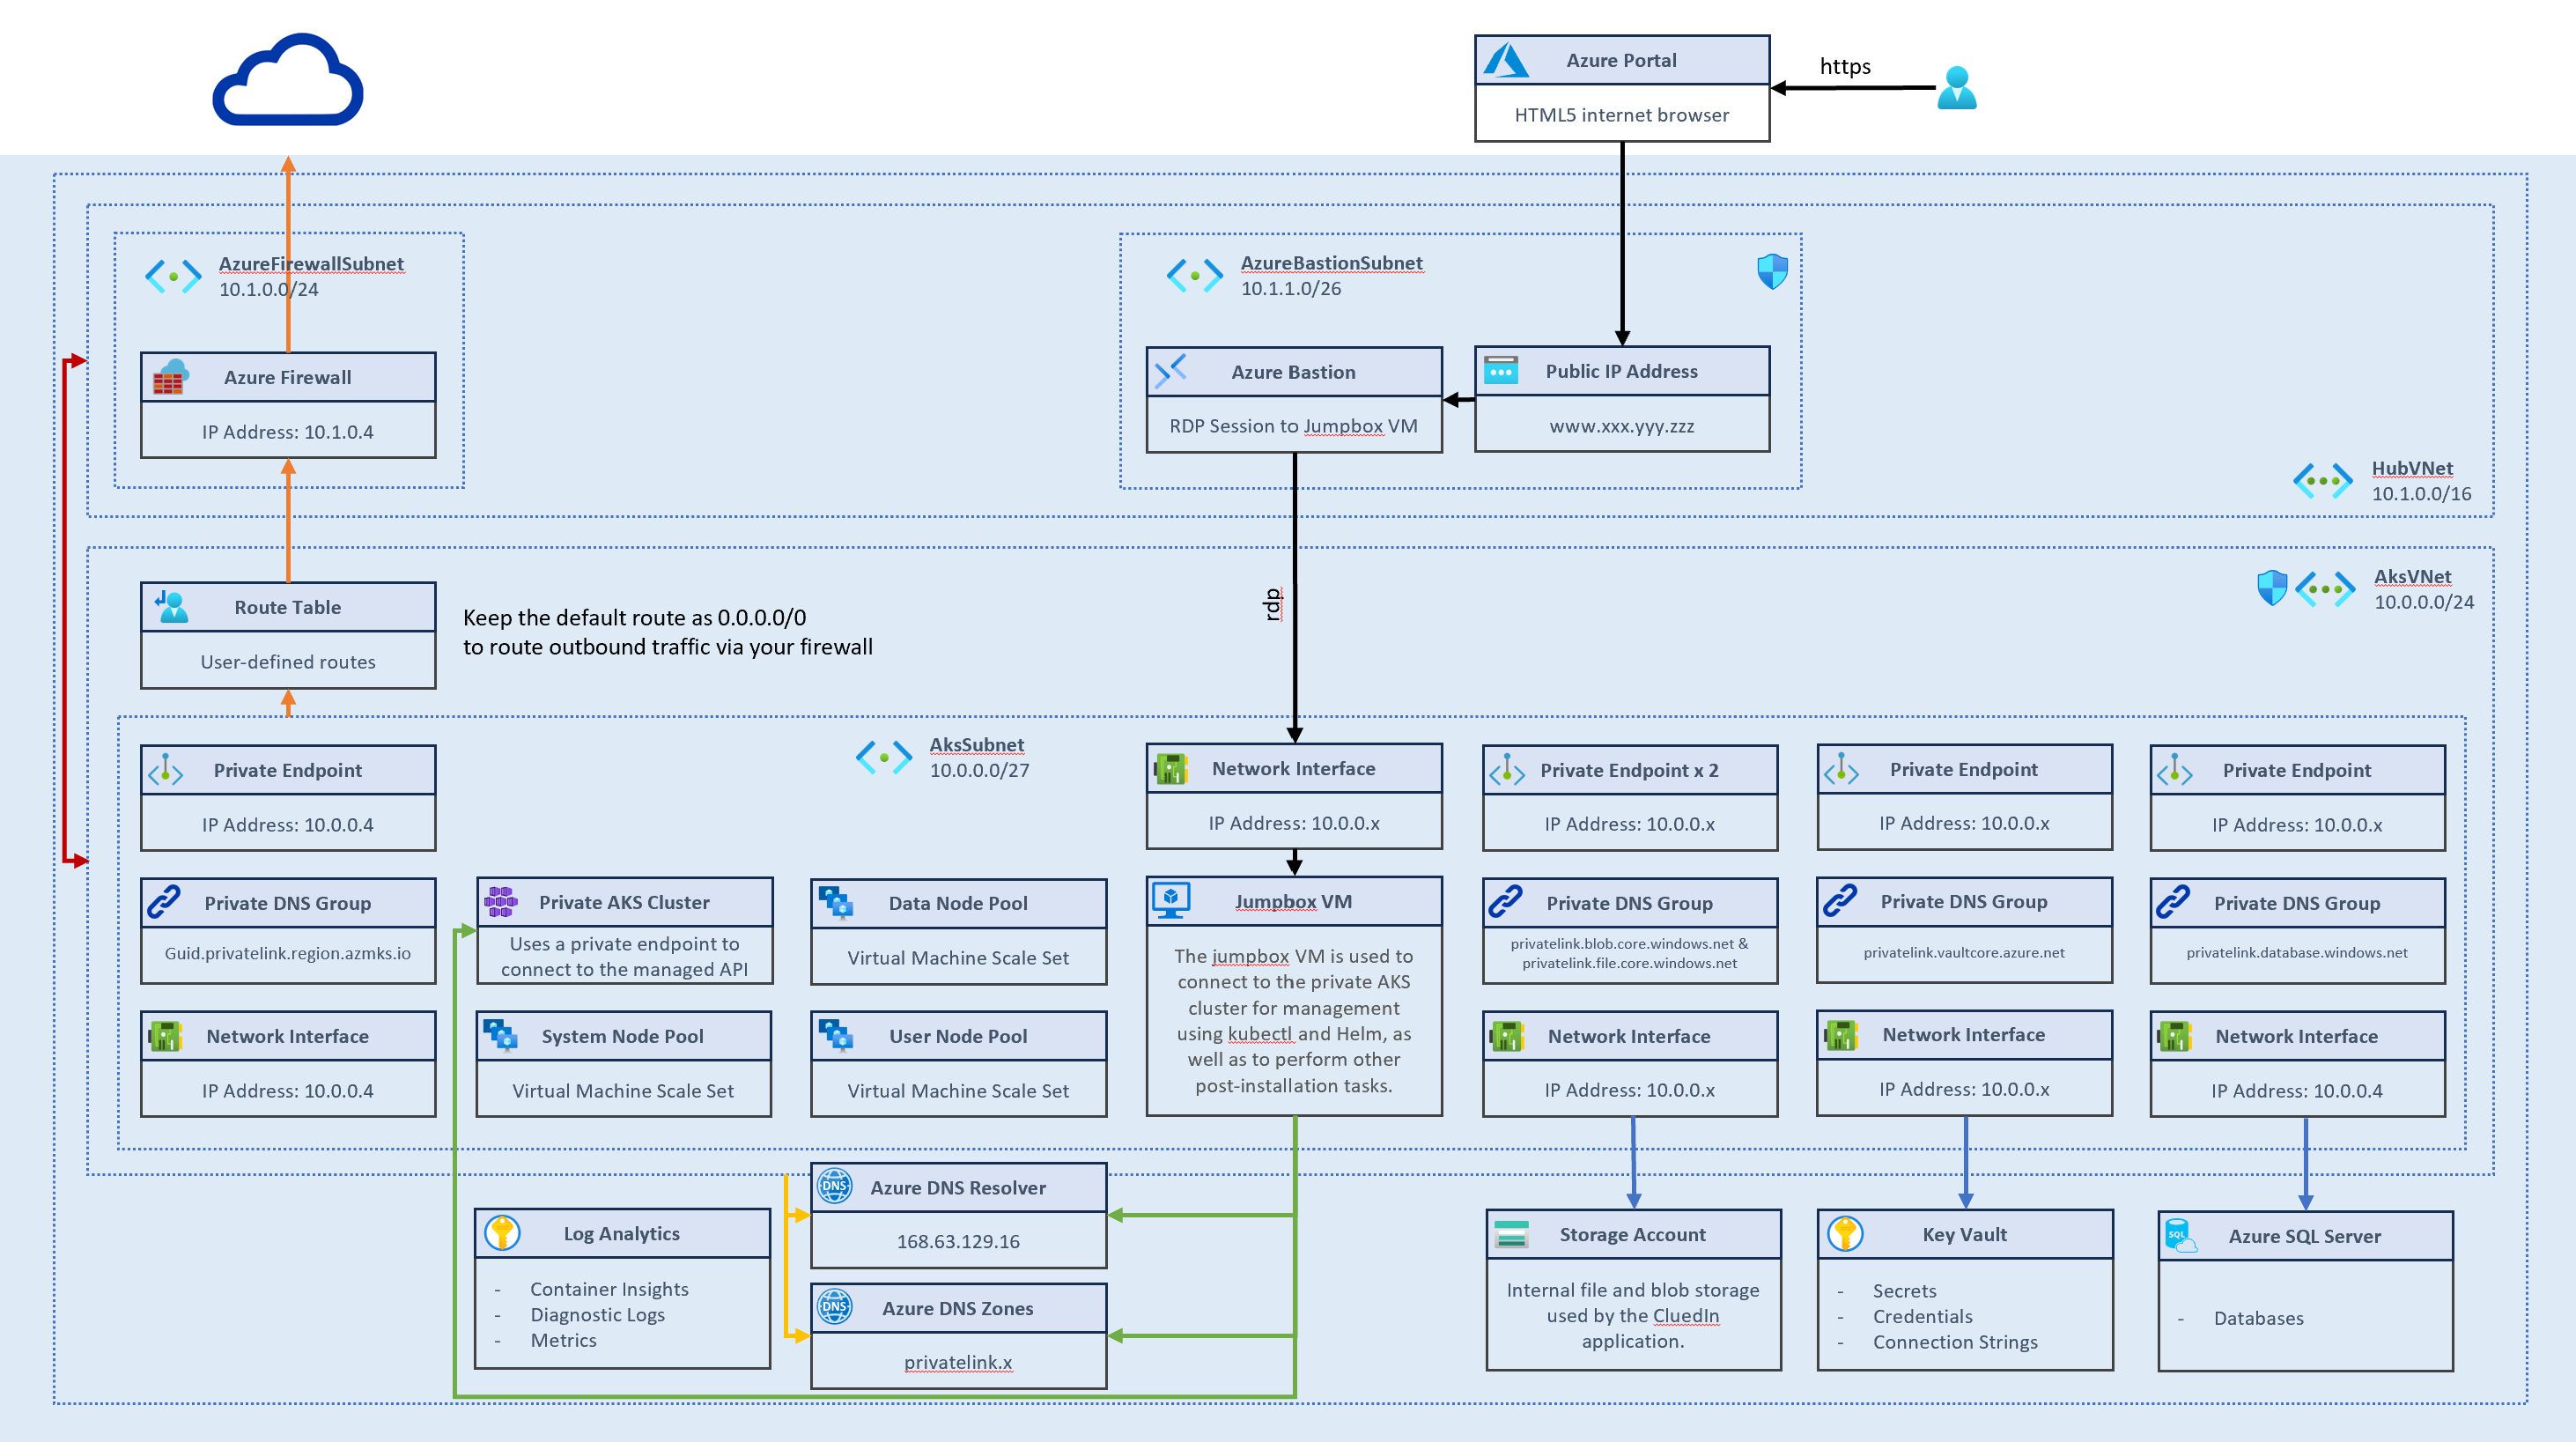
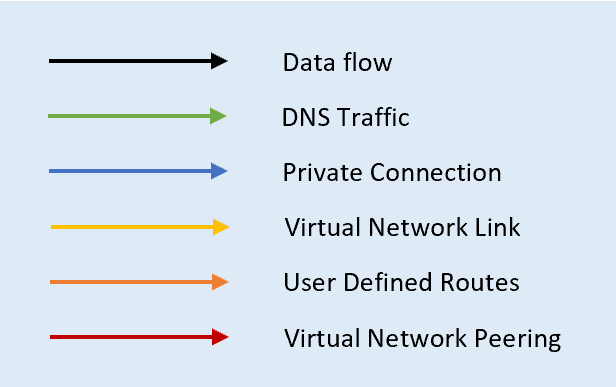
The following diagram shows the advanced network configuration of CluedIn.
{: width="800"}
{: width="800"}
{: width="200"}
**HubVNet**
This virtual network is hosted by the client. All IP addresses and address ranges in this design are suggestions only and must be validated and finalized by the client according to their internal IP planning policies.
**AzureFirewallSubnet**
The Azure Firewall service should be provisioned and managed by the client.
- IP address ranges shown in this design are placeholders and may be adjusted to align with the client’s networking strategy.
- The subnet must meet minimum size requirements (at least /26) to support firewall functionality and scaling.
**AzureBastionSubnet**
Azure Bastion is optional and can be deployed by the client for secure, browser-based RDP/SSH access.
- The subnet name must be AzureBastionSubnet, and the IP range must be /26 or larger, per Azure requirements.
- If CluedIn provisions Bastion, it and the jumpbox will be deployed inside the AKS VNet rather than the Hub.
**AksVNet**
This virtual network is dedicated to hosting Azure Kubernetes Service (AKS) resources.
- NICs (Network Interface Cards) and Private Endpoints within this VNet will be assigned IPs dynamically from the allocated subnet pools.
- Subnets must be sized appropriately to support expected service scaling, including node pools and private endpoints.
- When integrating Bastion or other management services, ensure sufficient IP allocation and configure NSGs (Network Security Groups) to allow secure access.
Advanced network configuration requires that you have read and configured your firewall as per the firewall policy. For more information, see [Configure firewall](https://documentation.cluedin.net/operate/configuration/configure-firewall.md).
During the installation, you will have the option to use the recommended CluedIn defaults, or to use your own vNet and subnet to comply with internal policies.
CluedIn supports two main options, which are detailed in the following table.
| Supported CNI Modes | Description | Recommended class | Reference | Notes|
| --- | --- | --- | --- | --- |
| Azure CNI Overlay | \***Default**\*
CluedIn recommends this option as it only requires 1 IP per node from your subnet.
This means if you have 5 nodes, a total of 5 IP addresses will need to be used upfront. | `/27`
30 available IP addresses | [Azure CNI Overlay planning](https://learn.microsoft.com/en-us/azure/aks/azure-cni-overlay?tabs=kubectl#ip-address-planning) | When using Azure CNI Overlay, ensure that both the node CIDR and pod CIDR ranges are allowed in your NSG configuration. Refer to the official [documentation](https://learn.microsoft.com/en-us/azure/aks/concepts-network-azure-cni-overlay#network-security-groups) for details. |
| Azure CNI | Assigns 1 IP per pod, per node based on the `maxPods` property, which defaults to `50` during installation.
This means that if you have 5 nodes, each with a max of 50 pods, a total of 250 IP addresses will need to be used upfront. | `/23`
510 available IP addresses | [CNI network planning](https://learn.microsoft.com/en-us/azure/aks/azure-cni-overview#plan-ip-addressing-for-your-cluster) | |
> **Important:** It is best to always accomodate for expansion of your cluster, especially during AKS upgrades as additional nodes will be spun up at upgrade time. The above is CluedIn's recommendation.
## Advanced network configuration options
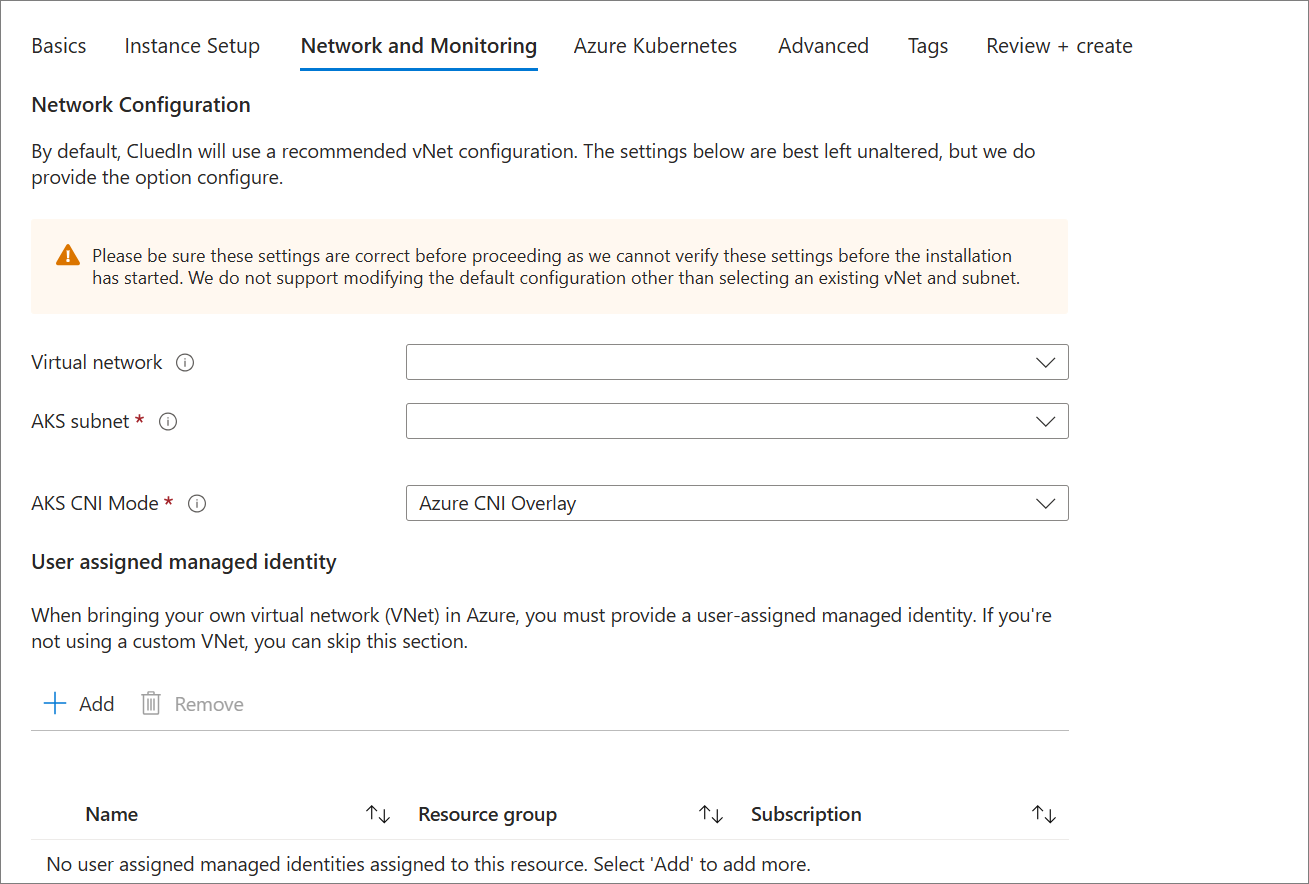
During the installation of CluedIn from the Azure Marketplace, you can set up advanced network configuration on the **Networking and Monitoring** tab. The default option is to create a new vNet and subnet with recommended defaults, but this can be changed to use an existing vNet.
> **Important:** If you're using an existing vNet as part of the deployment, you will need to ensure that the AKS cluster identity has appropriate permissions to manage the subnet. This is because AKS nodes will join and leave the subnet at times.
Out of the box, CluedIn will use a public ingress and egress load balancer to serve traffic initially regardless of vNet choice. In advanced networking setups, we recommend changing this so ingress is only accessible via a private vNet. The following sections will cover how to do this, and as part of the CluedIn managed service, we will work with you to ensure it's done in a supported way.
### Using an existing vNet
If you are using an existing virtual network as part of your CluedIn deployment, you need to consider the following security aspects:
- The cluster identity used by the AKS cluster must have at least **Network Contributor** permissions on the subnet within your virtual network.
**Note**: On a standard CluedIn instance, this will be the User Assigned Identity rather than Machine Assigned. This is located in the Managed Resource Group.
- If you want to define a **custom role** instead of using the built-in `Network Contributor` role, the following permissions are required:
- Microsoft.Network/virtualNetworks/subnets/join/action
- Microsoft.Network/virtualNetworks/subnets/read
- Microsoft.Authorization/roleAssignments/write
For details on creating custom roles, see [Azure custom roles](https://learn.microsoft.com/en-us/azure/role-based-access-control/custom-roles).
### Private cluster - BYO vNet
When using your own network (BYON) for private cluster installation, the **Network Contributor** permissions are required for the vNet created outside the managed resource group. To meet this requirement, you can create a **user-managed identity** and assign it the **Network Contributor** role on the specified vNet. During installation, ensure this user-assigned managed identity is specified in the **Network and Monitoring** section.
## Internal load balancer
This section contains a procedure for configuring CluedIn to use your internal load balancer and IP address.
**Prerequisites**
- You should be comfortable working in either PowerShell or bash terminal via Azure Cloud Shell.
- You should be connected to your AKS cluster. See [Connect to CluedIn cluster](https://documentation.cluedin.net/operate/configuration/connect-to-cluedin.md) for detailed instructions.
- Your Helm repository is set up.
If you have any questions, you can request CluedIn support by sending an email to [support@cluedin.com](mailto:support@cluedin.com) (or reach out to your delivery manager if you have a committed deal).
**To configure CluedIn to use your load balancer and internal IP address**
1. Download the current cluster configuration file by running the following command:
`helm get values cluedin-platform -n cluedin -o yaml > Cluster-Current-values.yaml`
1. Open the file in nano editor by running the following command:
`nano Cluster-Current-values.yaml`
1. In the file, find a section that looks like the example below.
```yaml
infrastructure:
haproxy-ingress:
controller:
service:
annotations:
service.beta.kubernetes.io/azure-load-balancer-resource-group: mrg-azurecluedin
loadBalancerIP: {PublicIP} # This will match the allocated Azure Resource
```
This section controls the load balancer configuration and associated IP address. The example shows external load balancer with external IP address.
1. Replace the section that you found with the following section:
```yaml
infrastructure:
haproxy-ingress:
controller:
service:
annotations:
service.beta.kubernetes.io/azure-load-balancer-internal: "true"
loadBalancerIP: {PrivateIP} # This must be valid in the vNet subnet range
```
1. Reconfigure a new load balancer to use your internal IP address. To do this, replace `{PrivateIP}` with a valid IP address from your AKS subnet range.
The IP address can be any IP from the range that is not in use by the nodes, pods, or other resources. To verify that the IP address is not in use, look at connected devices in the vNet resource page in the Azure portal.
1. Save the file and post the new configuration to the cluster by running the following command:
`helm upgrade -i cluedin-platform cluedin/cluedin-platform -n cluedin --values Cluster-Current-values.yaml`
After a short time, a confirmation appears in the console. It means that CluedIn is now configured to use your new load balancer and internal IP address.
In Azure, you should then see a new Load Balancer resource called `kubernetes-internal`, which will be used for ingress. The original `kubernetes` then simply becomes egress only.
## Integration options
With Kubernetes now configured to use the internal load balancer for ingress, you will need to decide how you want to access this front-end load balancer from your internal network. The two options supported are `Virtual network peering` and `Private link service with private endpoint`.
If your subnets overlap in any way, the only option will be `Private link service with private endpoint`.
### Virtual network peering
To configure virtual network peering, refer to [Microsoft documentation](https://learn.microsoft.com/en-us/azure/virtual-network/tutorial-connect-virtual-networks-portal). As all resources have already been created, you only need to follow the **Create virtual network peer** step in the tutorial.
### Private link service with private endpoint
In the event there is overlapping of subnets, this is not a problem as `private endpoints` also work here. This is slightly more complicated than virtual network peering and we'll offer a bit of guidance here.
Microsoft has a [document](https://learn.microsoft.com/en-us/azure/private-link/create-private-link-service-portal) explaining how to achieve this.
As AKS maintains the load balancers, and the vnet is created at deployment time (or an existing one is used), you only need to follow the steps **Create a private link service** and **Create a private endpoint** in the above document.
For the `Private Link Service`, ensure that the `Load balancer` is set to `kubernetes-internal` and uses the frontend IP address from the private range. The Source NAT vnet and subnet should default correctly.
Ensure that Source NAT subnet is set to No and it is best to assign a Static Private IP address.

For the `Private endpoint`, ensure you select the virtual network that will be used to access CluedIn along with the subnet. It is recommended to statically allocate an IP address here as this will be used as the entry point for CluedIn and will be required as part of your DNS at a later stage.

### Next steps
The next step is to test access from the private network to CluedIn to ensure that traffic can reach the endpoint as expected.
By default, ICMP packets do not respond, but HTTPS (443/TCP) will. It may cause an error due to certificate, but this can be corrected.
When you've confirmed that traffic is flowing, the final steps are to set up host name/DNS and TLS.
The following documents will help configure DNS and TLS:
- [Configure DNS](https://documentation.cluedin.net/operate/configuration/configure-dns.md)
- [Configure certificates](https://documentation.cluedin.net/operate/configuration/configure-certificates.md)
## Host name resolution
When an internal load balancer is used, it may no longer be possible for the cluedin-server pod to resolve the hostname. This will prevent the application from functioning correctly unless some additional steps are taken to allow resolution.
One way to achieve this is to use an Azure Private DNS zone linked to the kubernetes vnet. The other is to add the hostAlias section to your CluedIn values file which will get passed down to the servers host file.
```yaml
application:
cluedin:
hostAliases:
- hostnames:
- app.cluedin.com
ip: {privateIP}
```
If you need assistance with this, please reach out to CluedIn support.
Up: [Configuration](https://documentation.cluedin.net/operate/configuration.md)