---
title: Direct connection
url: https://documentation.cluedin.net/solutions/master-data-services/direct-connection
content_type: how-to
section: Solutions & integrations > Master Data Services
---
# Direct connection
> how-to: Steps to accomplish one task.
In this article, you will learn how to connect CluedIn to on-premises Master Data Services (MDS) directly over HTTPS. MDS only accepts Windows (NTLM/Negotiate) authentication by default, which is not supported from CluedIn's Linux-based crawler containers, so a dedicated Basic authentication endpoint is exposed instead. Use this approach if CluedIn has a routable network path to your on-premises MDS server - if it doesn't, see [Azure Relay](https://documentation.cluedin.net/solutions/master-data-services/azure-relay.md) instead.
**Prerequisites:**
- Administrator access to your on-premises MDS server, for a one-time reconfiguration.
- A routable network path from CluedIn to the MDS server (for example, an appropriate firewall rule or VPN).
## Configure the MDS web.config
1. Using IIS, locate the physical path for the MDS website. The default location for SQL Server 2019 Master Data Services is `C:\Program Files\Microsoft SQL Server\150\Master Data Services\WebApplication`.
2. Make the following modifications to the `web.config` file in the previously located path.
>Add the following binding to `system.serviceModel/bindings`.
>```xml
>
>
>
>
>
>
>
>```
>Add the following to the `system.serviceModel/services/service` node whose `name` attribute matches your MDS service, alongside any existing endpoints.
>```xml
> binding="basicHttpBinding"
> bindingConfiguration="mdsCluedInBasicHttpBinding"
> contract="Microsoft.MasterDataServices.Services.ServiceContracts.IService" />
>```
3. Recycle the application pool so the configuration changes take effect.
If you browse to `service.svc` before recycling, you may see a Yellow Screen of Death (an ASP.NET error page) rather than the expected service page. This is expected immediately after editing `web.config` - recycling the application pool (not a full `iisreset`) resolves it.
## Enable Basic Authentication in IIS
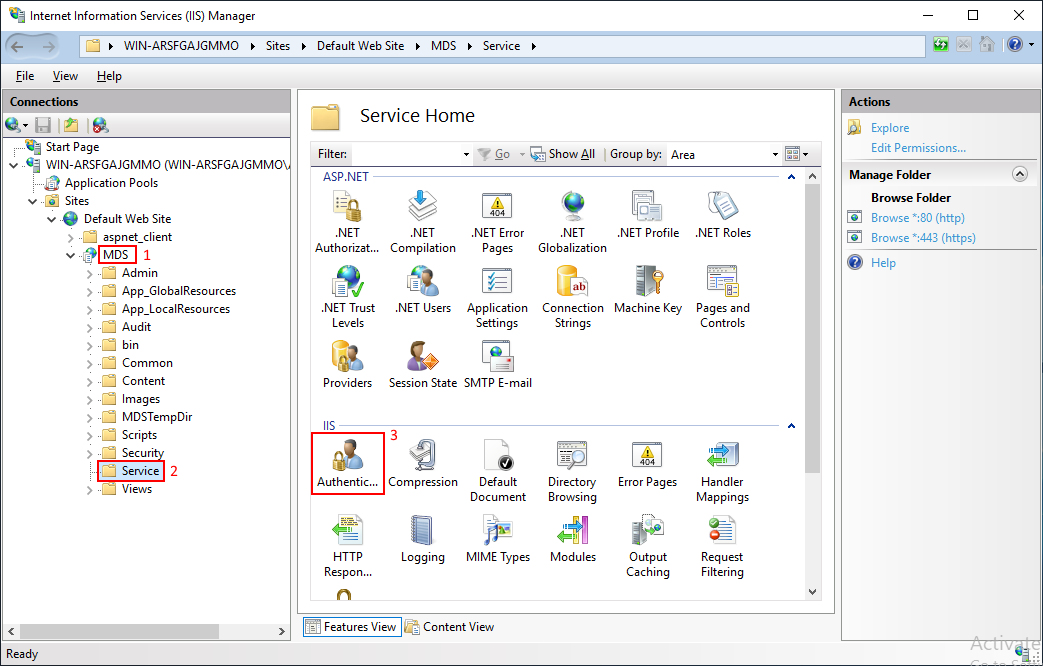
1. In IIS Manager, expand **Sites > Default Web Site > MDS**, and select the **Service** folder - the same one that contains `service.svc`. Then, open the **Authentication** feature.
The screenshots below show MDS installed as an application under **Default Web Site**. If your MDS is installed as its own site instead, the path in the tree will start directly from **Sites > MDS** - the steps are otherwise the same.
Basic Authentication must be enabled on this **Service** folder specifically. In many installs it's configured as its own IIS Application, with its own authentication settings that don't automatically inherit from the parent **MDS** node - enabling it on **MDS** alone is not enough.
2. Select **Basic Authentication**, and then select **Enable**. Leave **Windows Authentication** enabled too, for any existing domain-joined clients that already work.
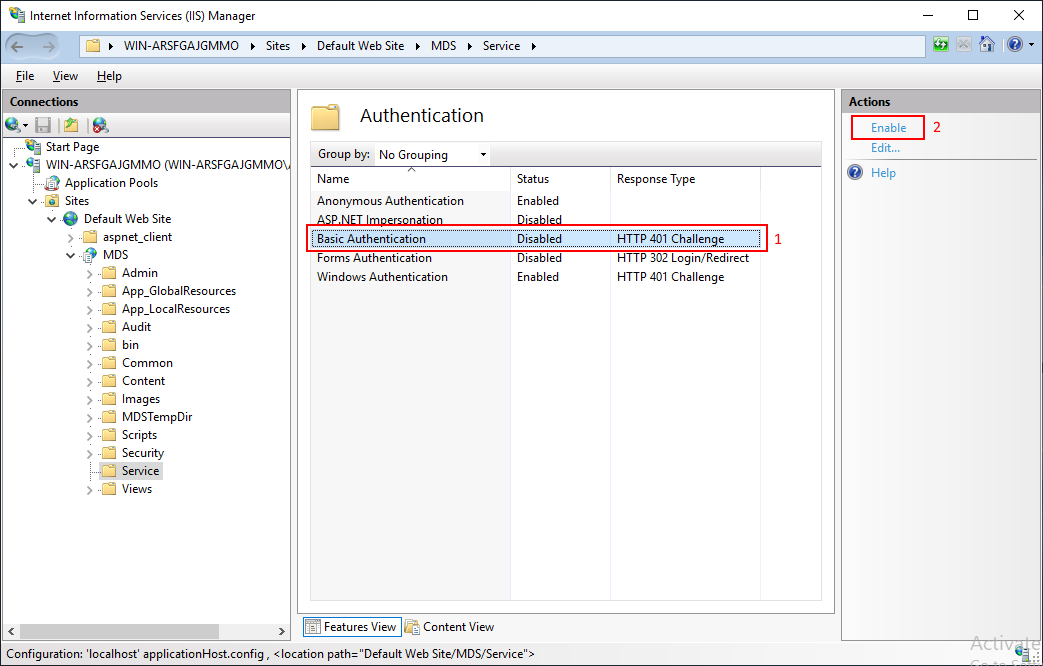
If Basic Authentication is greyed out, the role feature may not be installed - add it from Server Manager under Web Server (IIS) > Web Server > Security > Basic Authentication.
If the setting cannot be saved from IIS Manager because it's locked at the server level, it can instead be set from an elevated command prompt:
```powershell
appcmd.exe set config "Default Web Site/MDS/service" -section:system.webServer/security/authentication/basicAuthentication /enabled:"True" /commit:apphost
```
Adjust the site/path to match your IIS setup.
3. Recycle the application pool so the configuration changes take effect.
## Verify configuration
1. Verify the configuration by loading the service endpoint. For this, perform the sequence of steps as displayed on the following screenshot.
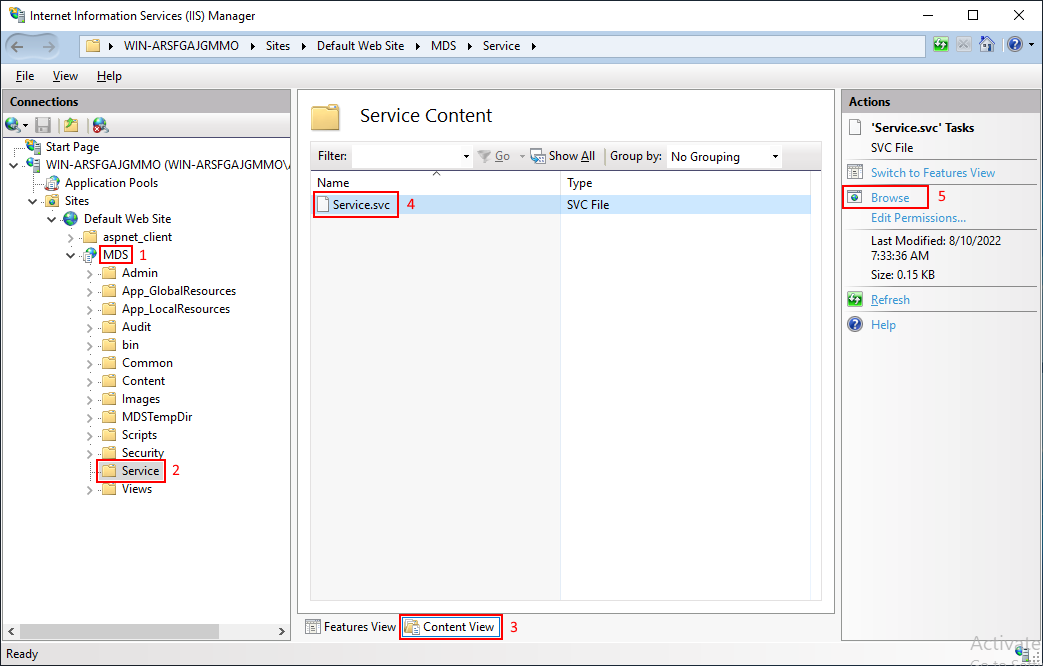
As a result, you will see the screenshot similar to the following.
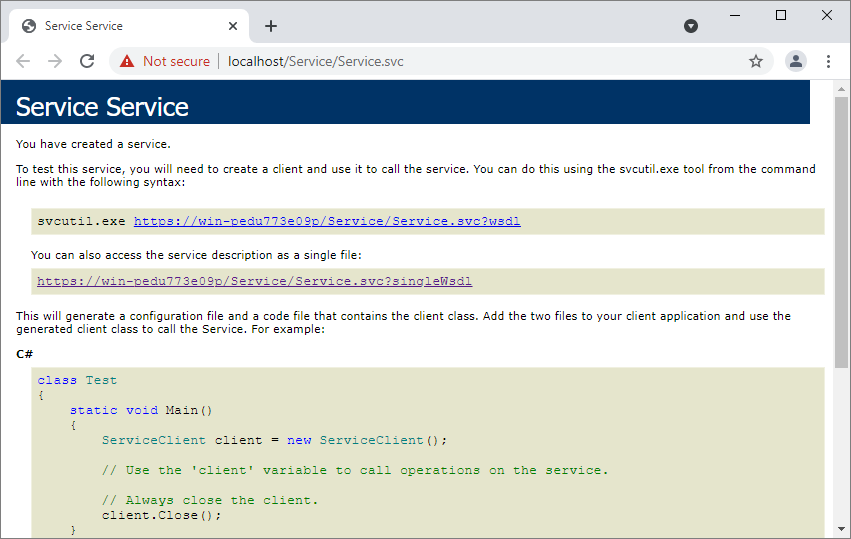
2. Browse to the new endpoint address, for example:
```
https://yourmdsserver/MDS/service/service.svc/cluedin
```
3. You should be prompted for credentials, or receive a 401 Basic authentication challenge, rather than a Windows/NTLM negotiation error.
## In CluedIn
When adding the MDS crawler in CluedIn, check **Configuring MDS for CluedIn** to confirm you're using this direct connection method, and set:
- **MDS Url** to the new endpoint, for example `https://yourmdsserver/MDS/service/service.svc/cluedin`. This must be HTTPS - Basic authentication sends credentials in a way that is only safe over an encrypted connection.
- **Username**/**Password** to the same domain\username and password you would normally use to log in to MDS.
Up: [Master Data Services](https://documentation.cluedin.net/solutions/master-data-services.md)