

Create mapping
how-to Steps to accomplish one task
On this page
- Prerequisites
- Inputs
- Choose mapping type
- Configure mapping details
- Mapping preview
- Ignore fields
- Reset mapping
- Verify the result
- What this changes
- If something goes wrong
Create a mapping for a data set so that CluedIn knows which business domain and vocabulary its records belong to, which original field becomes which vocabulary key, and which values identify each record. Mapping is a semantic layer that allows CluedIn to understand the nature of data and process it to produce golden records. A data set needs a mapping before you can process it.
Mapping encompasses complex tasks, and CluedIn is committed to consistently enhancing the user experience associated with it. Nevertheless, it is crucial to grasp certain mapping concepts to leverage its full potential.
Prerequisites
-
A data set to map, created from a file, an ingestion endpoint, or a database.
-
Access to the Data Sources module. The claims it needs are listed in Data sources.
-
For Existing Mapping: a mapping already created for another data set with the same fields.
-
For AI Mapping: the steps in Prerequisites for AI mapping.
Prerequisites for AI mapping
The AI mapping feature is not available by default. To use it, you need to fulfill several prerequisites:
-
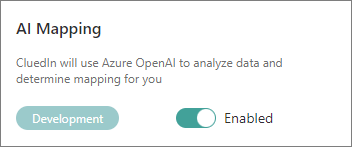
Go to Administration > Feature Flags and enable the AI Mapping feature.
-
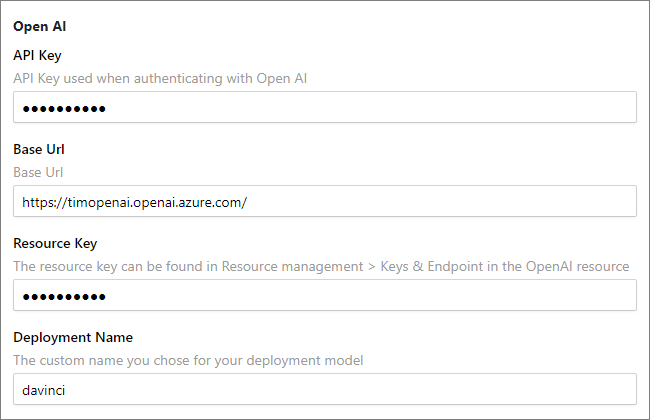
Go to Administration > Azure Integration > Azure AI Services. Then, complete the following fields:
-
API Key – check the following link to learn where to find your API Key.
-
Base Url – you can find this value in your Azure OpenAI resource, in Resource Management > Keys and Endpoint, in the Endpoint field.
-
Resource Key – you can find this value in your Azure OpenAI resource, in Resource Management > Keys and Endpoint. You can use either KEY 1 or KEY 2.
-
Deployment Name – you can find this value in your Azure OpenAI resource, in Resource Management > Model deployments.
For more information about the required variables, see Microsoft documentation.
-
Inputs
What the Configure tab asks for depends on the mapping type.
| Field | Mapping types | Required | What it accepts |
|---|---|---|---|
| Mapping Type | All | Yes | Auto Mapping, Manual Mapping, Existing Mapping, or AI Mapping. See Choose mapping type. |
| Business domain | Manual, auto | Yes | An existing business domain, or a name for a new one. A new business domain also needs an icon. With AI mapping, the business domain is suggested for you. |
| Vocabulary | Manual, auto | Yes | An existing vocabulary, or a name for a new one. With AI mapping, the vocabulary is suggested for you. |
| Existing mapping | Existing | Yes | A mapping to reuse. Its name consists of the mapping type and the data set it was generated for. |
| Existing data set | Existing | Yes | A data set that contains the same fields as the current data set. |
The process of creating a mapping consists of two parts:
Choose mapping type
Mapping type defines how you want to configure the mapping of original fields from the data set to the vocabulary keys in CluedIn. You can choose from the following mapping types:
-
Auto Mapping – CluedIn automatically creates mapping for your data. This option provides a reliable mapping configuration. You can check the results of auto mapping and make changes if needed.
-
Manual Mapping – CluedIn creates empty mapping configuration that you can modify as you want. This option is challenging and time-consuming because you have to create the configuration from scratch.
-
Existing Mapping – CluedIn uses the existing mapping configuration. This option is useful if you want to create mapping for the data set that has the exact same structure as the existing data sets.
-
AI Mapping – CluedIn uses AI capabilities to interpret your data and create mapping. You can check the results of AI mapping and make changes if needed.
AI mapping is not available by default. Before you choose it, complete the prerequisites for AI mapping.
To choose the mapping type
-
On the navigation pane, go to Integrations > Data Sources. Then, find and open the data set for which you need to create mapping.
-
Go to the Map tab, and then select Map Data.
The Create Mapping pane opens, where you can choose the mapping type and configure the mapping details.
-
On the Mapping Type tab, choose the mapping type. Then, in the lower-right corner, select Next.
The Configure tab opens, where you can provide other mapping details following the instructions from the next section.
Configure mapping details
Depending on the selected mapping type, the actions required from you on the Configure tab may differ. To find relevant instructions for your chosen mapping type, refer to the needed section:
Manual mapping
Manual mapping gives you full control over how each field for your data set will generate records.
To configure manual mapping
-
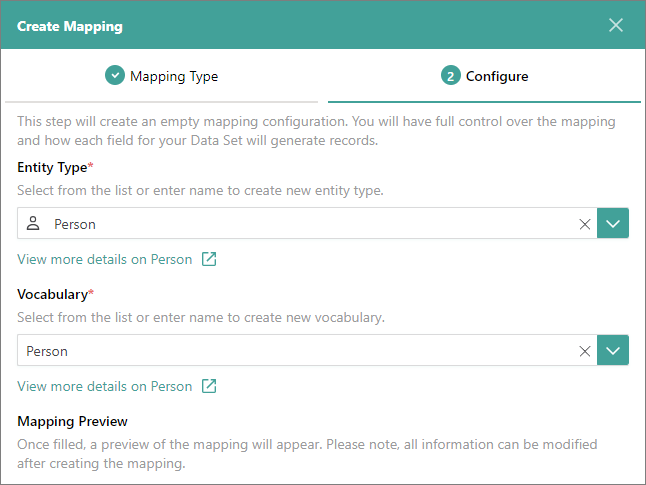
Choose the existing business domain or create a new one. If you create a new business domain, select an icon to visually represent the business domain.
-
Choose the existing vocabulary or create a new one.
With manual mapping, the mapping preview is not available.
-
Select Create Mapping.
An empty mapping configuration is created. Next, map the original fields to the vocabulary keys. You can map all fields at once or map fields one by one.
To map all fields at once
-
On the Map tab, select Map All Fields.
-
In the pane that opens, review the suggested mapping. You can edit the vocabulary key names if needed. Also, if you change the vocabulary key name, you can edit its data type.
-
In the lower-right corner, select Add Property to Annotation.
The mapping is created. Next, review the mapping details.
To map fields one by one
-
On the Map tab, select Edit Mapping.
-
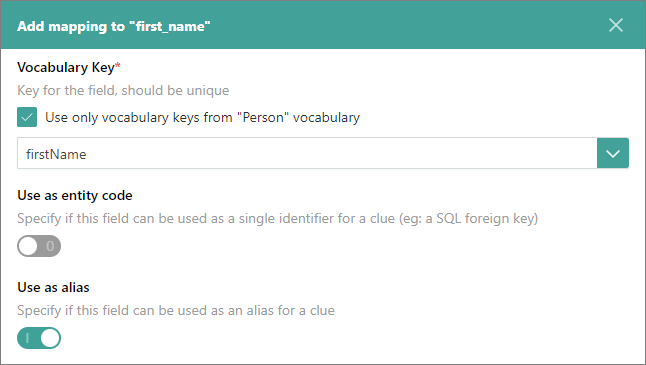
In the Maps to vocabulary key column, expand the dropdown list, and then select Add mapping. In the pane that opens, do the following:
-
Expand the dropdown list and select the vocabulary key to which the original field should be mapped.
-
If you want to use the field as a primary unique identifier for the record, turn on the Use as entity code toggle.
-
If you want to use the field as an alias for the records, turn on the Use as alias toggle.
-
In the lower-right corner, select Add Property to Annotation.
-
-
Repeat step 2 for each field.
The mapping is created. Next, review the mapping details.
Auto mapping
Auto mapping tries to detect unique codes and map original columns to the most appropriate vocabulary keys.
To configure auto mapping
-
Choose the existing business domain or create a new one. If you create a new business domain, select an icon to visually represent the business domain.
-
Choose the existing vocabulary or create a new one.
-
In the Mapping Preview section, review how the original fields will be mapped to the vocabulary keys in CluedIn.
-
In the lower-right corner, select Create Mapping.
The mapping is created. Next, review the mapping details.
Existing mapping
If you’ve already created a mapping for a data set and you have another data set with the same structure, you can save time by reusing the existing mapping.
To configure existing mapping
-
Select the existing mapping that you want to reuse. The name of the mapping consists of two parts: the mapping type and the data set for which the mapping was generated.
-
Select the existing data set that contains the same fields as in the current data set.
-
In the lower-right corner, select Create Mapping.
The mapping is created. Next, review the mapping details.
AI mapping
CluedIn AI recommendation engine helps you create mapping in a quick and efficient manner.
To use AI capabilities to create mapping, first complete all the steps described in Azure Open AI Integration.
AI mapping analyzes your data set and suggests the following details for your mapping:
-
Business domain and vocabulary.
-
Origin – field used to produce the primary unique identifier.
-
Codes – fields used to produce additional unique identifiers.
-
Mapping of original fields to the vocabulary keys. For more details, see Mapping preview.
You need to review AI suggestions and make changes if needed.
Mapping preview
The Mapping Preview section is available when creating mapping with the following types: auto mapping and AI mapping. This section contains a table showing how the original fields will be mapped to the vocabulary keys in CluedIn. The table consists of the following columns:
-
The checkboxes column that represents the fields that will be sent to CluedIn during processing. If you do not want to send a specific field, clear the checkbox. The status of such field will be changed to Ignored.
-
Original Field – contains the names of the columns from the data set.
-
Will Map To – contains the vocabulary keys to which the original fields will be mapped. If needed, you can edit the names of both new and existing vocabulary keys directly in the table. If you edited the name of the existing vocabulary key, its status becomes New.
-
Data Type – contains the data type of each vocabulary key for strong typing. If needed, you can change the data type of both new and existing vocabulary keys directly in the table. If you edited the data type of the existing vocabulary key, its status becomes New.
-
Status – contains the status of each vocabulary key (New, Existing, or Ignored).
-
Preview – allows you to view the values in the column.
Ignore fields
By default, all fields included in the mapping are processed and appear in the resulting golden records. If you do not want a field to be processed, you can choose to ignore it.
Ignore fields for an ingestion endpoint
When data is ingested through an endpoint with schema protection enabled, CluedIn checks whether the incoming data matches the mapping defined for that endpoint:
-
If the data contains new, unmapped fields (outside of the defined mapping), the records are moved to quarantine during processing.
-
To prevent these records from being quarantined, you can mark the unmapped fields as ignored. Ignored fields are skipped during processing and do not appear in the resulting golden records.
To include a new field in the mapping (and have this field processed), first disable schema protection for the endpoint. Then, map the field on the Map tab and re-enable schema protection.
To ignore unmapped fields for an ingestion endpoint
-
On the navigation pane, go to Ingest > Endpoints.
-
Navigate to the needed endpoint and dataset.
-
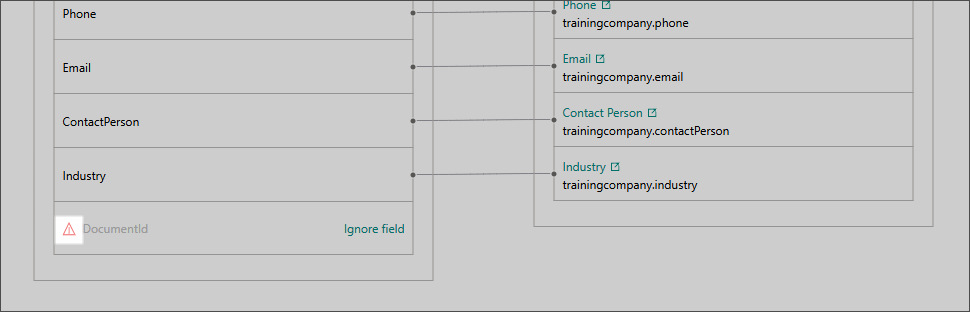
On the Map tab of the dataset, locate the fields marked with a Warning label. These are the fields outside of the defined schema.
-
Next to the needed field, select Ignore Field.

-
On the Ignore field panel, select Ignore field.
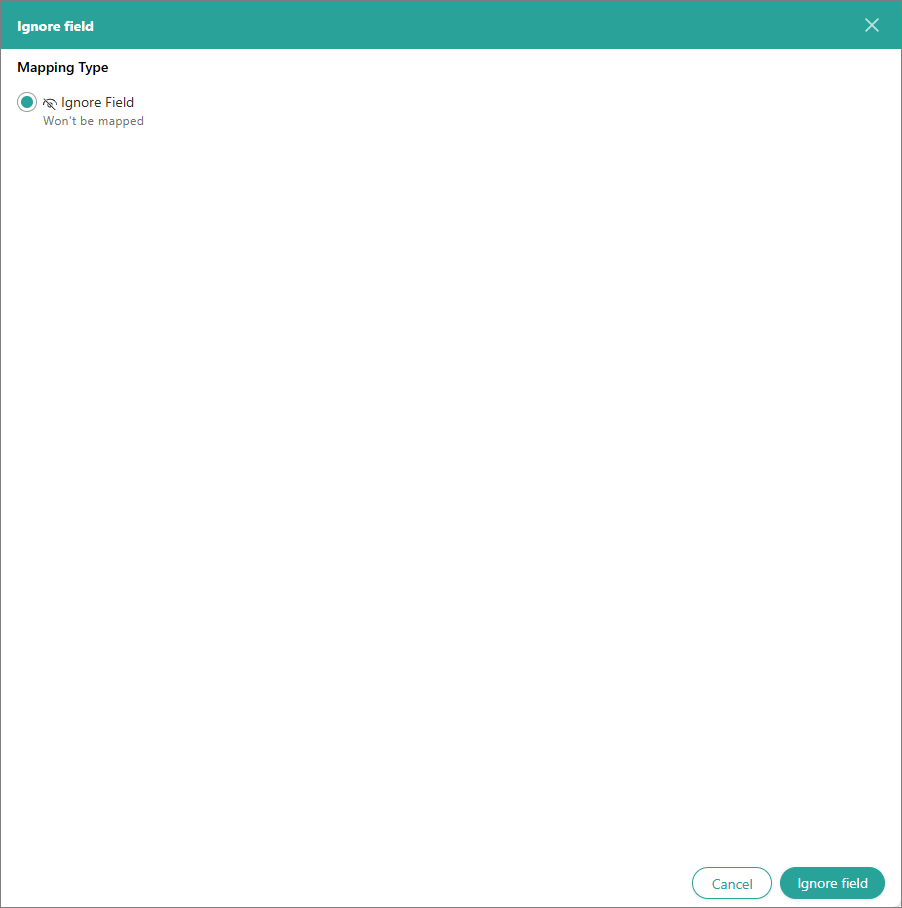
The field is marked as ignored and will not be processed. On the Map tab, the field is marked with a corresponding icon.

Reset mapping
If you’ve created a mapping and are concerned about its accuracy or correctness, you can reset it and start over. However, note that if the data set has already been processed, the option to reset the mapping is not available. In such cases, you’ll need to perform additional steps before you can reset the mapping for a processed data set.
To reset the mapping
-
Depending on whether you have already processed the data set, do one of the following:
-
If you have already processed the data set:
-
In you have not yet processed the data set:
- Go the Map tab, select Reset, and then confirm that you want to reset the mapping configuration.
Now, you can create the mapping from scratch.
-
Verify the result
-
On the Map tab of the data set, the original fields are shown connected to the vocabulary keys they map to. In a data set from an endpoint with schema protection, fields outside the mapping carry a Warning label, and ignored fields carry the ignored-field icon.
-
To check every detail, on the Map tab, select Edit mapping. The mapping details are on three tabs: Map columns to vocabulary key, Map entity, and Add edge relations. Review mapping explains what to check on each, including the primary identifier.
-
Before you process the data set, use View duplicates on the Preview tab to check whether a column contains duplicate values. See Duplicates.
What this changes
-
Creating or editing a mapping changes configuration, not records. Before the data is processed, your mapping changes don’t affect the existing records in CluedIn.
-
The mapping takes effect when you process the data set. The values used as the primary identifier decide merging: records with identical primary identifiers are merged during processing. See Review mapping.
-
Fields with the Ignored status, or marked with Ignore Field, are not sent to CluedIn during processing and do not appear in the resulting golden records.
-
After the data set has been processed, the Reset option is not available. You first have to remove the records created from the data set, which removes the golden records or data parts they produced. See Reset mapping and Removal of records.
If something goes wrong
-
AI Mapping is not available. Check that the AI Mapping feature flag is enabled and the Azure AI Services fields are complete. See Prerequisites for AI mapping.
-
There is no mapping preview. With manual mapping, the mapping preview is not available. Map the fields on the Map tab instead.
-
The Reset option is not available. The data set has already been processed. Follow the steps for a processed data set in Reset mapping.
-
Records from an ingestion endpoint go to quarantine. With schema protection enabled, records that contain fields outside the mapping are quarantined during processing. Ignore the unmapped fields, or map them as described there. See Quarantine.
-
The Logs tab shows mapping errors. CluedIn validates records during mapping, and any inconsistency appears as a log entry on the Logs tab of the data set. See Logs.