

Process data
how-to Steps to accomplish one task
On this page
- Prerequisites
- How processing decides what to process
- Manual processing
- Auto-submission
- Bridge mode
- Processing logs
- Verify the result
- What this changes
- If something goes wrong
Process a data set to turn its records into standalone golden records, or to use them to enhance existing golden records. Process a data set after you have created and reviewed its mapping; until then, the records exist only in the data set.
Depending on the type of data source, there are three processing options:
-
For file, ingestion endpoint, and database: Manual processing
-
For ingestion endpoint only: Auto-submission
-
For ingestion endpoint only: Bridge mode
Prerequisites
-
A data set with a mapping. See Create mapping.
-
Access to the Data Sources module. The claims it needs are listed in Data sources.
-
For auto-submission and bridge mode: a data set created from an ingestion endpoint.
-
Recommended: check the Logs tab of the data set for errors before processing. See Logs.
How processing decides what to process
-
You can process the data set as many times as you want. In CluedIn, once a record has been processed, it won’t undergo processing again. When the processing is started, CluedIn checks for identical records. If identical records are found, they won’t be processed again.
-
If you change the primary identifier for the previously processed records, CluedIn will treat these records as new and process them.
-
Records with identical primary identifiers, or identical identifiers, are merged. The confirmation pane of manual processing shows whether the selected identifier fields contain duplicates in the current data set. See Identifiers.
-
Records that fail the conditions in property or pre-process rules go to quarantine instead of becoming golden records. So do records from an endpoint with schema protection enabled that contain fields outside of the defined mapping.
-
If source record approval is configured for the data source, and the data set is processed by a user who is not its owner or receives data in auto-submission mode, records that meet the approval conditions are sent for approval before they are processed.
-
Fields that the mapping ignores are not processed and do not appear in the resulting golden records.
Manual processing
Manual processing is available for the data coming from a file, an ingestion endpoint, or a database. With manual processing, the original data that was initially sent to CluedIn remains in the temporary storage on the Preview tab. After the data has been processed, the resulting golden records appear on the Data tab.
To process the data
-
On the navigation pane, go to Integrations > Data Sources. Then, find and open the data set that you need to process.
-
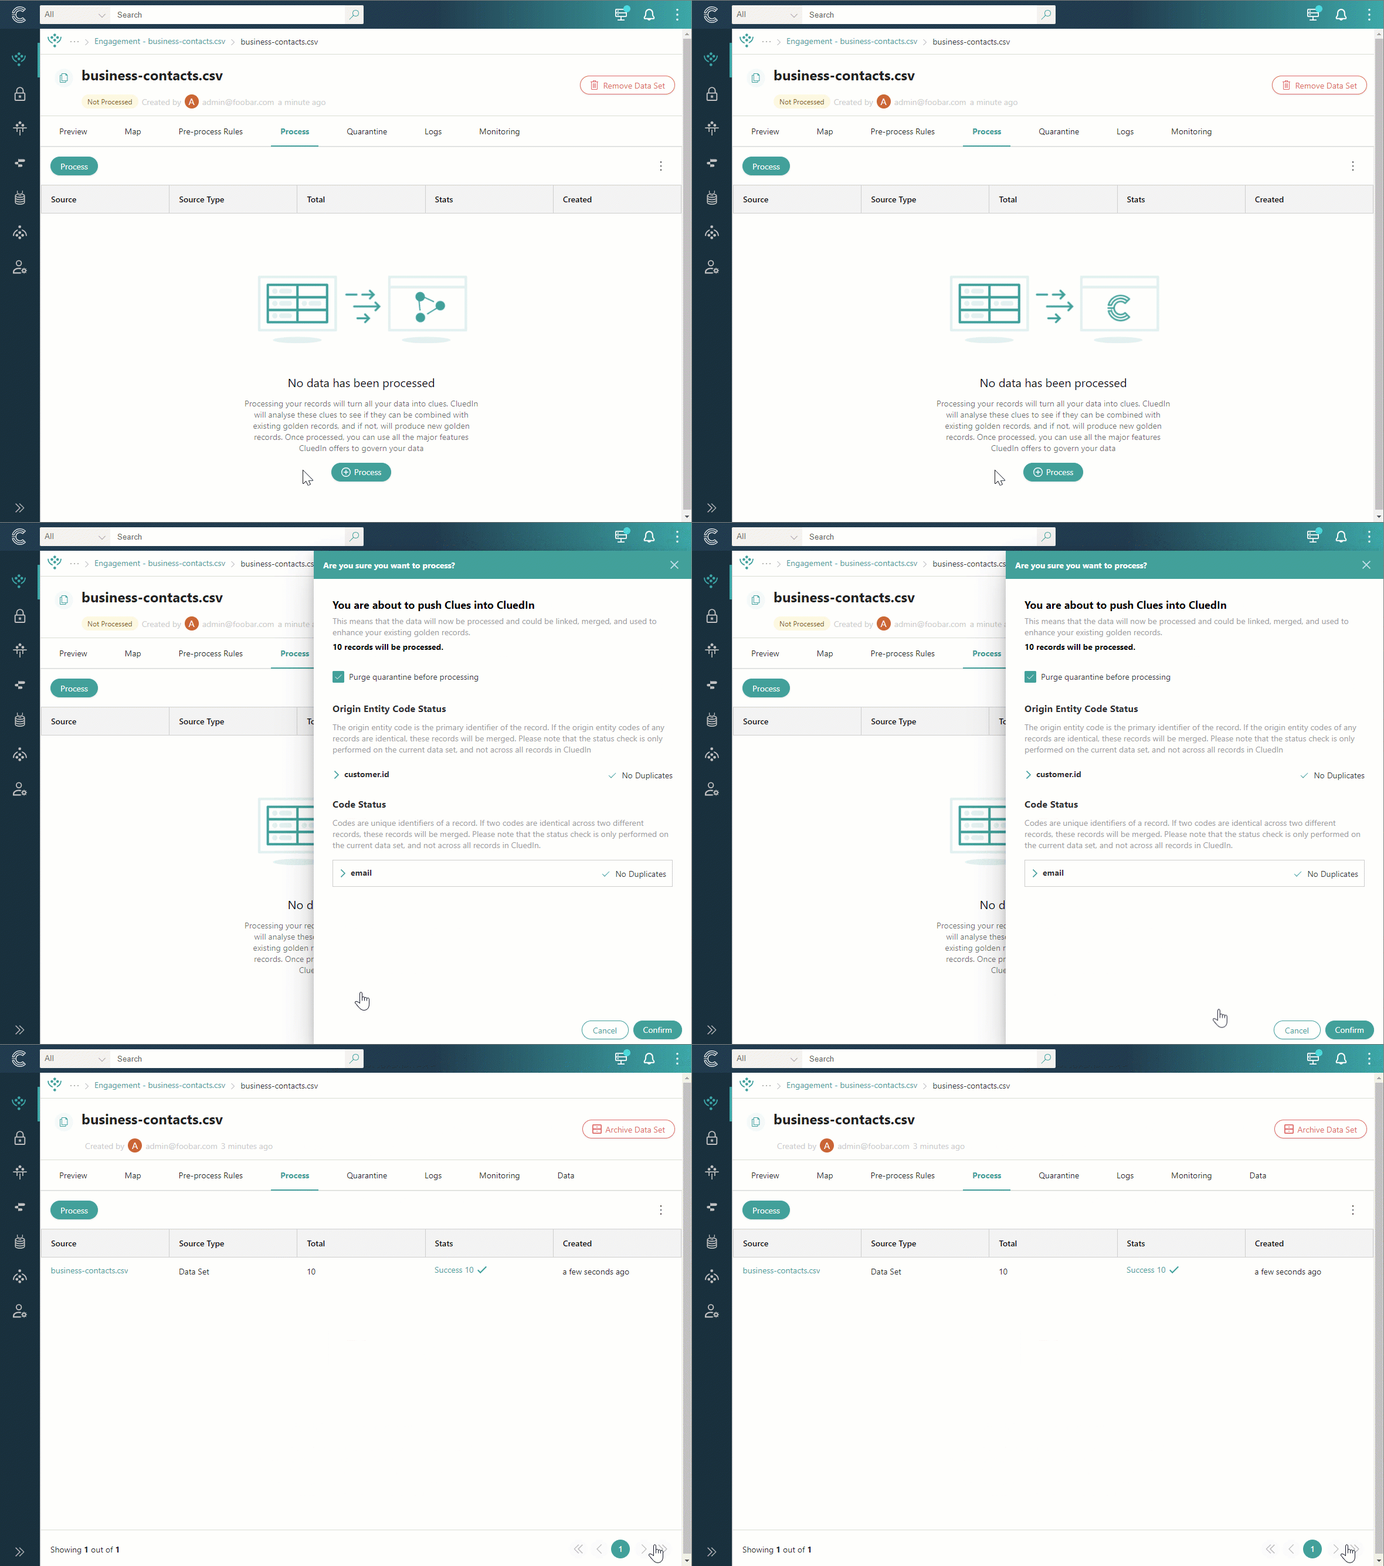
Go to the Process tab, and then select Process.
The confirmation pane opens, where you can do the following:
-
View the number of records that will be processed.
-
Delete the records that are currently in quarantine. This option is useful if you have already processed the data set before and there are some records in quarantine.
-
View the result of the primary identifier status check along with the field that was selected for producing the primary identifier.
-
View the result of the identifier status check along with the field that was selected for producing additional identifier.
If any status check shows duplicates, the records containing duplicates will be merged to maintain data integrity and consistency. To learn more about unique identifiers, see Identifiers.
-
-
In the lower-right corner, select Confirm.
Auto-submission
Auto-submission is available for the data coming from an ingestion endpoint. When auto-submission is enabled, data received from the ingestion endpoint is processed automatically. With auto-submission, the original data that was initially sent to CluedIn remains in the temporary storage on the Preview tab. After the data has been processed, the resulting golden records appear on the Data tab.
To enable auto-submission
-
On the navigation pane, go to Integrations > Data Sources. Then, find and open the data set for which you want to enable auto-submission.
-
Go to the Process tab, and then turn on the toggle next to Auto-submission.
-
Confirm that you want to enable automatic processing of records once they are received by CluedIn.
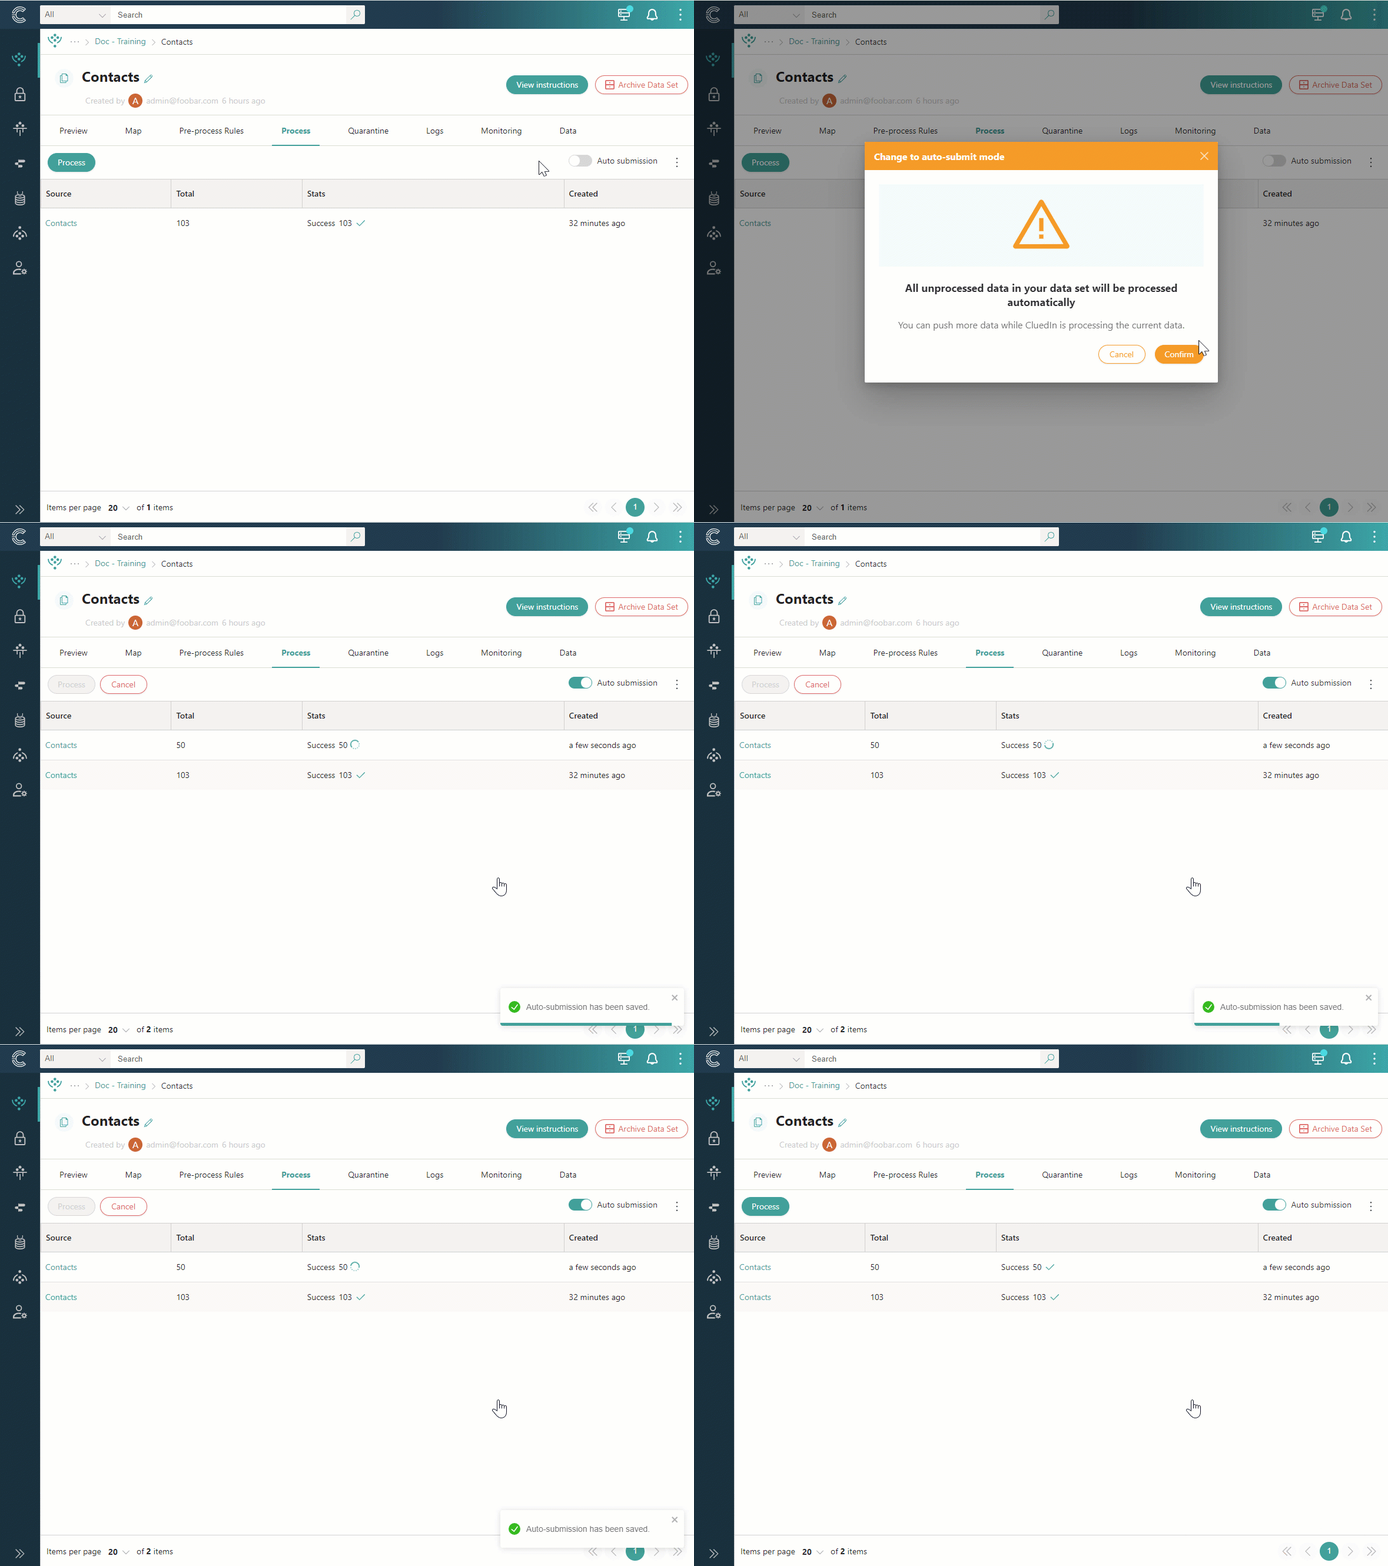
If you no longer want the records to be processed automatically, turn off the toggle next to Auto-submission.
Bridge mode
Bridge mode is available for the data coming from an ingestion endpoint. When bridge-mode is enabled, all your JSON records will be transformed into golden records directly, without being stored in the temporary storage on the Preview tab. However, you can rely on data set logs and ingestion receipts for debugging purposes.
Bridge mode allows you to use less storage and memory, resulting in increased performance. Use this mode when your mapping will not change over time, and you want to use the ingestion endpoint only as a mapper.
To switch to bridge mode
-
On the navigation pane, go to Integrations > Data Sources. Then, find and open the data set that you want to switch to bridge mode.
-
Go to the Process tab. Open the three dots menu, and then select Switch to bridge mode.
-
Confirm that you want to switch to bridge mode by entering BRIDGE. Then, select Confirm bridge mode.
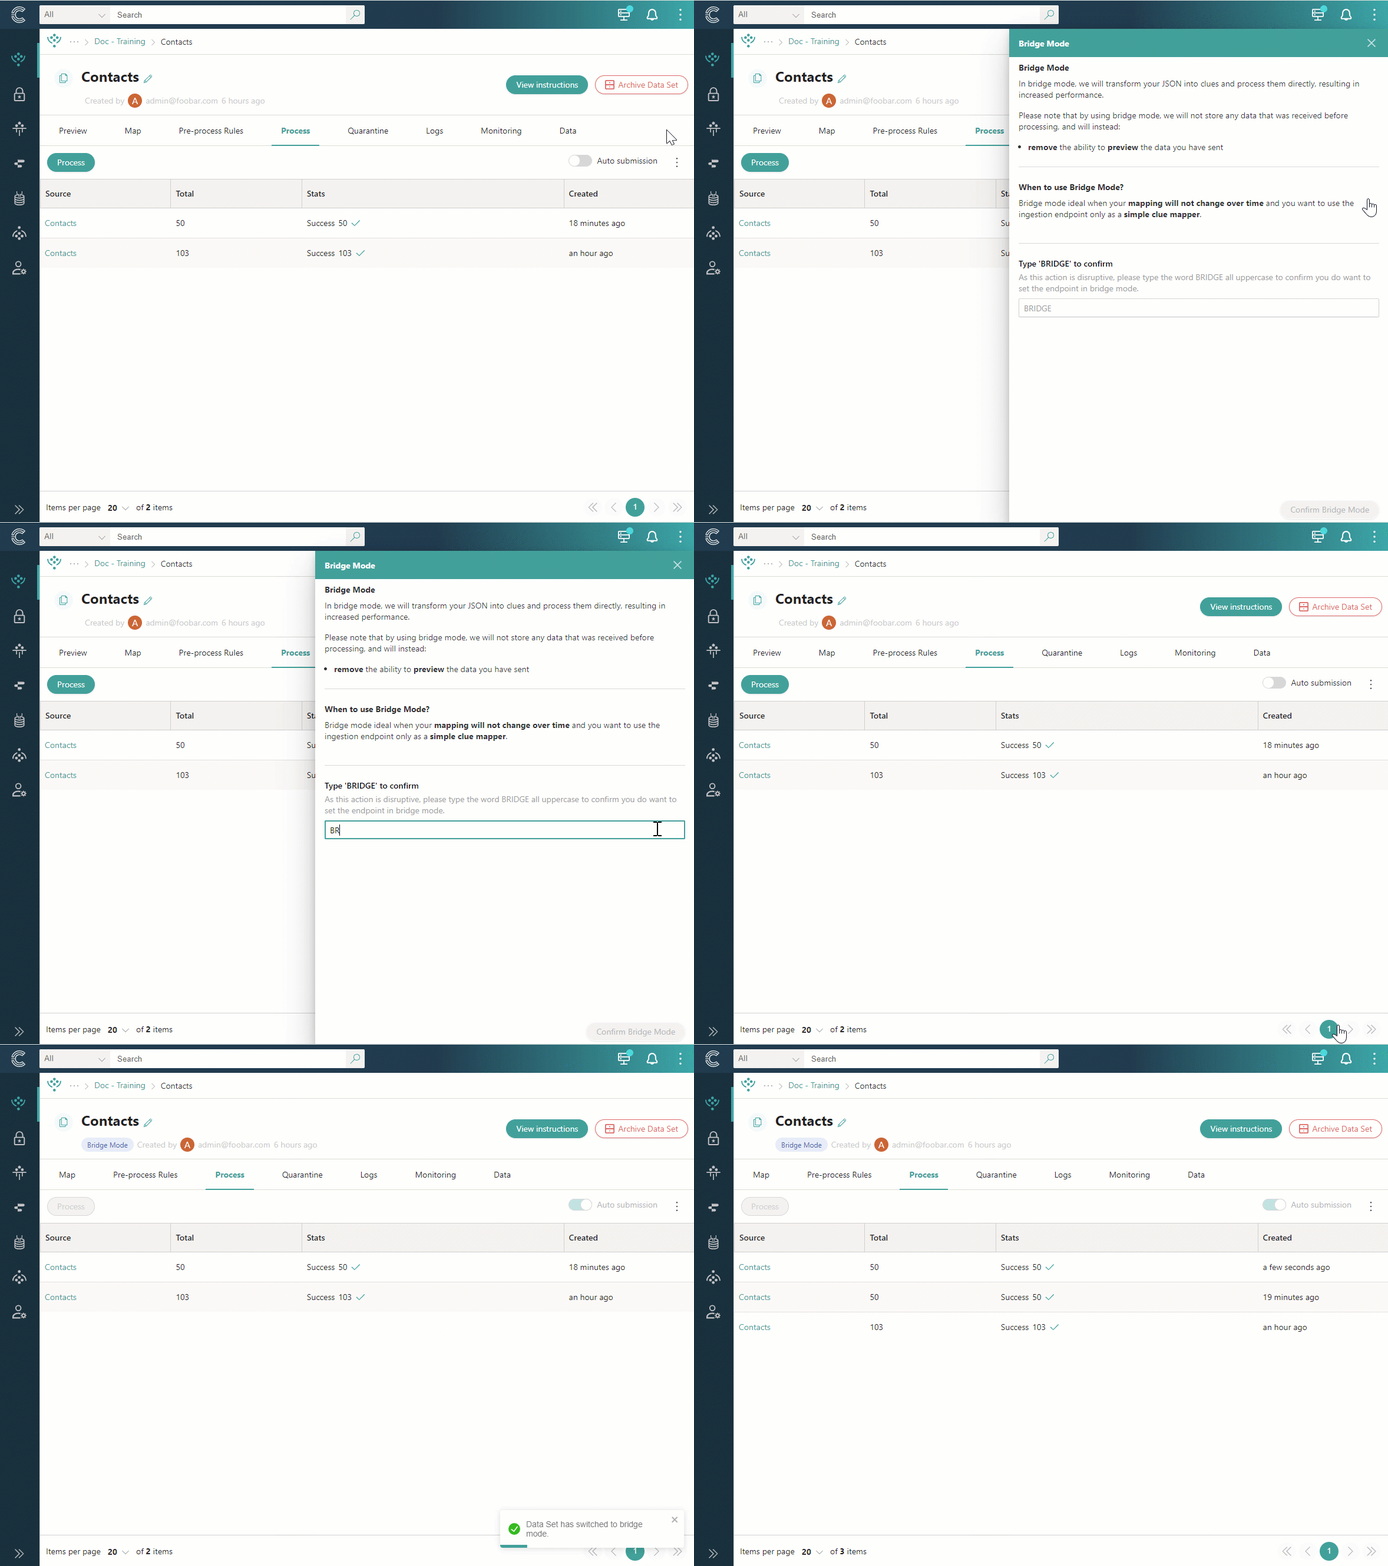
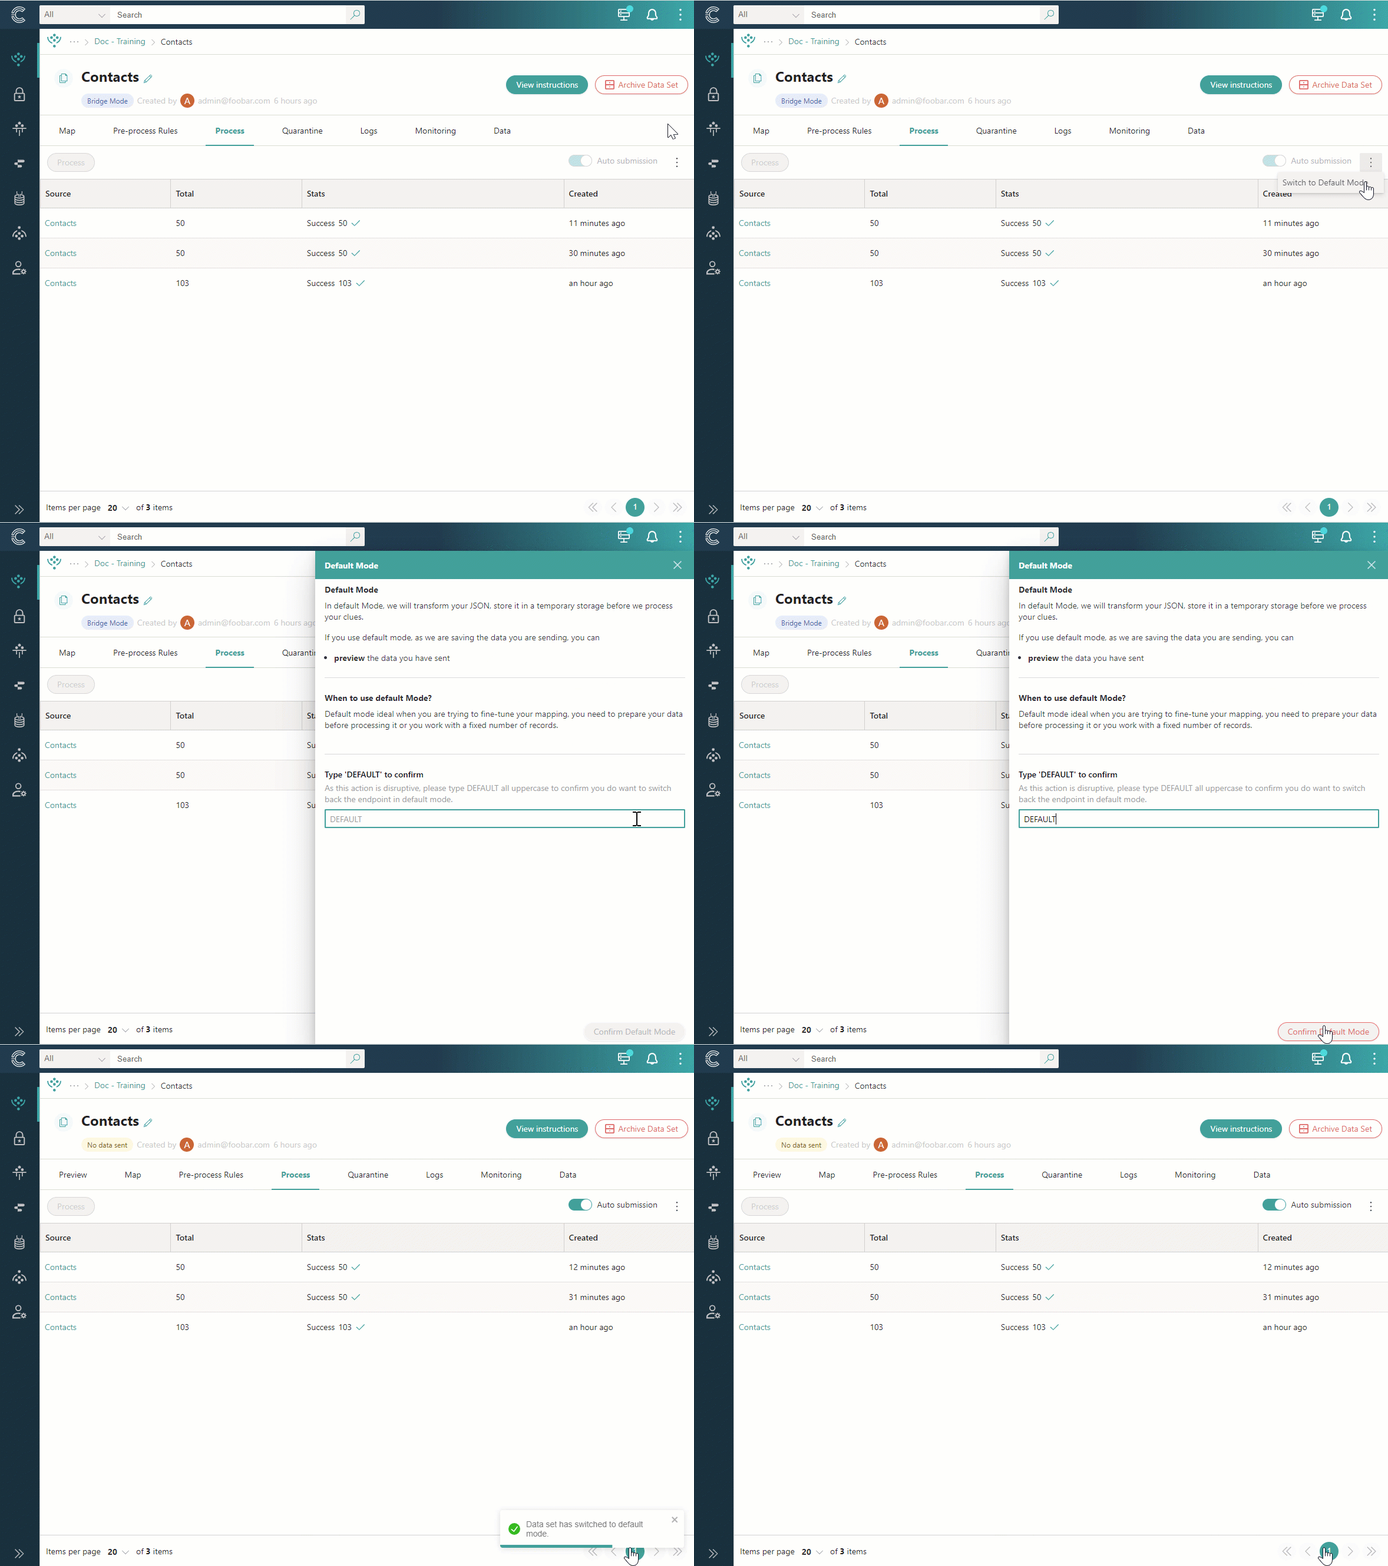
If you no longer want your ingestion endpoint to operate in bridge mode, you can switch it back to the default mode. After switching back to the default mode, the Preview tab will appear. However, it will not contain records received while bridge mode was enabled.
To switch back to default mode
-
On the navigation pane, go to Integrations > Data Sources. Then, find and open the data set that you want to switch back to default mode.
-
Go to the Process tab. Open the three dots menu, and then select Switch to default mode.
-
Confirm that you want to switch back to default mode by entering DEFAULT. Then, select Confirm default mode.
Processing logs
Every time the records are processed, a new processing log appears on the Process tab of the data set. If the number of processing logs is growing, consider removing older logs. You can also configure the retention settings to automatically remove processing logs after a specific period.
Remove processing logs
Removing processing logs frees up disk space without impacting the processed records. However, once removed, processing logs cannot be recovered.
To remove processing logs
-
Near the upper-right corner of the processing logs table, open the three dots menu, and then select Purge processing logs.
-
Select the statuses of the processing logs that you want to remove.
-
Confirm that you want to remove processing logs by entering DELETE. Then, select Purge.
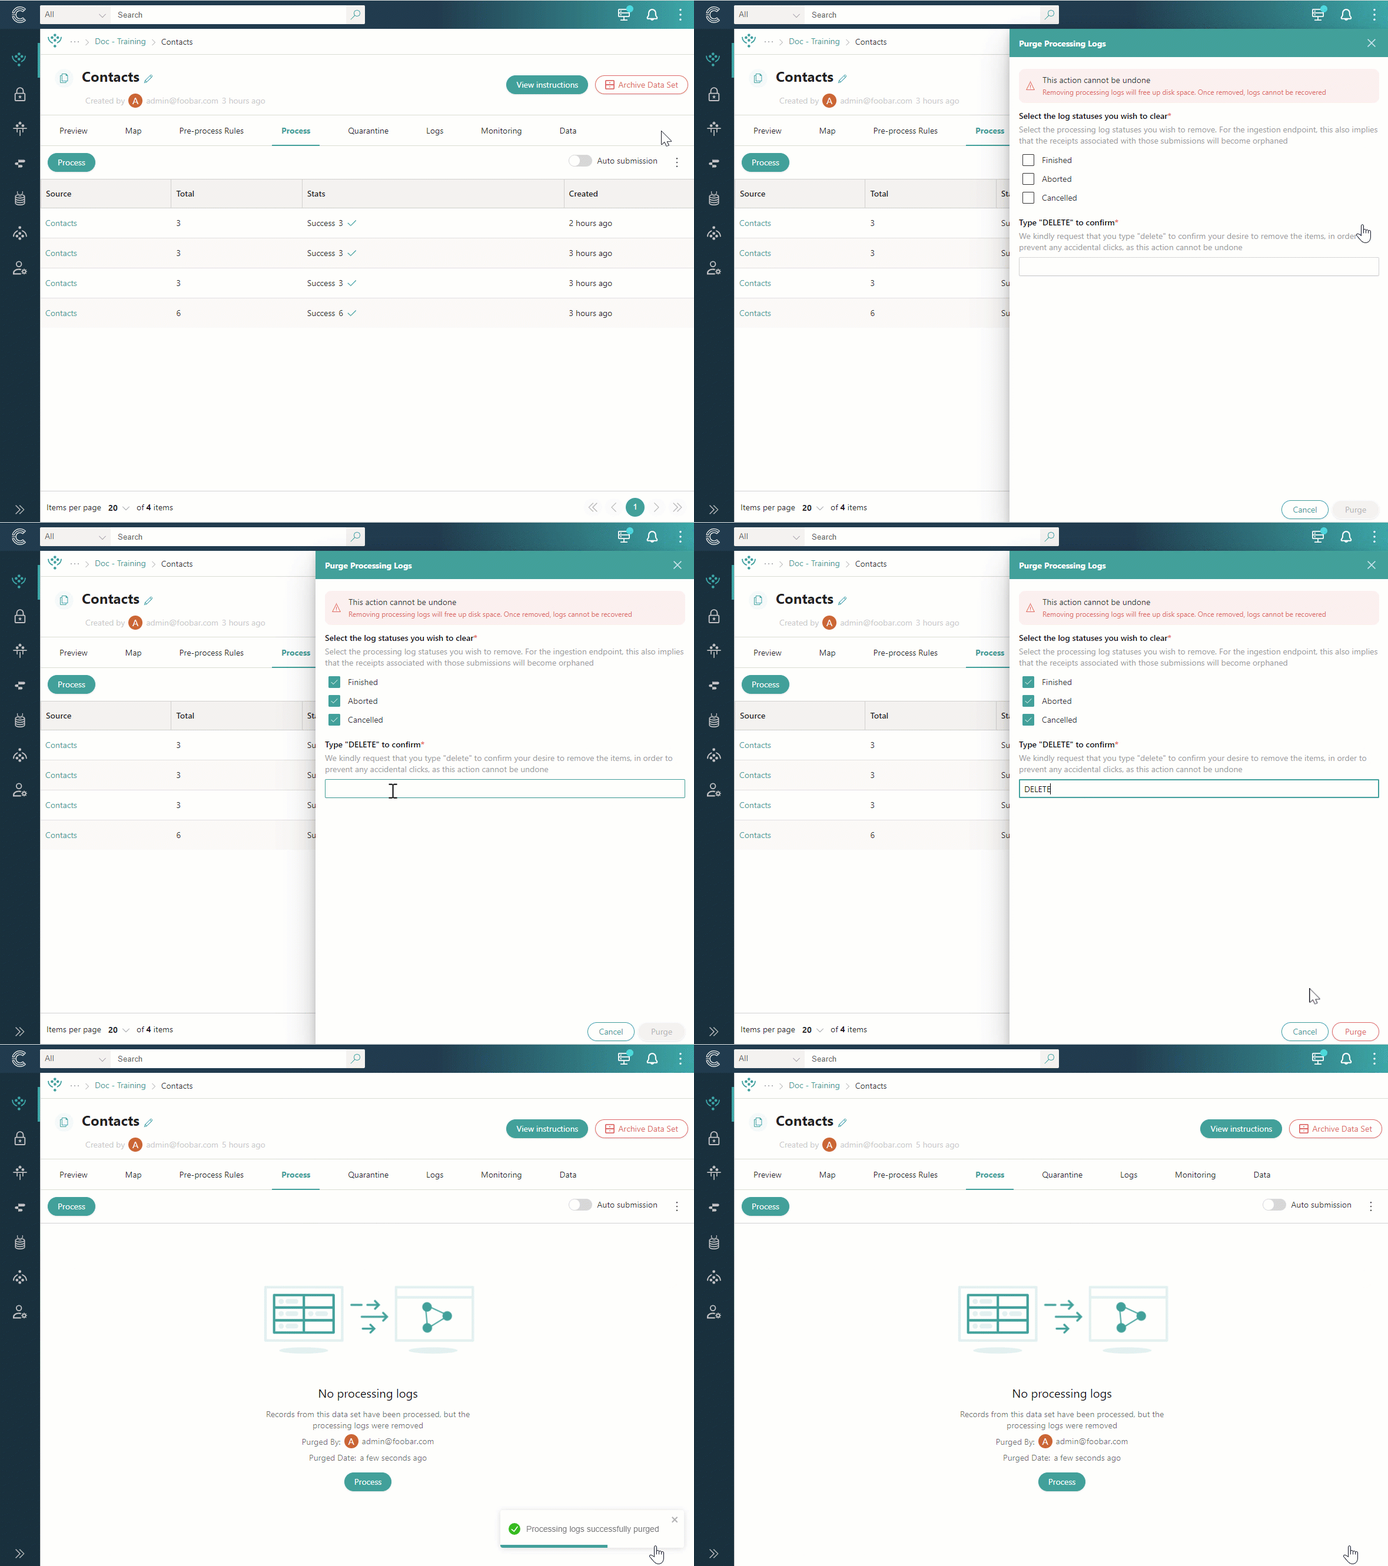
After processing logs are removed, the Process tab will display information about the user who removed them and the time of removal.
Configure retention settings
Retention settings allow you to automatically delete processing logs after a specified period.
To configure retention settings
-
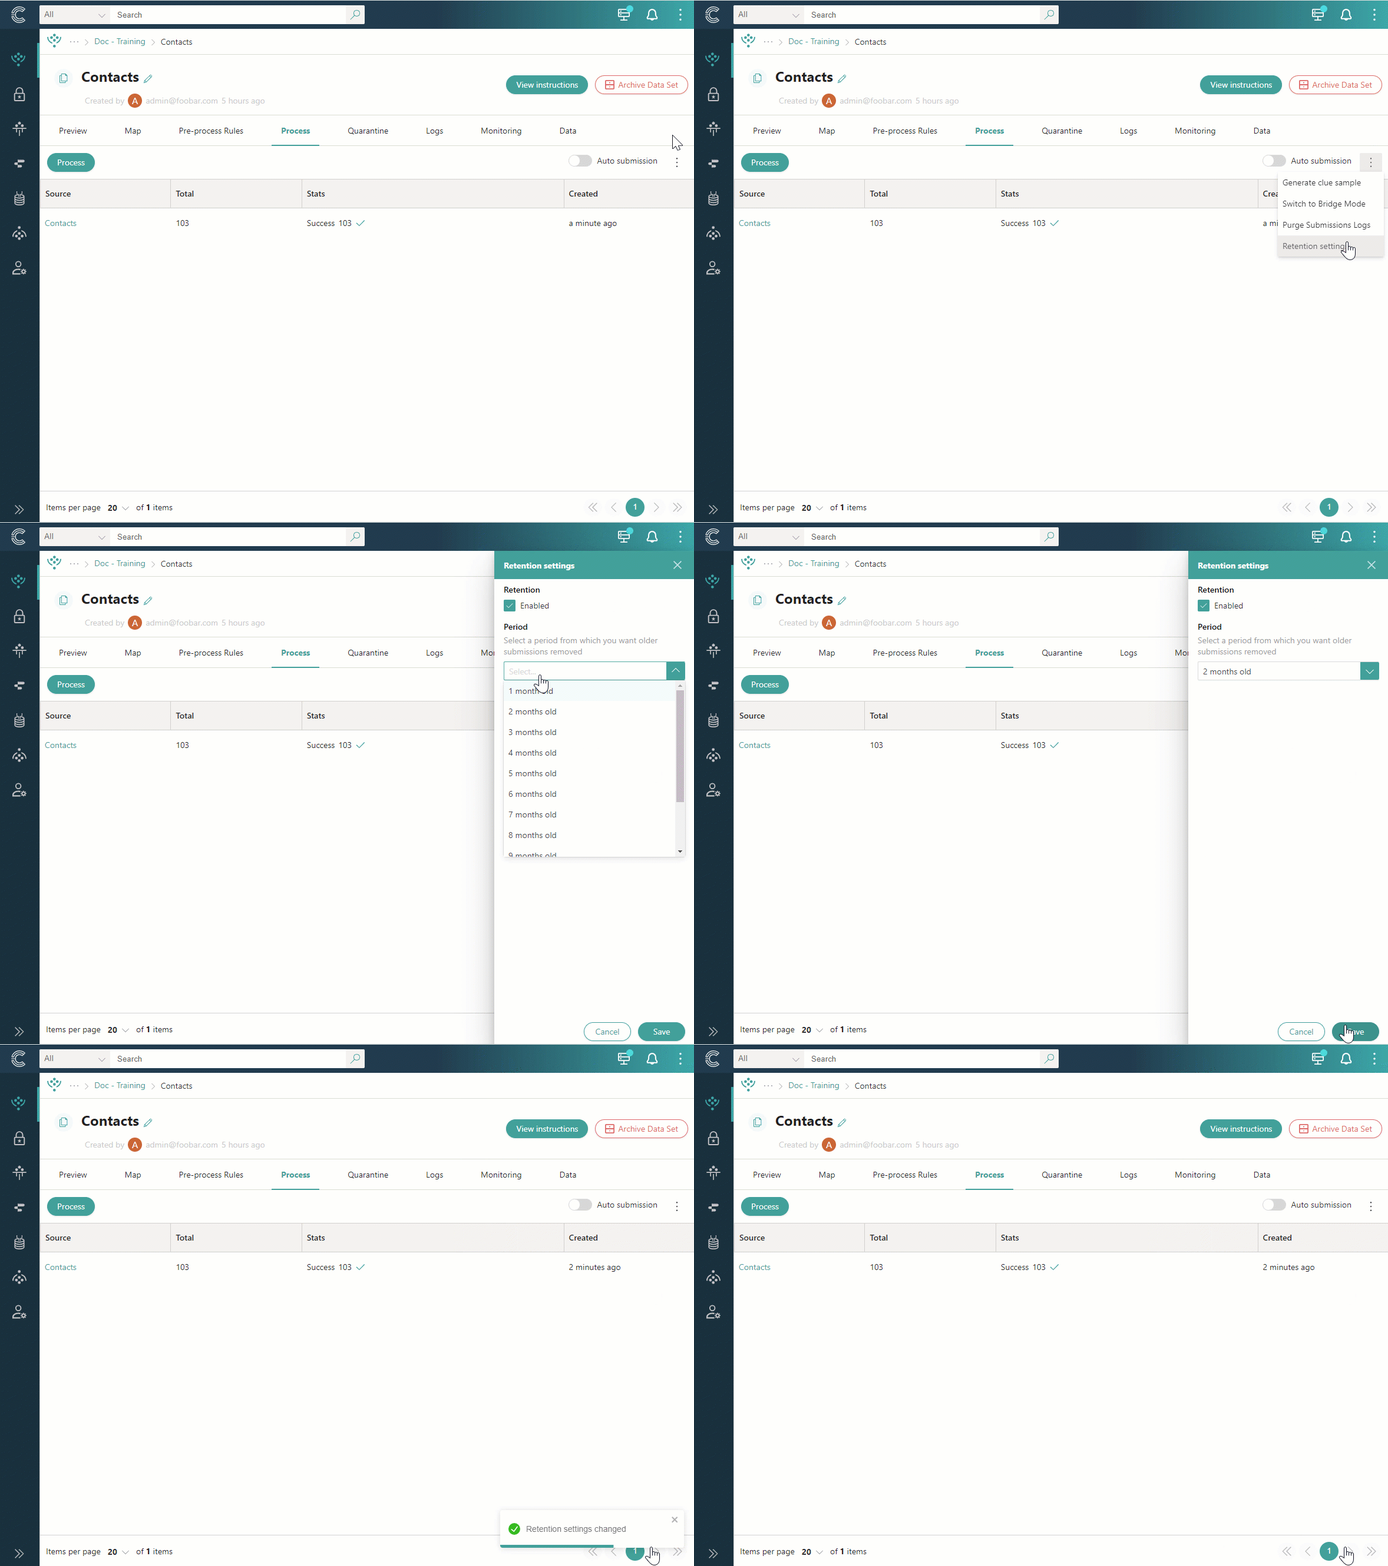
Near the upper-right corner of the processing logs table, open the three dots menu, and then select Retention settings.
-
Select the checkbox to enable retention.
-
Select a period to specify which processing logs should be removed. For example, selecting 2 months old means that all processing logs created 2 months ago will be removed. Thus, when a processing log turns 2 months old, it will be automatically removed.
-
Select Save.
-
If you want to change the retention period, repeat step 1. Then, select another period and save your changes.
-
If you want to remove the retention settings, repeat step 1. Then, clear the checkbox to disable retention and save your changes.
Verify the result
Processing runs in the background. Selecting Confirm, or new data arriving with auto-submission enabled, sends a request for processing; the records then move through the processing queues shown on the Monitoring tab.
-
On the Process tab, a new processing log appears in the table, with the Source, the Total number of records, the Stats, and when it was Created. While the records are being processed, the Stats column shows a progress indicator and a Cancel button is available. When processing has finished, the Stats column shows Success with the number of records and a check mark.
-
On the Data tab, records that were processed successfully are displayed.
-
On the Quarantine tab, records that did not meet the conditions described in How processing decides what to process are listed. See Quarantine.
-
On the Monitoring tab, the queue message counts return to 0 when there is nothing left to process. See Monitoring.
What this changes
-
Golden records. Processed records become new golden records, or are added as data parts to existing golden records. Records with identical primary identifiers are merged.
-
Source data. With manual processing and auto-submission, the original data that was initially sent to CluedIn remains in the temporary storage on the Preview tab. In bridge mode, records are not stored there.
-
Undoing processing. To take the processed records out of CluedIn again, remove the records created from the data set. This removes golden records that consist only of those records, and removes the corresponding data parts from golden records that also have data from other sources.
-
Processing logs. Removing processing logs frees up disk space without impacting the processed records, but removed logs cannot be recovered. For an ingestion endpoint, the receipts associated with those submissions become orphaned.
If something goes wrong
-
Processing takes a long time. Go to the Monitoring tab and check the number of messages in the queues. Depending on the type of message queue with a high message count, you can perform specific troubleshooting actions. For further details, see Monitoring.
-
A submission is in the Error state. On the Process tab, select Retry for that submission. See Monitoring.
-
Records are in quarantine. Open the Quarantine tab to see which rule sent each record there, then fix and process the records, or reject them. See Quarantine.
-
Some records were not processed again. Records that were processed before are skipped. See How processing decides what to process.
-
More records were merged than expected. The field used for the primary identifier or an identifier contains duplicate values. Check the identifier status in the confirmation pane before you confirm, and see Review mapping.