Azure customer usage attribution
On this page
- Before you start
- Roles Assignment
- Create a Resource Group
- Create an SSH key pair
- Create an ARM template
- Deploy the ARM template
- Verify the deployment
This article describes how to create customers Azure resources associated with CluedIn as a Microsoft partner.
We will create a basic AKS cluster with the help of an ARM template. The sizing and setup of the Kubernetes cluster are not in the scope of this article.
Before you start
Before you start, please read the following Microsoft documentation articles:
- Azure customer usage attribution
- Quickstart: Deploy an Azure Kubernetes Service (AKS) cluster using an ARM template
- Detailed steps: Create and manage SSH keys for authentication to a Linux VM in Azure
Roles Assignment
To create an AKS cluster, you have to be assigned to a subscription’s Owner or Contributor roles. If you are don’t have one of these roles, you will need to ask someone who has one of these roles to perform the following steps.
Create a Resource Group
First, we create a resource group with the help of Azure CLI:
$tenant_name = 'cluedinpartner.com' # your tenant name
$rg_name = 'cliedin-rg' # resource group name
$location_name = 'northeurope' # location of the resource group

az login --tenant $tenant_name # this line will open Azure Login page in your browser
az group create --name $rg_name --location $location_name
Create an SSH key pair
- Go to https://shell.azure.com to open Cloud Shell in your browser.
- Run the ssh-keygen command. The following example creates an SSH key pair using RSA encryption and a bit length of 2048:
ssh-keygen -t rsa -b 2048
Then run cat ~/.ssh/id_rsa.pub and copy the output - you will need it later.
Create an ARM template
Now, let’s create an ARM template. We can take a simple template from Quickstart: Deploy an Azure Kubernetes Service (AKS) cluster using an ARM template and add a deployment under the resources:
    {
      "apiVersion": "2020-06-01",
      "name": "pid-e64d9978-e282-4d1c-9f2e-0eccb50582e4",
      "type": "Microsoft.Resources/deployments",
      "properties": {
          "mode": "Incremental",
          "template": {
              "$schema": "https://schema.management.azure.com/schemas/2015-01-01/deploymentTemplate.json#",
              "contentVersion": "1.0.0.0",
              "resources": []
          }
      }
    },
The full ARM template will look like this:
{
  "$schema": "https://schema.management.azure.com/schemas/2019-04-01/deploymentTemplate.json#",
  "contentVersion": "1.0.0.0",
  "parameters": {
    "clusterName": {
      "type": "string",
      "metadata": {
        "description": "The name of the Managed Cluster resource."
      }
    },
    "location": {
      "type": "string",
      "defaultValue": "[resourceGroup().location]",
      "metadata": {
        "description": "The location of the Managed Cluster resource."
      }
    },
    "osDiskSizeGB": {
      "type": "int",
      "defaultValue": 0,
      "maxValue": 1023,
      "minValue": 0,
      "metadata": {
        "description": "Disk size (in GB) to provision for each of the agent pool nodes. This value ranges from 0 to 1023. Specifying 0 will apply the default disk size for that agentVMSize."
      }
    },
    "agentCount": {
      "type": "int",
      "defaultValue": 3,
      "maxValue": 50,
      "minValue": 1,
      "metadata": {
        "description": "The number of nodes for the cluster."
      }
    },
    "agentVMSize": {
      "type": "string",
      "defaultValue": "Standard_D2s_v3",
      "metadata": {
        "description": "The size of the Virtual Machine."
      }
    },
    "linuxAdminUsername": {
      "type": "string",
      "metadata": {
        "description": "User name for the Linux Virtual Machines."
      }
    },
    "sshRSAPublicKey": {
      "type": "string",
      "metadata": {
        "description": "Configure all Linux machines with the SSH RSA public key string. Your key should include three parts, for example, 'ssh-rsa AAAAB...snip...UcyupgH azureuser@linuxvm'"
      }
    }
  },
  "functions": [],
  "resources": [
    {
      "apiVersion": "2020-06-01",
      "name": "pid-e64d9978-e282-4d1c-9f2e-0eccb50582e4",
      "type": "Microsoft.Resources/deployments",
      "properties": {
          "mode": "Incremental",
          "template": {
              "$schema": "https://schema.management.azure.com/schemas/2015-01-01/deploymentTemplate.json#",
              "contentVersion": "1.0.0.0",
              "resources": []
          }
      }
    },
    {
      "type": "Microsoft.ContainerService/managedClusters",
      "apiVersion": "2020-09-01",
      "name": "[parameters('clusterName')]",
      "location": "[parameters('location')]",
      "identity": {
        "type": "SystemAssigned"
      },
      "properties": {
        "dnsPrefix": "[parameters('clusterName')]",
        "agentPoolProfiles": [
          {
            "name": "agentpool",
            "osDiskSizeGB": "[parameters('osDiskSizeGB')]",
            "count": "[parameters('agentCount')]",
            "vmSize": "[parameters('agentVMSize')]",
            "osType": "Linux",
            "mode": "System"
          }
        ],
        "linuxProfile": {
          "adminUsername": "[parameters('linuxAdminUsername')]",
          "ssh": {
            "publicKeys": [
              {
                "keyData": "[parameters('sshRSAPublicKey')]"
              }
            ]
          }
        }
      }
    }
  ],
  "outputs": {
    "controlPlaneFQDN": {
      "type": "string",
      "value": "[reference(resourceId('Microsoft.ContainerService/managedClusters', parameters('clusterName'))).fqdn]"
    }
  }
}
According to the Recommended node pool sizing and the customer’s requirements, you can add other node polls to this ARM template or via the Azure Portal.
Deploy the ARM template
Assuming that you are in the same PowerShell session since you created the resource group, run the following:
$deployment_name = 'cluedin-deployment'

az deployment group create `
  --name $deployment_name `
  --resource-group $rg_name `
  --template-file .\azuredeploy.json # ARM template file
The command line prompt will ask you to enter a name for your AKS cluster, a name for the Linux admin user, and the RSA key that you generated earlier.
Note: If you are in a new terminal session, you will need to redeclare the $rg_name variable.
Verify the deployment
Now, let’s verify our deployment. You can do it in two ways: in the Azure Portal or via a PowerShell script.
Azure Portal
Go to your resource group, and in the Overview section, check out the Deployments:
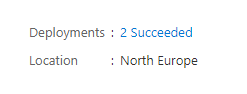
Click on this link, and you should see this:
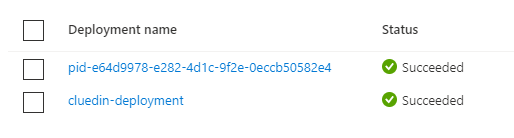
The deployment that starts with “pid” must have the valid GUID in its name.
Verify script
Run this script:
Param(
    [string][Parameter(Mandatory=$true)]$deploymentName, # the full name of the deployment, e.g. pid-XXXXXXXX-XXXX-XXXX-XXXX-XXXXXXXXXXXX
    [string][Parameter(Mandatory=$true)]$resourceGroupName
)

# Get the correlationId of the named deployment
$correlationId = (Get-AzResourceGroupDeployment -ResourceGroupName $resourceGroupName -Name "$deploymentName").correlationId

# Find all deployments with that correlationId
$deployments = Get-AzResourceGroupDeployment -ResourceGroupName $resourceGroupName | Where-Object{$_.correlationId -eq $correlationId}

# Find all deploymentOperations in all deployments with that correlationId as PowerShell doesn't surface outputResources on the deployment or correlationId on the deploymentOperation

foreach ($deployment in $deployments){
    # Get deploymentOperations by deploymentName
    # then the resourceIds for each resource
    ($deployment | Get-AzResourceGroupDeploymentOperation | Where-Object{$_.targetResource -notlike "*Microsoft.Resources/deployments*"}).TargetResource
}
You should see the pid-e64d9978-e282-4d1c-9f2e-0eccb50582e4 deployment in the output.