Use agents
On this page
- Why use agents
- Responsibilities of agents
- Authentication and setup
- Communication model
- Agent jobs
- Agent deployment
- Payloads
- Job types
- Job statistics
- Job restrictions
- Orchestration server
- Deploy an agent
Agents are the orchestrators of integrations. They make it possible to run crawlers in remote environments, often on different machines and even in different physical networks.
Why use agents
Agents are typically used in hybrid environments, for example:
-
CluedIn is hosted in the cloud.
-
Crawlers must run against systems inside an internal business network.
In this setup, agents handle the communication between CluedIn and internal data sources.
Responsibilities of agents
-
Running scheduled crawls.
-
Ensuring crawlers recover and continue after failures.
-
Reporting data, logs, and health statistics back to the CluedIn server.
Authentication and setup
To run an agent, you must:
-
Register an agent API key in the CluedIn datastore.
-
Configure the same API key in the agent’s configuration file on the remote machine.
-
The API key must match one of the keys registered in the agents database within CluedIn.
-
The API key must also be associated with the organization ID of the account running the agent.
-
Simplest setup:
-
Remove the
ServerComponentfolder from CluedIn, leaving only theAgentfolder. -
In
container.config, verify that the URLs are correct (for example,AgentServerUrlshould point to CluedIn’s API endpoint).
Communication model
-
Agents cannot receive incoming messages.
-
Instead, they use a polling mechanism to communicate with the CluedIn server.
-
This ensures that no external systems can directly instruct an agent to run a job.
-
Agents post:
-
Data
-
Logs
-
Health statistics
-
This gives CluedIn full visibility into the status of each agent and any issues occurring during crawls.
Agent jobs
Agents execute agent jobs from the CluedIn system against third-party or provider APIs.
Job results (clues) are sent back to CluedIn as payloads.
Agent deployment
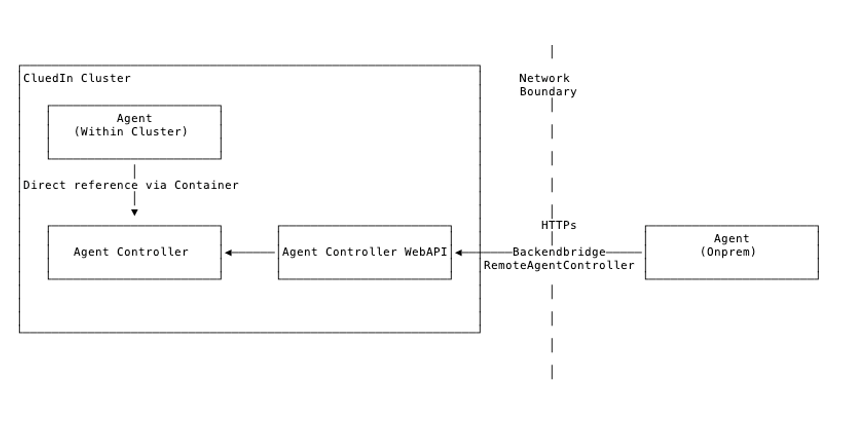
Agents can be deployed in two main ways:
-
Within the CluedIn cluster (cloud).
-
As a separate isolated component (on-prem).
Cloud deployment (within the CluedIn cluster)
-
Directly connected to the backend
-
Communicates with Agent Controller via a direct container reference.
On-prem deployment (outside of CluedIn control)
-
Deployed as VMs within the customer’s environment.
-
Provides access to environments not directly accessible from the CluedIn cluster.
-
Communicates with the Agent Controller over HTTP/TLS.
-
No access to CluedIn databases, Message Bus, and so on.
-
Deployed with ComponentHost and individual components:
-
Smaller package than the full CluedIn.
-
Processing, Web API, and DataStores are not included.
-
-
Uses an agent API key for authentication.
Payloads
-
Format: Binary
-
Structure: Multiple records
-
Compression: Enabled
Types of payloads
-
Clue payloads.
-
Clues produced from crawlers.
-
Agent job log payloads.
-
Logs produced from job/crawler execution.
-
Log shipping from the agent back to the CluedIn cluster.
-
CompressedRecord payload.
Job types
-
Normal jobs:
- Execute a job and finish once crawling is complete.
-
Continuous jobs:
-
Never finish.
-
Used to monitor systems and produce clues when changes occur.
Examples include file system monitoring and Kafka queue monitoring.
-
Job statistics
Each job includes detailed statistics:
-
Start/stop dates
-
Current number of tasks
-
Completed tasks
-
Failed tasks
-
Number of clues produced
-
Number of payloads submitted
Job restrictions
Jobs can be restricted to run only on:
-
A specific agent
-
A specific group of agents
-
Any agent of a given type:
-
Cloud
-
SharedProcessor (shared between multiple tenants)
-
On-prem (single tenant)
-
Orchestration server
-
Agents automatically download updates from the server (ZIP file deployed centrally).
-
This enables updates for agents deployed in environments where CluedIn does not have direct access to the machines.
Deploy an agent
Agents can be deployed by downloading the agent binaries and decompressing them onto an operating system of your choice.
-
The package ships with binaries for multiple operating systems.
-
The example below demonstrates installation on a Windows machine.
Please contact your partner or CluedIn representative to obtain access to the binaries.
Configure the agent
The agent is configured through the container.config file located in your <agent-root>/Agent folder.
Open this file, and you should see a configuration similar to the following example:
<?xml version="1.0" encoding="utf-8"?>
<configuration xmlns:urn="urn:schemas-microsoft-com:asm.v1" xmlns:xdt="http://schemas.microsoft.com/XML-Document-Transform">
  <xdt:Import assembly="ComponentHost" namespace="ComponentHost.Transforms"/>
  <startup xdt:Transform="InsertIfMissing">
    <supportedRuntime version="v4.0" sku=".NETFramework,Version=v4.8"/>
  </startup>

  <appSettings xdt:Transform="InsertIfMissing">
    <add key="ServerUrl"                                                value="https://localhost:9000/" xdt:Locator="Condition(@key='ServerUrl')" xdt:Transform="Replace" />
     <add key="AgentServerUrl"                                                value="https://localhost:9000/" xdt:Locator="Condition(@key='AgentServerUrl')" xdt:Transform="Replace" />
    <add key="ServerBlobUrl"                                            value="https://localhost:9000/" xdt:Locator="Condition(@key='ServerBlobUrl')" xdt:Transform="Replace" />
    <add key="WebhookUrl"                                               value="https://localhost:9006/" xdt:Locator="Condition(@key='WebhookUrl')" xdt:Transform="Replace" />
    <add key="WebhookServerUrl"                                         value="https://localhost:9006/" xdt:Locator="Condition(@key='WebhookServerUrl')" xdt:Transform="Replace" />
    <add key="ServerStatusUrl"                                          value="http://localhost:9004/" xdt:Locator="Condition(@key='ServerStatusUrl')" xdt:Transform="Replace" />
    <add key="ServerLoggingUrl"                                         value="http://localhost:9005/" xdt:Locator="Condition(@key='ServerLoggingUrl')" xdt:Transform="Replace" />
    <add key="ServerStatusDefaultRedirect"                              value="https://www.cluedin.net/" xdt:Locator="Condition(@key='ServerStatusDefaultRedirect')" xdt:Transform="Replace" />
    <add key="AuthServerUrl"                                            value="https://localhost:9001/" xdt:Locator="Condition(@key='AuthServerUrl')" xdt:Transform="Replace" />
    <add key="Domain"                                                   value="localhost" xdt:Locator="Condition(@key='Domain')" xdt:Transform="Replace" />
    <add key="EmailServer"                                              value="" xdt:Locator="Condition(@key='EmailServer')" xdt:Transform="Replace" />
    <add key="EmailPort"                                                value="" xdt:Locator="Condition(@key='EmailPort')" xdt:Transform="Replace" />
    <add key="EmailDisplayName"                                         value="" xdt:Locator="Condition(@key='EmailDisplayName')" xdt:Transform="Replace" />
    <add key="EmailSender"                                              value="" xdt:Locator="Condition(@key='EmailSender')" xdt:Transform="Replace" />
    <add key="EmailUserName"                                            value="" xdt:Locator="Condition(@key='EmailUserName')" xdt:Transform="Replace" />
    <add key="EmailPassword"                                            value="" xdt:Locator="Condition(@key='EmailPassword')" xdt:Transform="Replace" />

    <add key="Logging.Targets.Exceptions"                               value="false" xdt:Locator="Condition(@key='Logging.Targets.Exceptions')" xdt:Transform="Replace" />

    <add key="Health.TemporaryDirectory.Enabled"                        value="true" xdt:Locator="Condition(@key='Health.TemporaryDirectory.Enabled')" xdt:Transform="Replace" />
    <add key="Health.TemporaryDirectory.FreeSpacePctThreshold"          value="0.0" xdt:Locator="Condition(@key='Health.TemporaryDirectory.FreeSpacePctThreshold')" xdt:Transform="Replace" />
    <add key="Health.TemporaryDirectory.FreeSpaceBytesThreshold"        value="209715200" xdt:Locator="Condition(@key='Health.TemporaryDirectory.FreeSpaceBytesThreshold')" xdt:Transform="Replace" />

    <!-- Agent -->
    <add key="Agent.Enabled"                                            value="true" xdt:Locator="Condition(@key='Agent.Enabled')" xdt:Transform="Replace"/>
    <add key="Agent.ErrorLogging.Project"                               value="6" xdt:Locator="Condition(@key='Agent.ErrorLogging.Project')" xdt:Transform="Replace" />
    <add key="Agent.APIKey"                                             value="!2qwaszx12346" xdt:Locator="Condition(@key='Agent.APIKey')" xdt:Transform="Replace" />
    <add key="Agent.TaskScheduler"                                      value="Default" xdt:Locator="Condition(@key='Agent.TaskScheduler')" xdt:Transform="Replace" />
    <add key="Agent.Queue.MaximumJobsToQueuePerCpu"                     value="1.5" xdt:Locator="Condition(@key='Agent.Queue.MaximumJobsToQueuePerCpu')" xdt:Transform="Replace" />
  </appSettings>

</configuration>
Connect to Kubernetes master server
To connect your agent to the Kubernetes cluster running the CluedIn Server, API, and JobServer, fill in the following configuration values in container.config:
-
ServerUrl– The route to your CluedIn Web API. For example,https://app.<hostname>/api/. -
AgentServerUrl– The route to your CluedIn Web API. For example,https://app.<hostname>/api/. -
ServerBlobUrl– The route to your Blob storage. By default, this is the same as your Web API URL. -
WebhookUrl– The route to your Webhook API. By default, it should behttps://app.<hostname>/webhooks/. -
ServerStatusUrl– The status endpoint of your Web API. By default, it should behttps://app.<hostname>/api/status. -
ServerLoggingUrl– The logging endpoint of your Web API. By default, it should behttps://app.<hostname>/api/. -
AuthServerUrl– The route to your Authentication API. By default, it should bettps://app.<hostname>/auth/.
Agent authentication
By default, the agent is already configured to run on a standard on-premises crawler. Changing the token is recommended but not required for the agent to communicate with the server.
The agent you downloaded must authenticate against a registered agent within the CluedIn server.
You can register the agent in two ways:
-
Port-forward to the CluedIn SQL Server pod in your Kubernetes cluster:
kubectl port-forward -l app=sqlserver 1433 --address 0.0.0.0Then, add an agent registration under
DataStore.Db.OpenCommunication > dbo.Agent. -
Run a SQL query directly against the
DataStore.Db.OpenCommunicationdatabase, as in the following example:DECLARE @AgentId varchar(60); SET @AgentId = '6CF17140-0FB0-47C5-AAAA-9A40A0ECF8BA'; DECLARE @AgentGroup varchar(60); SET @AgentGroup = '612ed11a-b1b3-463f-b4a5-7c1bb7bd55a0'; DECLARE @AgentToken varchar(60); SET @AgentToken = '--- INSERT YOUR API TOKEN HERE ---'; DECLARE @OrganizationId varchar(60); SET @OrganizationId = (SELECT Id AS OrganizationId FROM dbo.OrganizationProfile WHERE OrganizationName = '--- INSERT YOUR CLIENT ID HERE ---'); DECLARE @DateTimeMin varchar(60); SET @DateTimeMin = (select cast(-53690 as datetime)); UPDATE dbo.Agent SET AccountId = @OrganizationId, ApiKey = @AgentToken, LastPing = @DateTimeMin WHERE Id = @AgentId;After completing the registration, copy the API token you created and set it as the value of
ApiKeyin thecontainer.configfile you downloaded earlier.
Deploy crawlers
To deploy a crawler into an agent, you will need the crawler assembly files (DLLs), either:
-
From a NuGet package.
-
Or, by compiling and building the crawler locally on your developer machine.
Required assemblies:
-
CluedIn.Crawling._CrawlerName_ -
CluedIn.Crawling._CrawlerName_.Core -
CluedIn.Crawling._CrawlerName_.Infrastructure1
The provider project is not required in the agent, because the provider is registered in the cloud Web API instance. Everything in the provider project is executed from the cluster.
Ensure that all dependencies needed by your crawler (such as NuGet dependencies) are deployed along with the crawler assemblies.
To deploy a crawler
-
Move the crawler assemblies into
<agent-root>/Agent.The assemblies will be picked up automatically when the agent starts.
-
On the cluster, deploy the following:
-
All crawler packages listed above.
-
The provider project’s NuGet package parts responsible for your crawler (these will be executed by the agent).
-
Run the agent
-
To run the agent, simply start the
boot.shfile. On Windows, you may need to install a tool like Cygwin to run.shfiles.When the agent starts, you will see an output showing:
-
Assemblies being loaded.
-
The agent attempting to connect to the cluster.
-
-
Review the output and ensure there are no networking issues blocking the calls to the API server.
Once connected, you can do the following:
-
Sign in to CluedIn, add your integration, and the data crawling will be executed by the agent instead of the CluedIn server in the Kubernetes cluster.
-
Register the agent as a Windows Service so that it automatically restarts if the Windows VM reboots. For details, see the corresponding Microsoft guide.
-
Enable verbose logging
By default, the agent runs with low logging verbosity.
To increase verbosity
-
Set the environment variable:
$env:ASPNETCORE_ENVIRONMENT = "verbose". -
To make this setting persistent on the machine, configure it as a system variable.
-
Restart both:
-
The agent.
-
The bash/command prompt session used to run
boot.sh.
-
The changes will take effect after the restart.