User management
On this page
In this article, you will learn how to add and deactivate users in your CluedIn organization.
This article is intended for users with the OrganizationAdmin role or users with the following claim access level.
| Section | Claim | Access level |
|---|---|---|
| Admin | Users | At least Consulted |
A user is someone who can sign in to CluedIn. The user’s access to CluedIn modules and features is defined by the user’s roles. For more information, see Roles.
You can perform the following actions to manage users:
Add user
Users can be added to CluedIn in one of the following ways:
Add user by email address
If you don’t have Azure Active Directory SSO enabled for CluedIn, you can add users to the platform by their email addresses.
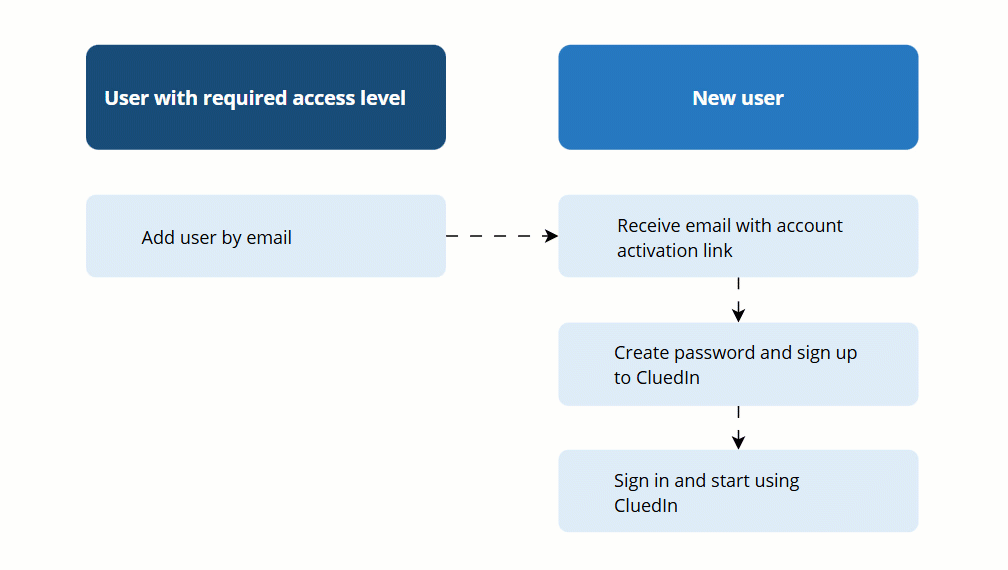
The following diagram shows the flow of adding users to CluedIn.
To add a user by email address
-
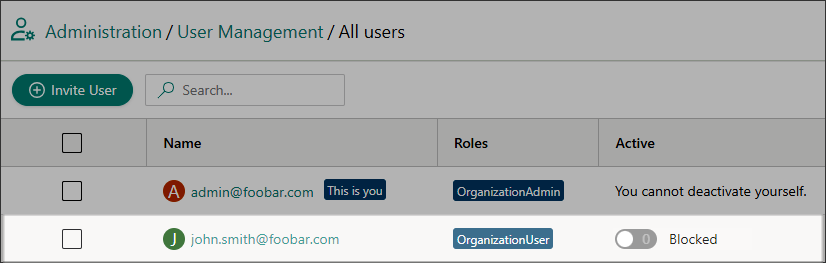
On the navigation pane, go to Administration > User Management.
-
On the actions pane, select Users. Then, select Invite User.
-
On the Invite User pane, enter the user’s email address. Then, in the lower-right corner, select Invite.
The user will receive an email with a link to activate their account. After the user follows the link and creates a password, you will see the user on the All users page.

By default, the user’s role is OrganizationUser. It means that the user can view all sections and modules in a read-only mode. To give the user access to more features within the platform, add another role to the user.
Add user via SSO
If you have Azure Active Directory SSO enabled for CluedIn, the users will be able to sign in using SSO. For more information, see Configure SSO.
Because the users are part of your SSO domain, they do not need an invite. They can log in directly using their organization credentials. Use invites only for CluedIn non-SSO users.
Deactivate user
If you want to prevent the user from signing in to CluedIn, deactivate the user.
For SSO users, you can revoke user access in Azure Active Directory. For users added to CluedIn by their email address, you can deactivate them in CluedIn.
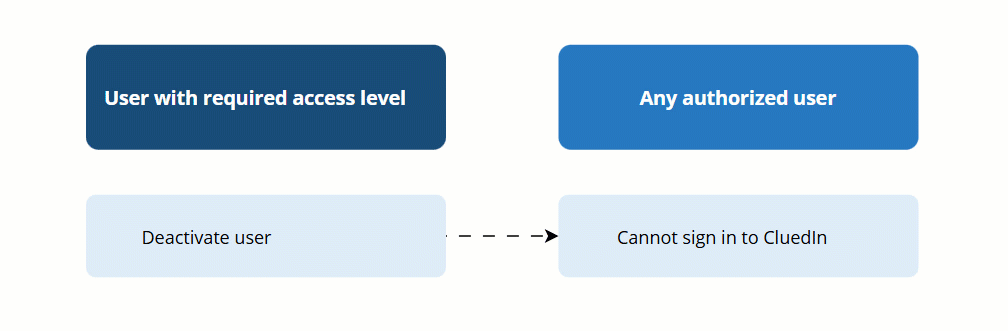
The following diagram shows the flow of deactivating a user in CluedIn.
To deactivate a user in CluedIn
-
On the navigation pane, go to Administration > User Management.
-
On the actions pane, select Users.
-
On the All users page, find the user whom you want to deactivate.
-
In the Active column, turn off the status toggle.
Alternatively, you can deactivate the user from the user details page. To do that, select the user and on the Settings tab, turn off the status toggle.
The status of the user is changed to Blocked.
The user won’t be able to sign in to CluedIn.
User management reference
Whenever a new user is added to CluedIn or changes are made to the user details page, they are recorded and can be found on the Audit Log tab. These actions include the following:
- Create a user
- Add a user to a role
- Remove a user from a role
- Activate a user
- Deactivate a user
- Delete user invite
- Complete registration