Validations
On this page
In this article, you will learn how to check the source records for errors, inconsistencies, and missing values, as well as how to fix invalid values with the help of validations. As a result, you can improve the quality of source records and prevent incorrect records from becoming golden records or aggregating to the existing golden records.
Perform validations
To perform source record validations, you need to meet the following prerequisites:
-
The data set should be mapped to standard fields. This way CluedIn can analyze your data and suggest appropriate validation methods. Learn more in Create mapping and Review mapping.
-
The data set should be in the edit mode. This way you can add validations and modify source records. Learn more in Preview.
To access validations
-
On the data set page, select Validations.
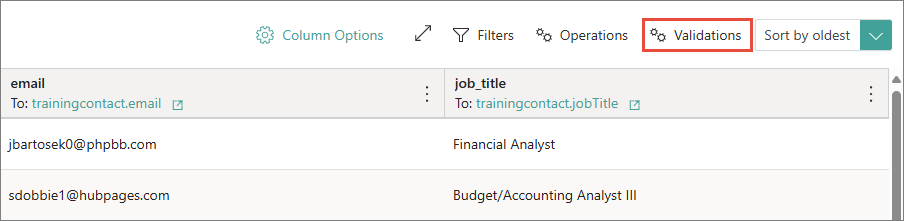
The pane containing Validations opens to the right side of the page.
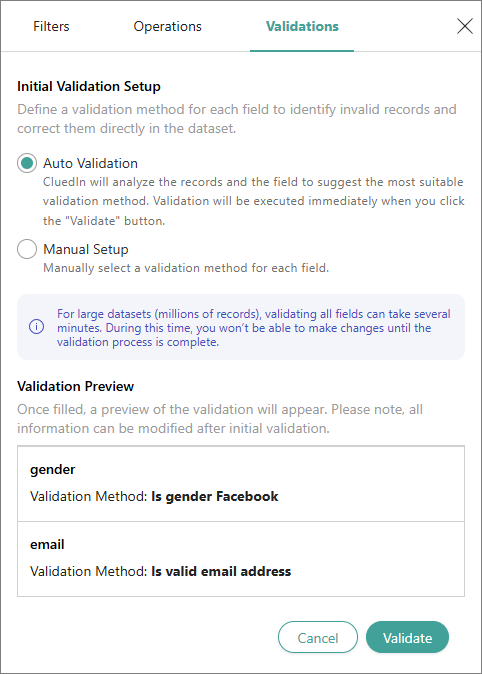
When you access validations for the first time or when you reset validations, you will see the initial validation setup options:
-
Auto-validation – CluedIn will analyze the fields and suggest appropriate validation methods for some fields.
-
Manual setup – you need to select appropriate validation methods for the fields that you want to validate.
You can start with auto-validation and then add manual validations for the needed fields.
Auto-validation
Auto-validation is a good starting point for finding invalid values.
To run auto-validation
-
On the Validations pane, in the Initial Validation Setup section, make sure that the Auto-validation option is selected.
-
In the Validation Preview section, review the fields along with validation methods suggested by CluedIn.
-
Select Validate.
CluedIn will run validations on the specific fields. When the validations are complete, you will see the validation results for each field.
The fields that failed the validation check are highlighted in red. Now, you can process the results of auto-validation and fix invalid values.
Manual validation
If auto-validation is not sufficient for you or if you want to apply different validation methods, use manual validation.
To add manual validation
-
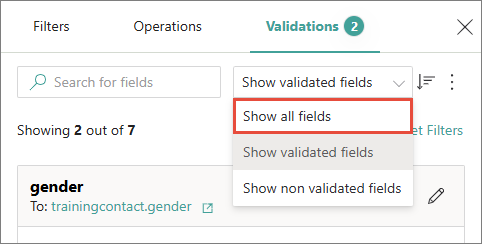
Depending on whether you have already run auto-validation, do one of the following:
-
If you have already run auto-validation, then expand the filter dropdown, and select Show all fields.
-
If you have not run auto-validation, then in the Initial Validation Setup section, select the Manual Setup option, and then select Validate.
-
-
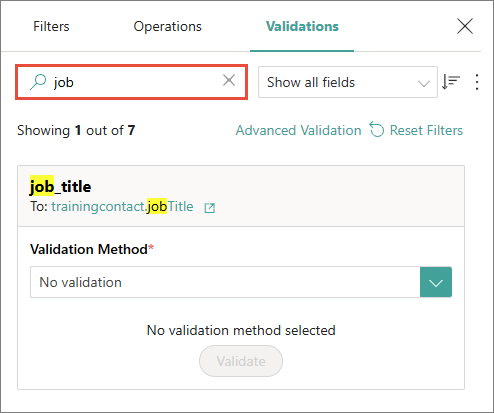
From the list of all fields, find the field for which you want to add manual validation. To quickly find the needed field, start entering its name in the search field.
-
In the Validation Method dropdown, select the validation method that you want to apply to the field. Depending on the selected validation method, you might need to provide additional configuration details.
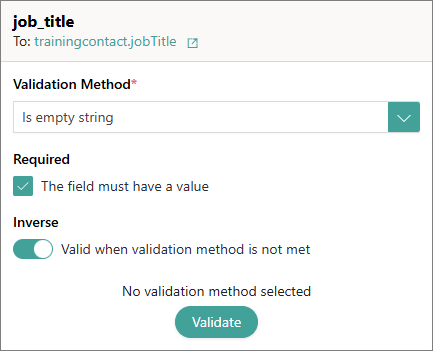
For example, the following screenshot shows the validation method that checks the Job Title field for empty values. The Inverse toggle is turned on, indicating that if the field contains an empty string, it will be marked as invalid.
-
When the validation for a field is configured, select Validate.
CluedIn will run validation on the specific field. When the validation is complete, you will see the validation results for the field.
-
To add manual validations for other fields, repeat steps 2–4.
The fields that failed the validation check are highlighted in red. Now, you can process the results of manual validation and fix invalid values.
Advanced validation
The previous validation options—auto-validation and manual validation—focus on the field-level validation. If you need to implement complex business logic to check for invalid records, use advanced validation.
To add advanced validation
-
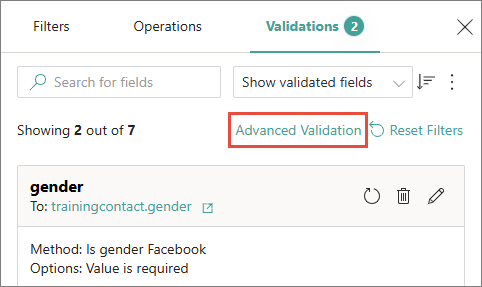
On the Validations tab, select Advanced Validation.
-
Select Run to load all clues that were created from the data set. The clues appear on the right side of the page.
-
On the left side of the page, write the code to create source record validation logic. You can write any JavaScript code.
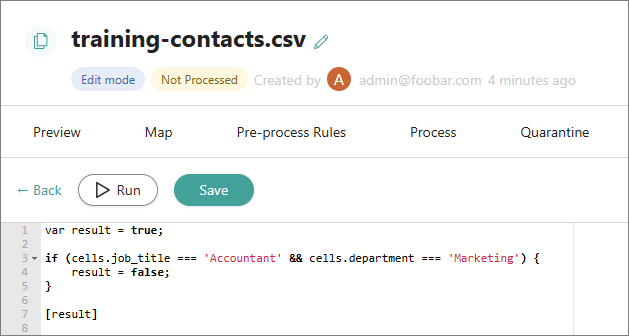
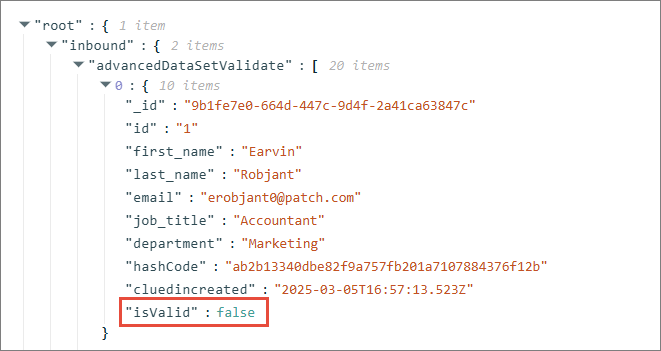
In this example, we wrote the code that checks the Job Title and Department values, and if the Job Title is Accountant and Department is Marketing, then the whole record will be marked as invalid.
-
To check if the code is applied as intended, select Run. As a result, if the record contains the specified combination of values, the isValid property is set to false.
-
If you are satisfied with the result, select Save. To return to the data set, select Back.
The source records that failed the advanced validation check are highlighted in red. Now, you can fix invalid values.
Manage validations
Once you have added validations, there are a number of actions you can take to manage these validations:
-
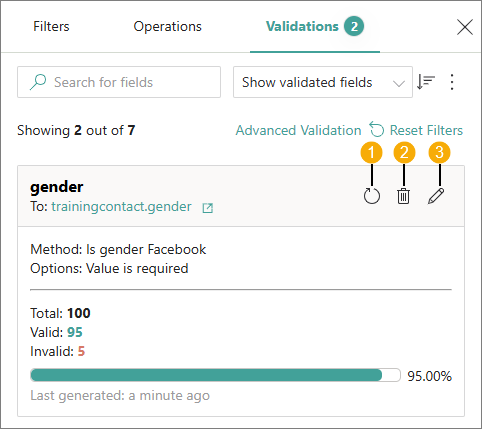
Refresh – re-run the validation check for a field.
-
Remove – remove the validation check for a field.
-
Edit – edit the configuration of the validation for a field. You can select another validation method and modify the configuration details. After you finish, select Save & Validate. As a result, the validation check for the field is run again.
-
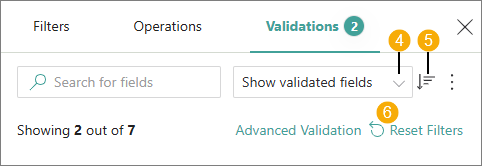
Filter fields – select between all fields, validated fields, or non-validated fields.
-
Sort fields – sort the fields displayed on the pane: by name, by newest, by oldest.
-
Reset field filters – resets the filters to show all fields.
-
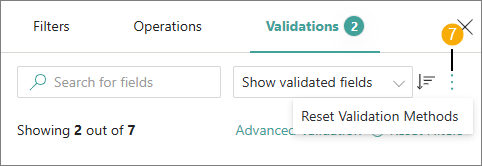
Reset validation methods – removes all validation methods so that you can start adding them from scratch.
Process validation results
After performing validations, you can start reviewing validation results and fixing invalid values.
Review validation results
You can review validation results in two places: on the Validations pane and on the data set page.
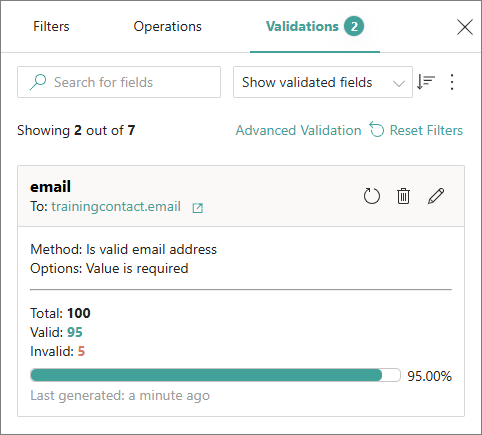
Validation results on the Validations pane
On the Validations pane, you can view validations results for each field. These results include the validation method as well as the total number of values, the number of valid values, and the number of invalid values. You can select the number of invalid values for a field to filter the records displayed on the page. Additionally, the status bar shows the percentage of valid values for a field.
Validation results on the data set page
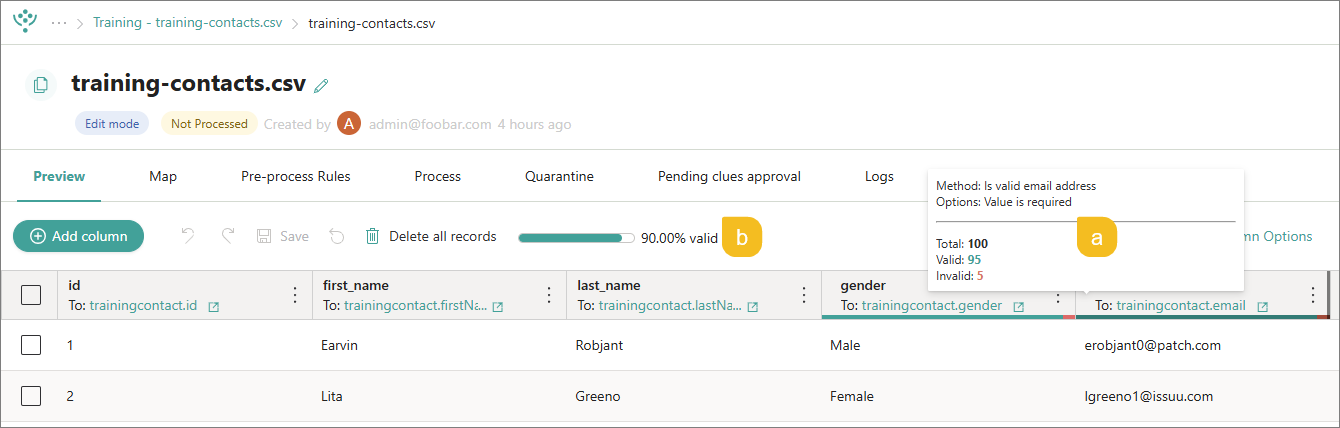
On the data set page, you can view validation results for each column. Hover over the status bar at the bottom of the column header and you will see the validation results for that column (a). These results are the same as on the Validations pane. Additionally, the status bar under the column header shows the correlation between valid (green) and invalid (red) values in the column. You can also view the general statistics of valid values in the data set (b).
Fix invalid values
After running the validation checks, you can start reviewing and fixing invalid values. You are not required to fix invalid values—when you process the data set, the records containing invalid values will be processed in the same way as all the other records and they will not be automatically sent to the quarantine or for approval area unless there are specific rules.
To find and fix invalid values
-
To find invalid values, use one of the following options:
-
In the Validations pane, locate the field for which you want to view invalid values, and then select the number of invalid values.
-
On the data set page, locate the column for which you want to view invalid values. Then, open the three-dot menu in the column header, and select Filter > Invalid Fields.
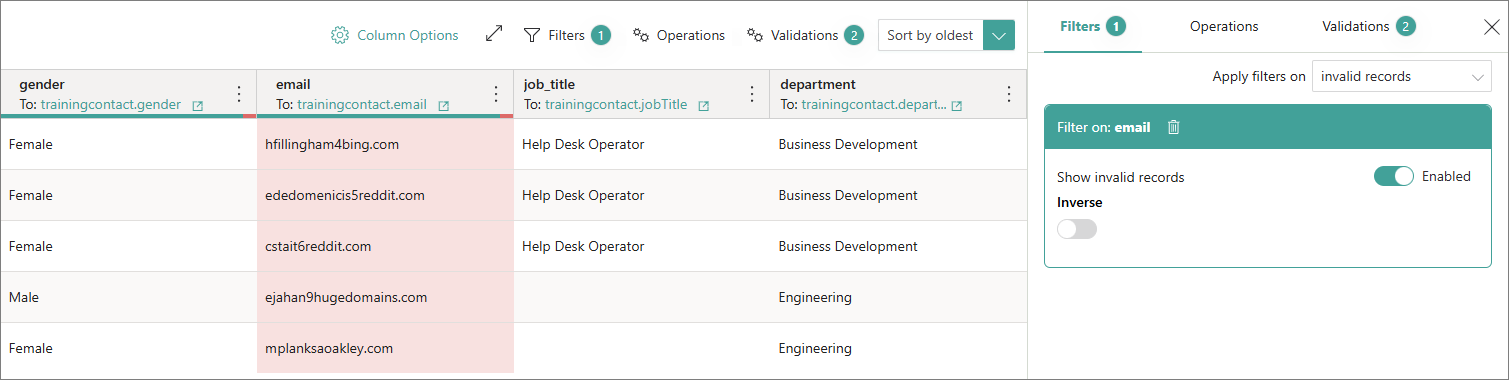
Regardless of the option that you use, the filter for invalid values is added to the Filters pane. As a result, the data set page displays the records containing invalid values. These invalid values are highlighted in red.
-
-
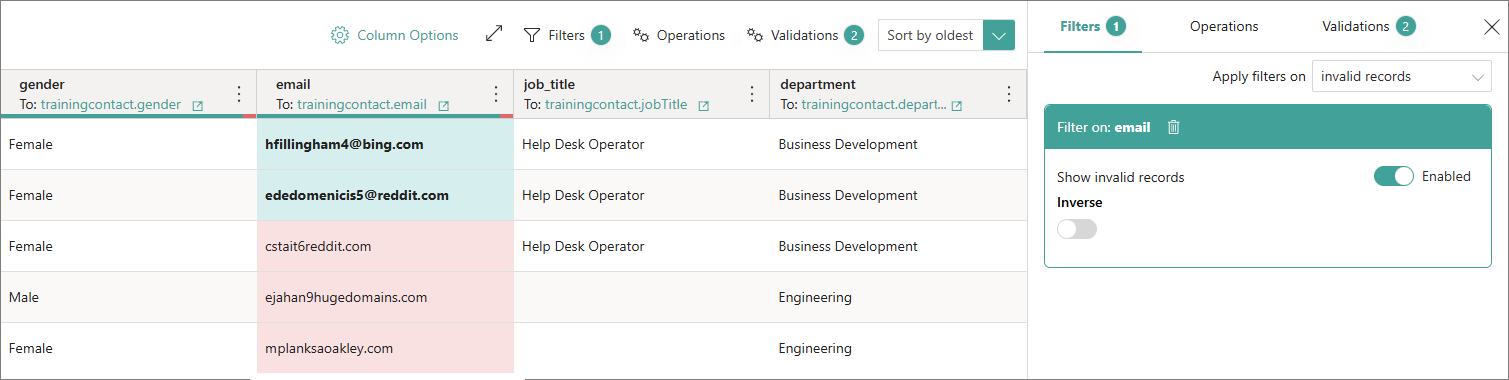
To fix invalid values, click on the cell containing the invalid value and modify it accordingly. The modified value is marked in bold. Once the value is correct, it becomes highlighted in green.
-
Select Save. The records containing fixed values disappear from the data set page because they no longer meet the filter criteria for showing invalid values.
The modifications that you make to the source records are added to the Operations pane every time you save changes.
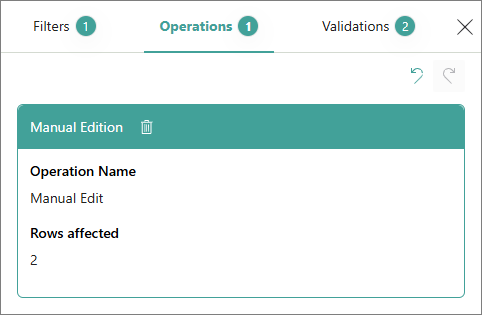
If you want to revert changes, select the delete icon next to the operation name or the revert icon in the upper-right corner. Note that changes can only be reverted consecutively, one by one, and not selectively.
Validation methods
| Method | Description |
|---|---|
| Range (<%=min> to <%=max%>) | Check if a value falls within a specified range. You need to provide the min and max values. |
| Is valid email address | Check if an email address is correctly formatted and potentially valid. This validation method ensures the email address follows standard formatting rules, such as having an “@” symbol and a valid domain name (e.g., example@domain.com). |
| Is empty string | Check if a value is either completely empty or contains no characters. |
| Is equal to | Check if a value is equal to a specific value. |
| Is equal to Multiple (AND) | Check if a value meets all of the specified values using the logical AND operator. |
| Is equal to Multiple (OR) | Check if a value meets at least one of multiple specified values using the logical OR operator. |
| Is a number | Check if a value is a valid number. |
| Regex - matches/<%=pattern%> | Check if a value matches a regex pattern. You need to provide the regex pattern. |
| Is URL | Check if a value is a valid URL (uniform resource locator). |
| Ip Address V4 | Check if a value is a valid IPv4 address. An IPv4 address consists of four numerical segments separated by dots, with each segment ranging from 0 to 255 (for example, 192.168.1.1). |
| Ip Address V6 | Check if a value is a valid IPv6 address. An IPv6 address consists of eight groups of four hexadecimal digits, separated by colons (for example, 2001:0db8:85a3:0000:0000:8a2e:0370:7334). |
| Is UUID | Check if a value is a valid UUID (universally unique identifier). |
| Is Credit Card | Check if a value is a valid credit card number. |
| Is Boolean | Check if value is a valid Boolean (either true or false). |
| Is Currency | Check if a value is a valid ISO 4217 currency code. |
| Is ISO31661 Alpha2 | Check if a value is a valid ISO 3166-1 alpha-2 country code. ISO 3166-1 alpha-2 codes are two-letter codes used to represent countries, dependent territories, and special areas of geographical interest. |
| Is ISO31661 Alpha3 | Check if a value is a valid ISO 3166-1 alpha-3 country code. ISO 3166-1 alpha-3 codes are three-letter codes used to represent countries, dependent territories, and special areas of geographical interest. |
| Is gender Facebook | Check if a gender value falls within the list of gender options available on Facebook. |
| Is Bank Card Type | Check if a value corresponds to a recognized bank card type, such as American Express, Bankcard, China UnionPay, Diners Club Carte Blanche, Diners Club enRoute, Diners Club International, Diners Club United States & Canada, InstaPayment, JCB, Laser, Maestro, Mastercard, Solo, Switch, Visa, Visa Electron. |
| Is gender Abbreviation | Check if a given value is a valid gender abbreviation, such as “M” for Male, “F” for Female, and “X” for non-binary or other gender identities. |
| Is Integer | Check if a value is a valid integer. |
| Is Age | Check if a value is a valid age between 0 and 199. |
Regardless of the validation method, the validation for a field contains two additional settings:
-
Required – this setting defines whether a field is required to have a value. This setting is particularly useful when you are checking for empty fields. If this is your case, make sure you select the checkbox. If you are using other validation methods, it does not matter if the checkbox is selected or not because the validation will be performed based on the existing values, and empty fields will not be marked as invalid.
-
Inverse – this setting defines whether a field is marked valid or invalid based on the validation method.
When the toggle is turned off, the value is marked as invalid if it does not meet the condition expressed in the validation method; if the value meets the condition expressed in the validation method, then it is marked as valid.
When the toggle is turned on, the value is marked as invalid if it meets the condition expressed in the validation method; if the value does not meet the condition expressed in the validation method, it is marked as valid.
For example, if you want to mark all empty fields as invalid, use the Is empty string validation method, select the Required checkbox, and turn on the Inverse toggle.