Configure Azure Data Factory with private link
On this page
- Configure private link service between ADF and CluedIn
- Configure ADF pipeline to copy Azure Data Lake file to CluedIn private endpoint
In this article, you will learn how to configure and validate a private link service between Azure Data Factory (ADF) and CluedIn.
Configure private link service between ADF and CluedIn
This section contains a procedure for configuring private link from ADF to private CluedIn endpoint.
Prerequisites
-
CluedIn endpoint is configured to be private. For detailed instruction, see Internal load balancer.
-
Host name resolution is configured with private IP. For detailed instruction, see Host name resolution.
If you have any questions, you can request CluedIn support by sending an email to support@cluedin.com (or reach out to your delivery manager if you have a committed deal).
To configure private link between ADF and CluedIn
-
Create a private link service to CluedIn private endpoint as described here. For more details, see Private link service with private endpoint. You may skip creating a private endpoint as we will use managed private endpoint from Azure Data Factory.
-
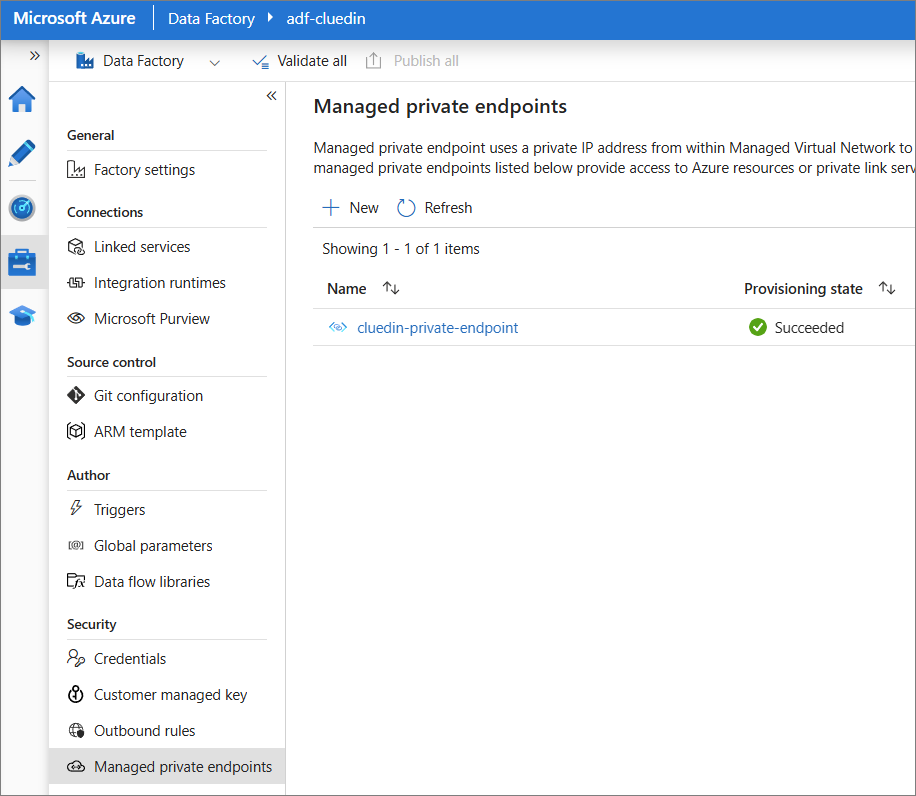
In Azure Data Factory Studio, go to the Manage tab. In the Security section, select Managed private endpoints.
-
Select New.
-
Find and select the private link service.
-
Enter the following information:
-
Name – enter cluedin-private-endpoint.
-
Account selection method – select From Azure subscriptions.
-
Azure subscriptions – enter the subscription of private link service created in step 1.
-
Private link service – enter the name of private link service created in step 1.
-
FQDN names – enter your company CluedIn host name. The following names are provided as an example:
-
app.company.com
-
clean.company.com
-
cluedin.company.com
-
-
-
Select Create.
Once the managed private endpoint is created, wait for provisioning state to be Succeeded.
-
Go to the private link service created in step 1 and approve the managed private endpoint:
-
Open the private link service created in step 1.
-
Go to Settings > Private endpoint connections.
-
Check and approve the managed private endpoint. Make sure the private endpoint name matches [adf name].[managed private endpoint name].
Once approved, your ADF should gain connectivity towards CluedIn private endpoint.
-
Configure ADF pipeline to copy Azure Data Lake file to CluedIn private endpoint
This section contains an example on how to configure ADF pipeline to copy data from Azure Data Lake to CluedIn private endpoint via REST API call. You can use the information in this section as a guideline for your use cases.
Prerequisites
-
Private link service between ADF and CluedIn is configured as described in the previous section.
-
Make sure you have Azure Data Lake with some CSV data.
-
Create an ingestion endpoint and authorization token in CluedIn. For more information, see Add ingestion endpoint.
Configuring ADF pipeline to copy Azure Data Lake file to CluedIn private endpoint consists of 4 steps:
Create a pipeline
-
On the home page of Azure Data factory, select New > Pipeline.
-
In the Activities tool box, expand the Move and Transform category, and then drag the Copy Data activity to the pipeline designer surface.
-
Add the Copy data activity.
Configure source
-
Go to the Source tab. Select + New to create a source dataset.
-
In the New dataset pane, find and select Azure Data Lake Storage Gen2, and then select Continue.
-
In the Select format pane, select DelimitedText, and then select Continue.
-
In the Set properties pane, enter the name for the dataset. Then, in the Linked service field, expand the dropdown and select + New.
-
In the New linked service pane, provide the following details:
-
Name – enter the name for your linked service.
-
Account selection method – select From Azure subscription.
-
Azure Subscriptions – select the subscription of your Azure Data Lake.
-
Storage account name – select the name of your Azure Data Lake storage account.
-
-
Test connection, and then select Create.
After the linked service is created, you’ll be taken back to the Set properties pane.
-
In the File path section, add the path to the appropriate folder/file of your Azure Data Lake.
-
Select OK.
Configure sink
-
Go to the Sink tab. Select + New to create a sink dataset.
-
In the New dataset pane, find and select REST, and then select Continue.
-
In the Set properties pane, enter the name for the dataset. Then, in the Linked service field, expand the dropdown and select + New.
-
In the New linked service pane, provide the following details:
-
Name – enter the name for your linked service.
-
Base URL – enter the URL of the ingestion endpoint in CluedIn. For more information, see Send data.
-
Authentication type – select Anonymous.
-
Auth headers – add a new header with the following details:
-
Name – enter Authorization
-
Value – enter Bearer, add a space, and then paste the token from CluedIn. For more information, see Send data.\
-
-
-
Test connection, and then select Create.
After the linked service is created, you’ll be taken back to the Set properties pane.
-
Select OK.
-
In the Request method field, select POST.
Debug and validate pipeline
Once the source and sink are configured, you can debug the pipeline to ensure it is working.
To debug the pipeline
-
On the toolbar, select Debug. You can see the status of the pipeline run in the Output tab at the bottom of the window.
The following image illustrates the ingestion endpoint in CluedIn before debugging the pipeline.
The following image the ingestion endpoint in CluedIn after debugging the pipeline.