Power Automate pre-configuration guide
On this page
- Set up a firewall policy
- Create a user account
- Configure an environment
- Create a service application
- Next steps
In this guide, you will learn how to prepare for configuring Power Automate integration for using workflows in CluedIn. The instructions in this guide are applicable to the current version of Power Automate (2502.2) and Dataverse (9.2.25031.00154).
This guide is applicable to both public and private CluedIn instances.
Set up a firewall policy
To enable CluedIn to call Power Automate, you need to add specific rules to your Azure Firewall as described here.
Power Automate integration also involves Power Apps, which is used for access to Dataverse where the CluedIn custom connector is stored. That’s why you need to add firewall rules both for Power Automate and Power Apps.
Create a user account
A user account in Microsoft Entra ID will be used to manage Power Automate workflows. This user account acts like a bot, creating and managing workflows on behalf of the service application. This approach addresses certain Power Automate limitations, such as the requirement that only user accounts can create connector connections.
This user account will be the sender of approval requests that users receive in Outlook.
Adding a new user might incur costs depending on your Microsoft Entra ID plan. For more details, please consult your IT team.
Prerequisites
- To create a new user, you need to have the User Administrator role in Microsoft Entra ID.
To create and configure a user account
-
Create a new user in Microsoft Entra ID following Microsoft documentation.
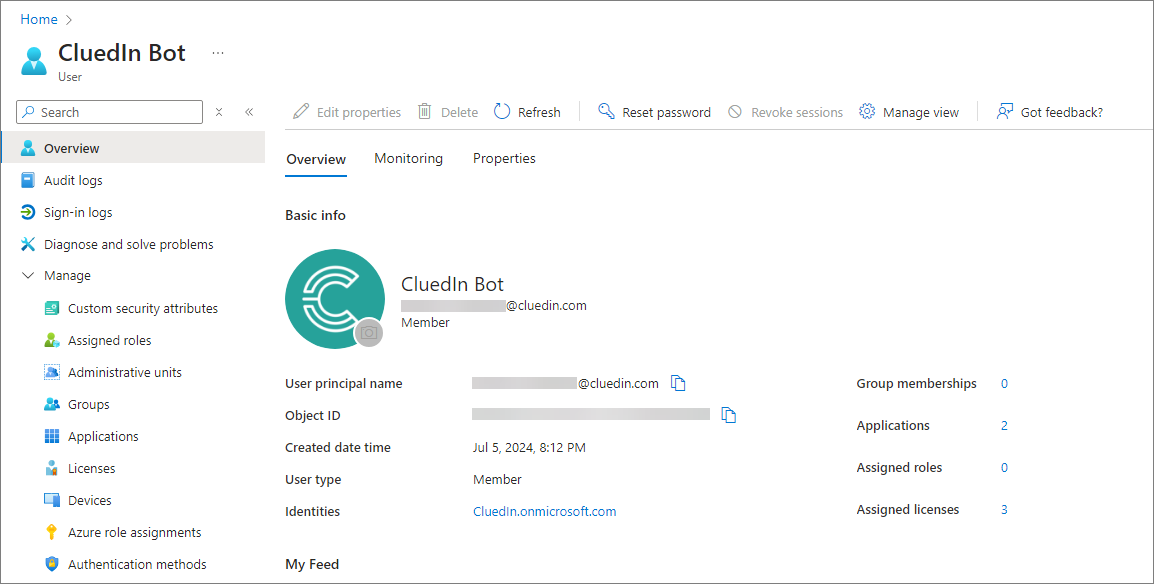
The user in Microsoft Entra ID follows the tenant configuration. The user on the screenshot above is created in CluedIn tenant and therefore it uses
cluedin.comas the domain name in User principal name and CluedIn logo as a profile picture. Your user will have the domain name that you specify when creating the user. You can also edit the profile picture after the user account has been created. To do that, select the camera icon in the lower-right corner of the user’s thumbnail. -
Add the following licenses to the created user account:
-
Microsoft 365 Business Standard – having this license allows sending approval requests to Outlook and Teams. You can use any Microsoft 365 license.
-
Microsoft Power Apps for Developer – having this license grants access to Dataverse, which is necessary for storing CluedIn custom connector that facilitates communication between CluedIn and Power Automate.
-
Microsoft Power Automate Free – having this license grants access to Power Automate and the ability to use connectors to create approval flows.
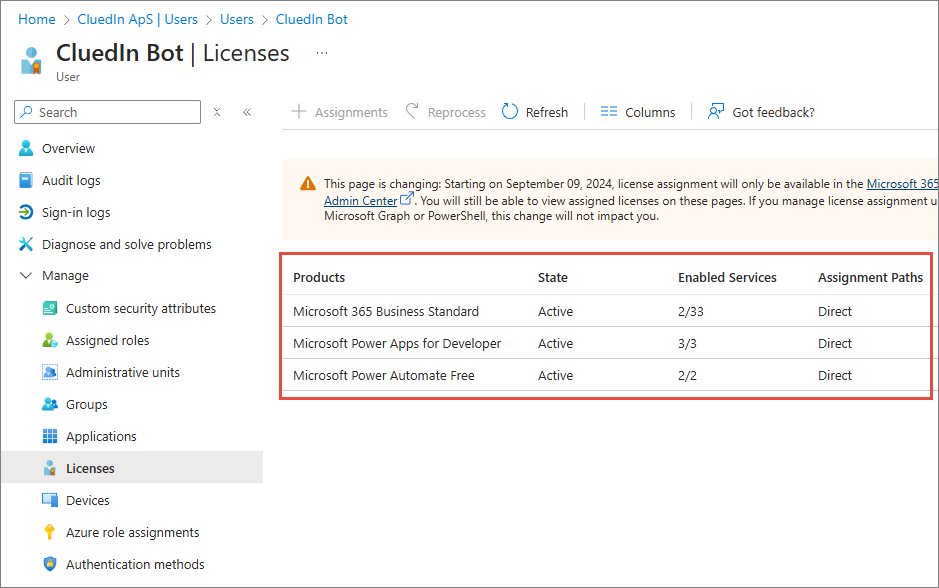
For more information on how to add a license, see Microsoft documentation.
-
Configure an environment
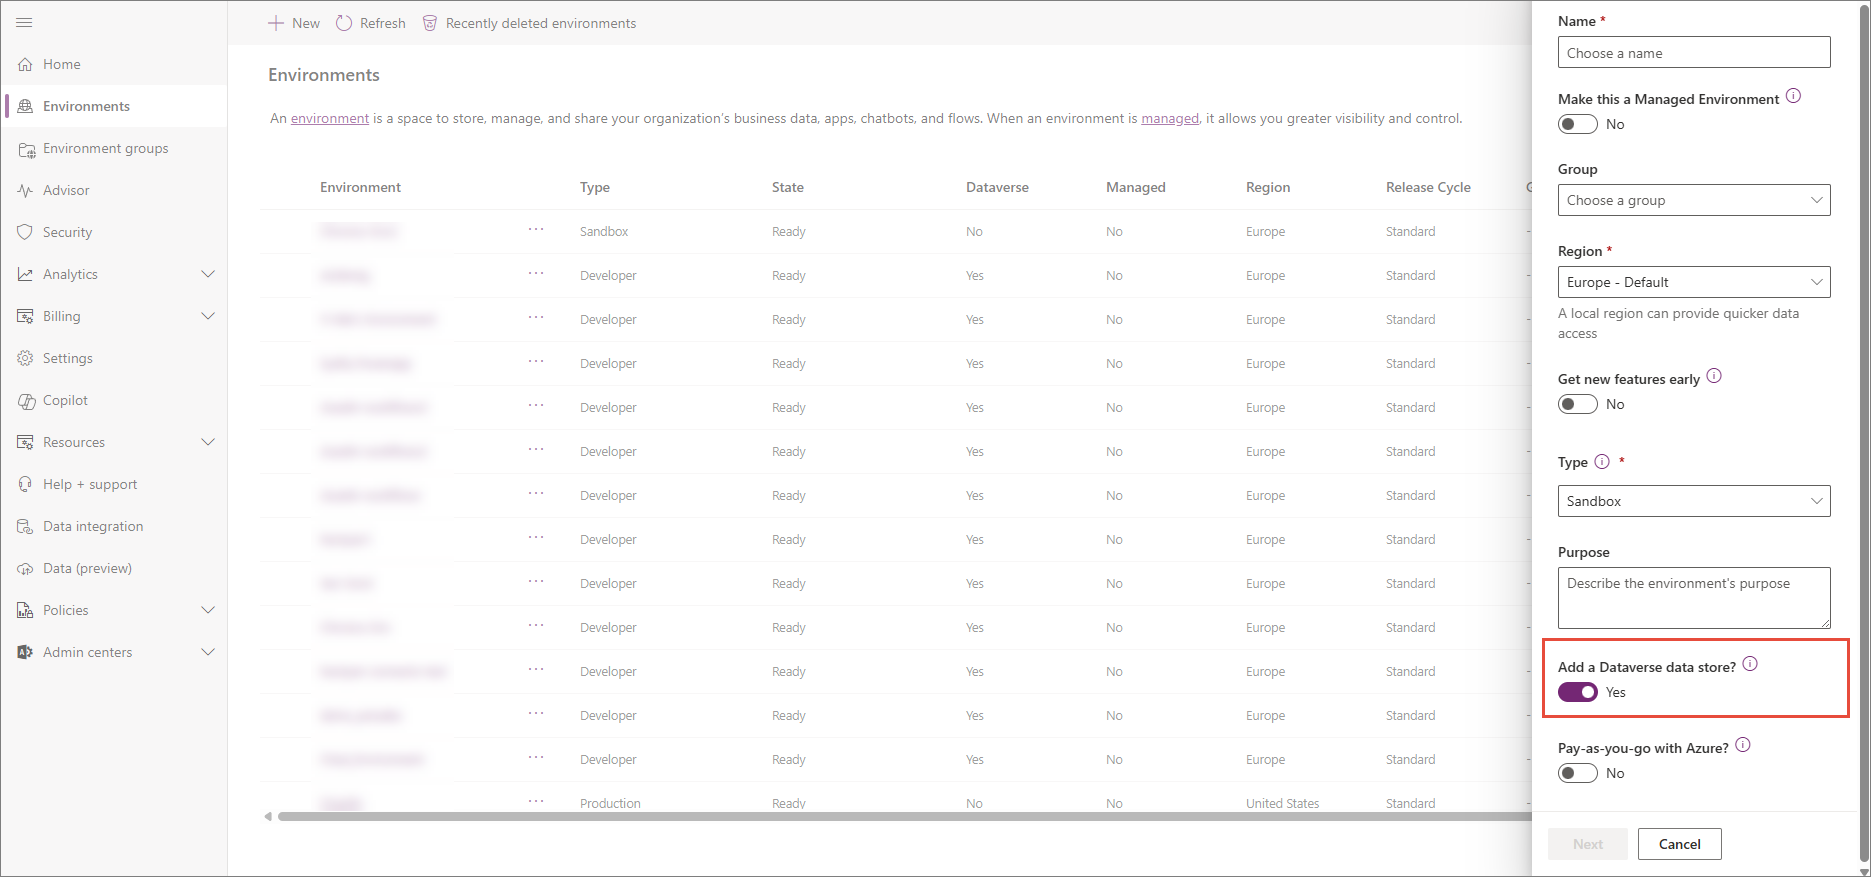
In order to use workflows, you will need to configure a Power Platform environment with Dataverse as a data store. The purpose of Dataverse is to store the CluedIn custom connector. Without Dataverse, there would be no location to store the CluedIn custom connector, and the workflows would not not function.
In this environment, the user account created in the previous step is granted System Administrator access. This access is limited to the specific environment. The System Administrator in the environment is NOT a global Azure role.
Prerequisites
- To create a new environment and add a new user to that environment, you need to have the Power Platform Admin role.
To a configure an environment
-
Create a new environment in the Power Platform admin center with Dataverse as a data store. To do this, follow the instruction in Create an environment with a database.
-
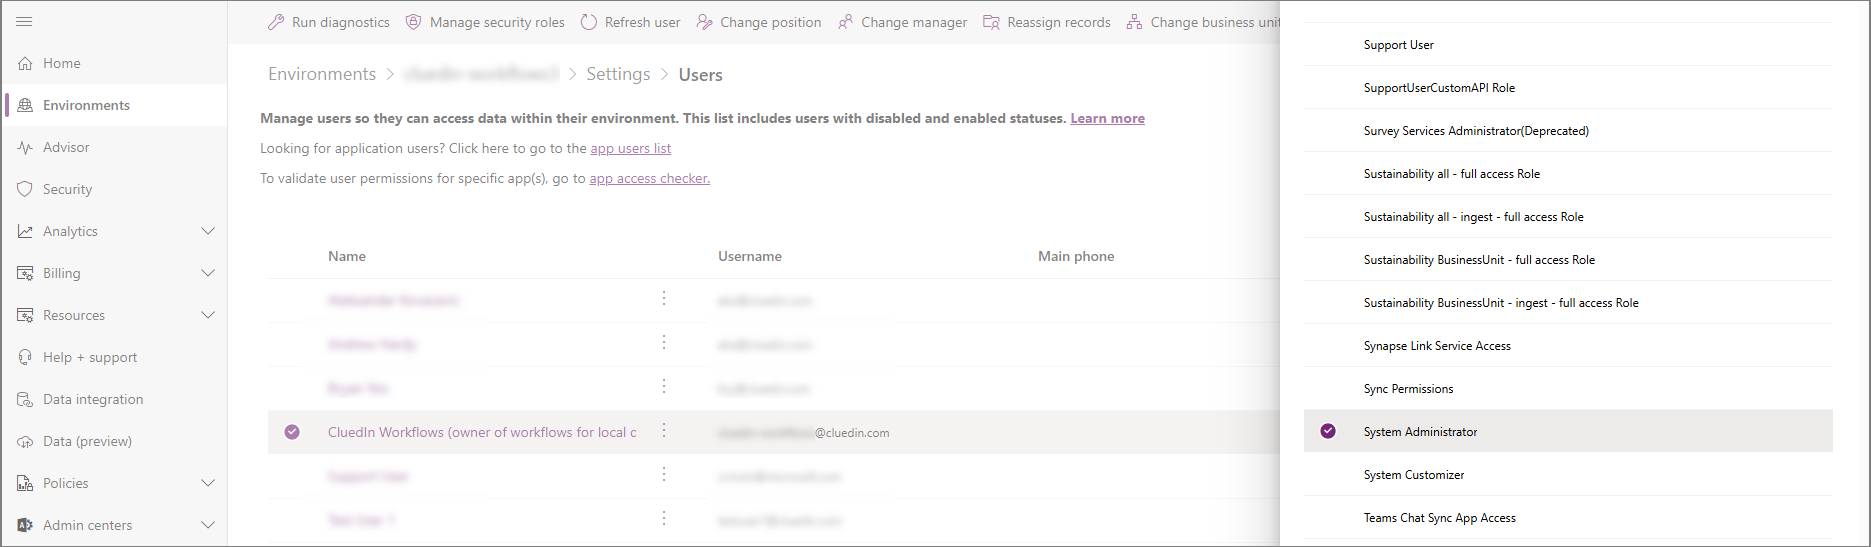
Add the user account that you created in the previous section to the list of users in the environment. To do this, follow the instruction in Add users to an environment that has a Dataverse database.
As a result, the user should be available in the list of users for the environment. On the following screenshot, the Username has
cluedin.comas the domain name. This is because the user was created in the CluedIn tenant in Microsoft Entra ID. Your user will have the domain name that you specify when creating a user.
-
Assign the System Administrator security role to the user account that you added in step 2. To do this, follow the instruction in Assign a security role to a user.
Create a service application
In order to authenticate the Power Automate widget in CluedIn, you need to register a new application in Microsoft Entra ID and grant it the necessary permissions.
This service application is required to create tokens for communication with Power Automate. When you load the workflow in CluedIn, you are actually loading a Power Automate iframe widget. The service application facilitates communication between CluedIn and Power Automate. Therefore, even though you create the workflow in CluedIn, the actual workflow is created in Power Automate.
Note that when you register a new application in Microsoft Entra ID, a service principal is automatically created for the app registration.
To create and configure an application
-
Register an application in Microsoft Entra ID following the instructions here.
-
Add a redirect URI:
-
Under Manage, select Authentication.
-
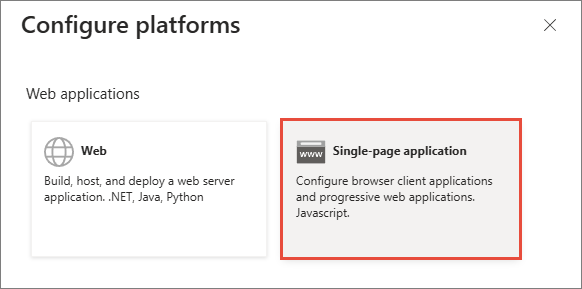
Under Platform configurations, select Add a platform.
-
Under Configure platforms, select Single-page application.
-
In the Redirect URIs section, enter the reply URI in the following format:
https://your-cluedin-domain/admin/workflow/workflow-builder.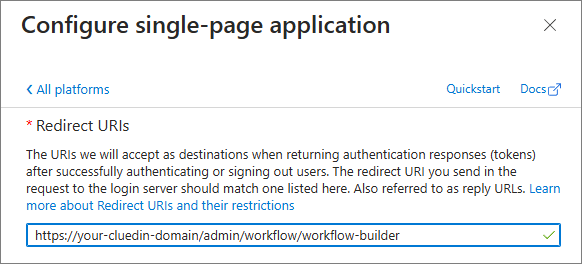
-
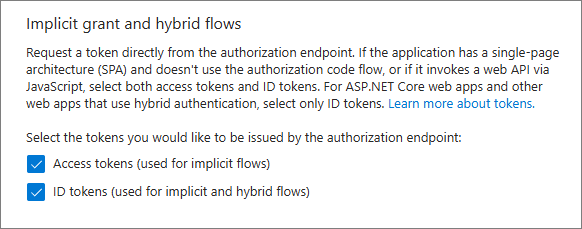
In the Implicit grant and hybrid flows section, select both for Access tokens and ID tokens.
-
Select Configure.
-
-
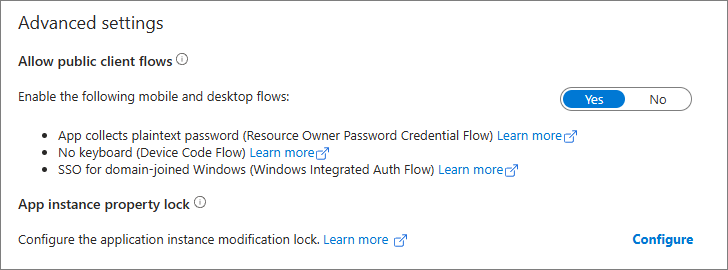
In the Advanced settings section, in Allow public client flows, set the toggle to Yes.
-
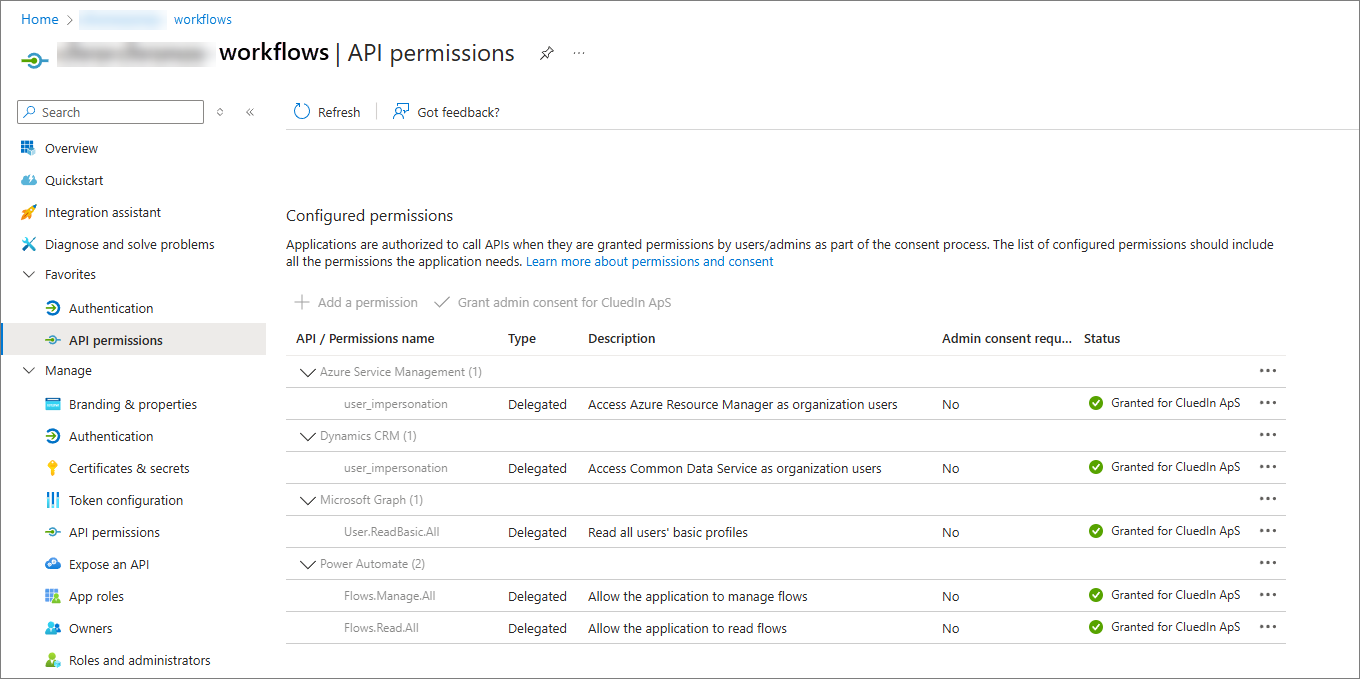
Go to Manage > API permissions, and add the following permissions:
-
Azure Service Management:
- user_impersonation – Delegated
-
Dynamics CRM / Dataverse:
- user_impersonation – Delegated
-
Microsoft Graph:
-
openid – Delegated
-
profile – Delegated
-
User.ReadBasic.All – Delegated.
-
-
Power Automate:
-
Approvals.Manage.All – Delegated
-
Approvals.Read.All – Delegated
-
Flows.Manage.All – Delegated
-
Flows.Read.All – Delegated
-
-
Next steps
Now that you have completed all pre-configuration steps, start the configuration of workflows in CluedIn using our Power Automate configuration guide.