Installation guide
On this page
- Prerequisites
- Find CluedIn
- Complete the Basics tab
- Complete the Instance Setup tab
- Review the Network and Monitoring tab
- Review the Azure Kubernetes tab
- Review the Advanced tab
- Installation Configuration
- Review the Tags tab
- Complete the Review + Create tab
- Results
- Next steps
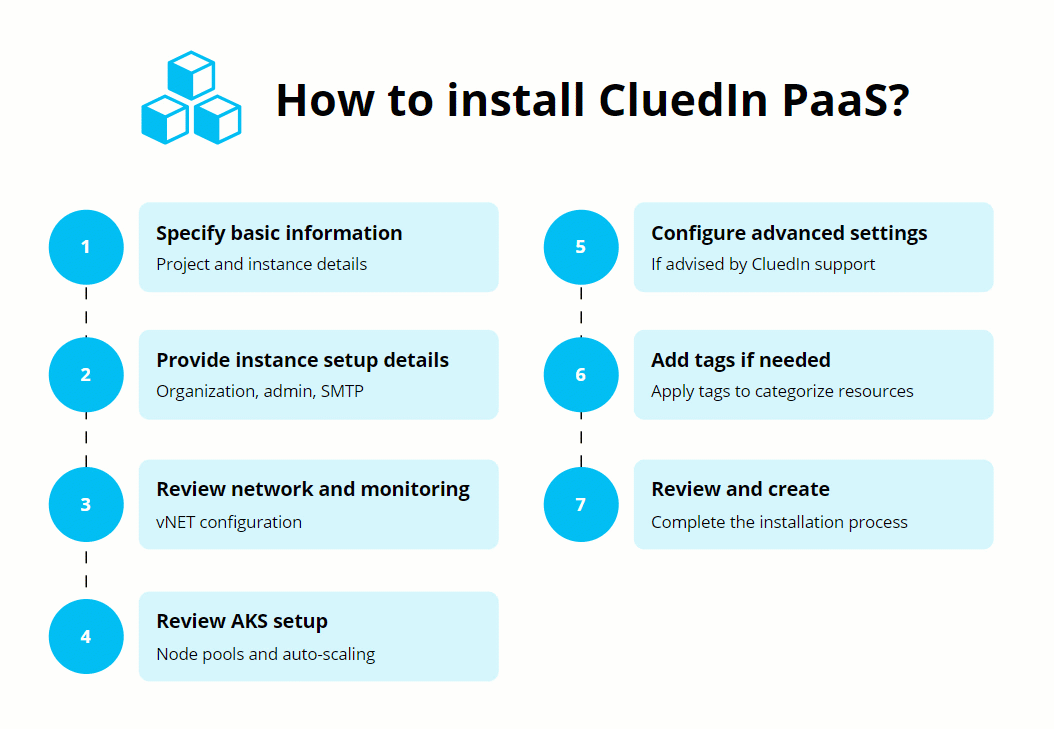
In this article, you will learn how to install CluedIn PaaS from the Azure Marketplace.
CluedIn team performs installation activities on all business days except Friday. Deploying on a Friday carries higher risk because issues may not surface immediately and can escalate into weekend incidents with fewer people available to respond. As a best practice, it is recommended to schedule installations earlier in the week (Tuesday–Thursday) to allow time for monitoring, troubleshooting, and stabilization.
Prerequisites
- Make sure that you have completed all of the actions described in Pre-installation checklist.
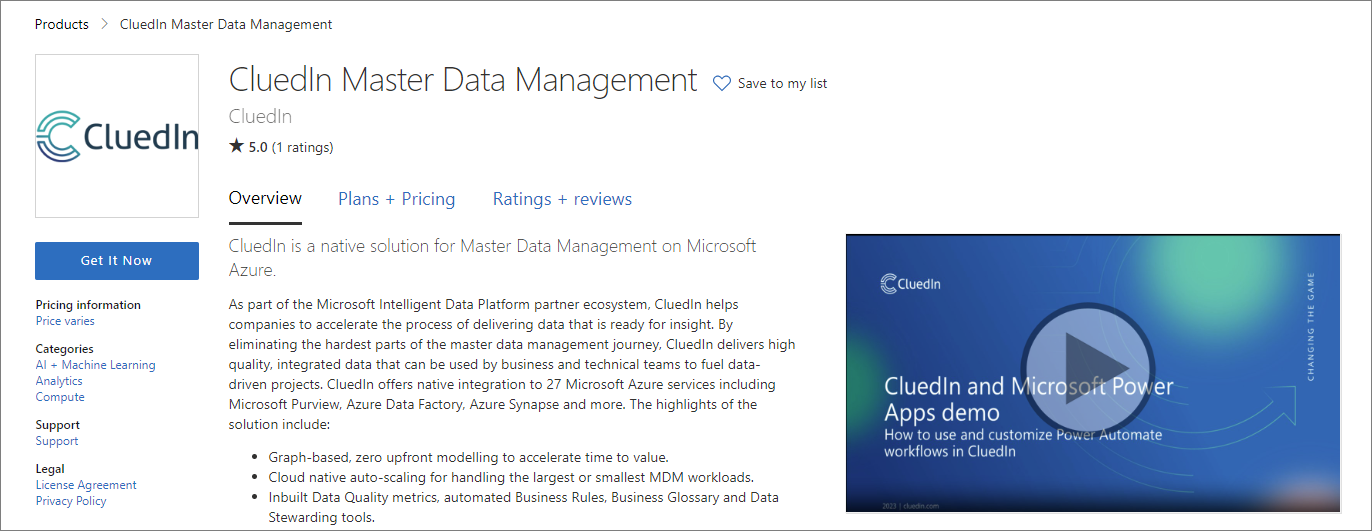
Find CluedIn
Start the installation process by finding CluedIn PaaS in the Azure Marketplace.
To find CluedIn
-
In the Azure Marketplace, go to our PaaS offering: CluedIn Master Data Management.
-
On the CluedIn Master Data Management page, select Get It Now.
-
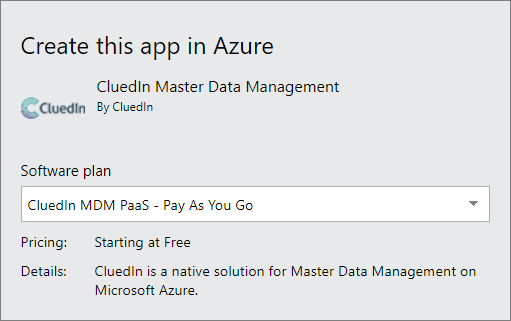
In Software plan, select the plan of your choice:
-
CluedIn MDM PaaS - Existing License – select this option if you possess a CluedIn PaaS license key acquired through a committed deal.
-
CluedIn MDM PaaS - Pay As You Go – select this option if you want to use CluedIn on a pay-as-you-go basis. For more information, see Pricing.
-
-
Review your contact information, and then select Continue.
Complete the Basics tab
On the Basics tab, you can select the Azure resource group where CluedIn will be installed and provide license or company details depending on the chosen software plan.
To complete the Basics tab
-
Fill in the Project details section:
-
In Subscription, select your Azure subscription where you want to install CluedIn.
-
In Resource group, create a new resource group.
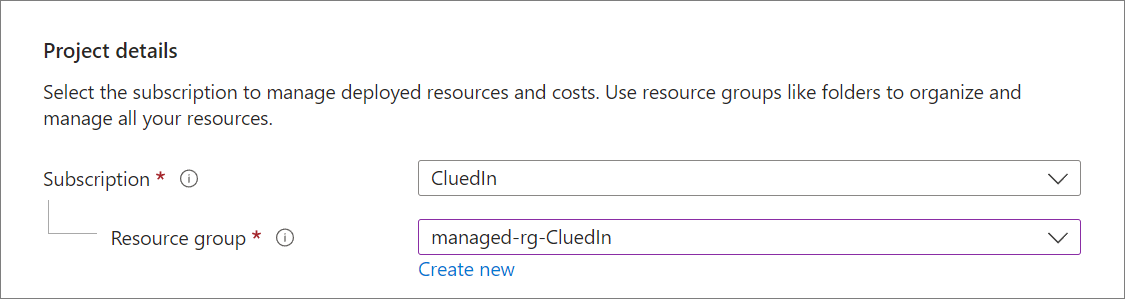
You can select the existing resource group, but it must be empty. If the resource group that you select contains other Azure resources, you will get an error.
-
-
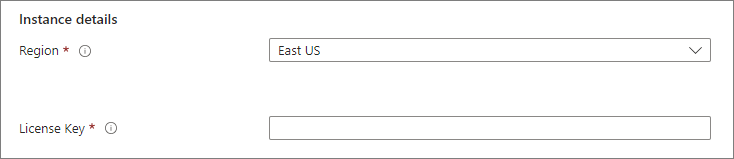
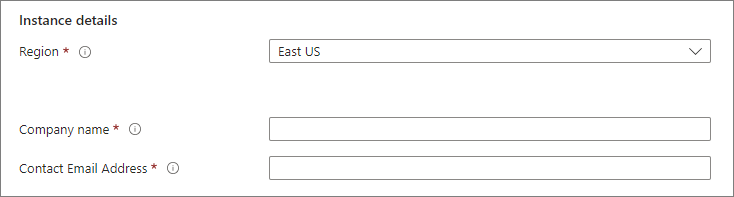
Fill in the Instance details section:
-
In Region, specify the Azure region where different resources will be created. The region will probably match your resource group location.
-
Depending on the selected software plan, do one of the following:
-
If you selected CluedIn MDM PaaS - Existing License, enter the license key that you should have received in an email from CluedIn.
-
If you selected CluedIn MDM PaaS - Pay As You Go, enter the Company name and Contact Email Address.
-
-
-
Make sure that the Managed Application Details section is filled out correctly. This section is usually filled out by default, but you can make changes if needed.

Complete the Instance Setup tab
On the Instance Setup tab, you can create the organization used within the CluedIn application along with an administrator account for your CluedIn instance as well as optionally specifying SMTP details.
To complete the Instance Setup tab
-
Make sure that the Installation Name field is filled out correctly. This field is usually filled out by default, but you can make changes if needed. This is the name of the Managed Application resource that gets created within the resource group specified on the Basics tab.
-
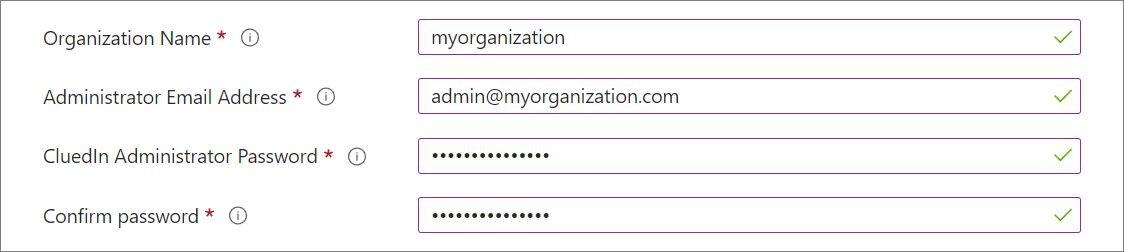
Specify organization details:
-
Specify Organization Name. The organization name will be used as part of the URL. Ideally, it should be one word with no dashes or hyphens.
-
Specify Administrator Email Address.
-
Specify CluedIn Administrator Password, and then Confirm password. The password must be more than 12 characters long.
-
-
Specify SMTP details:
-
Specify SMTP - Server.
-
In SMTP - Port, specify SSL port.
-
Add details about the email that will be used for sending invitations to other users to join CluedIn.
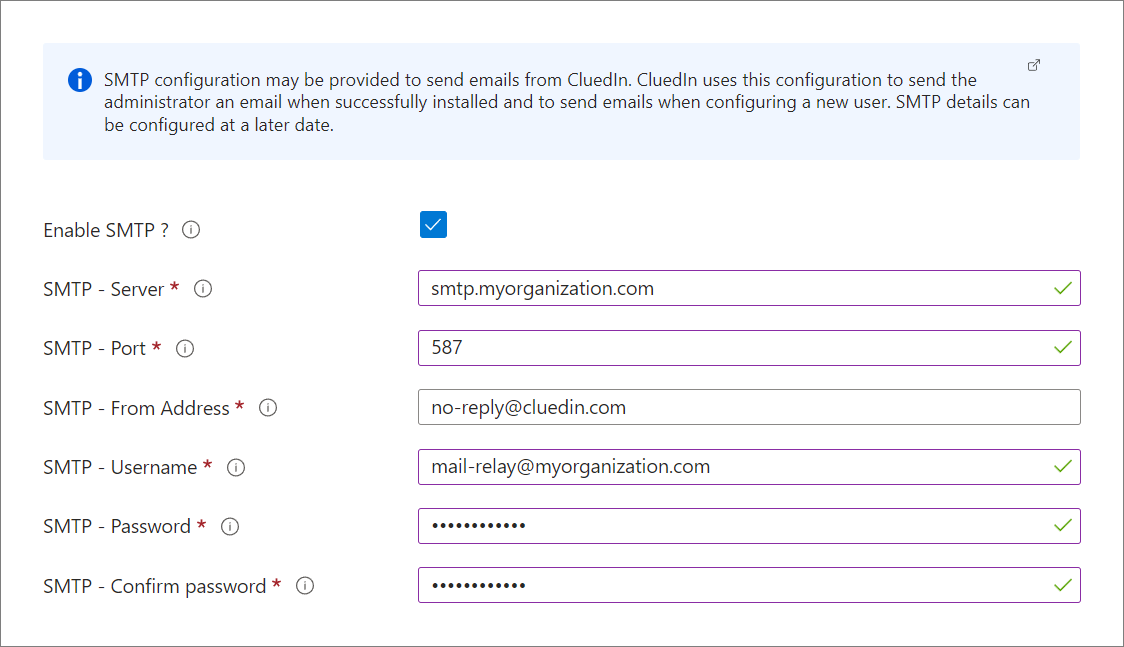
You can change SMTP details after installation by submitting a ticket to CluedIn support.
-
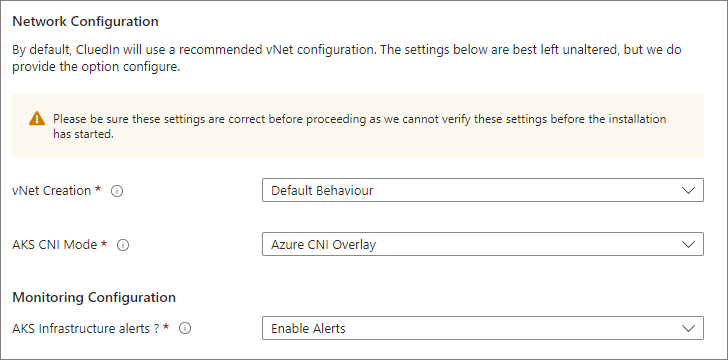
Review the Network and Monitoring tab
On the Network and Monitoring tab, you can review vNet default configuration settings and make changes if needed.
Review the Azure Kubernetes tab
On the Azure Kubernetes tab, you can customize the number of nodes that you want to use in your CluedIn instance, and you can also define autoscaling parameters.
In most cases, you do not need to adjust anything on this tab unless advised to do so by CluedIn support.
The AKS Setup tab contains the following settings:
-
General Node Size that runs the main application services. General Node Pool VM Count contains a minimum number of VMs to ensure that all resources can be scheduled. If you need to increase the VM count, consult with CluedIn support.
-
Data Node Size that runs any database and data collection services. Data Node Pool VM Count contains a minimum number of VMs to ensure that all resources can be scheduled. If you need to increase the VM count, consult with CluedIn support.
-
Data ES Node Size and Data ES Node Pool VM Count.
-
Processing Node Size that runs any CluedIn processing services. Processing Node Size depends on the license you have specified. If it is a pay-as-you-go installation, a basic SKU will be used at runtime.
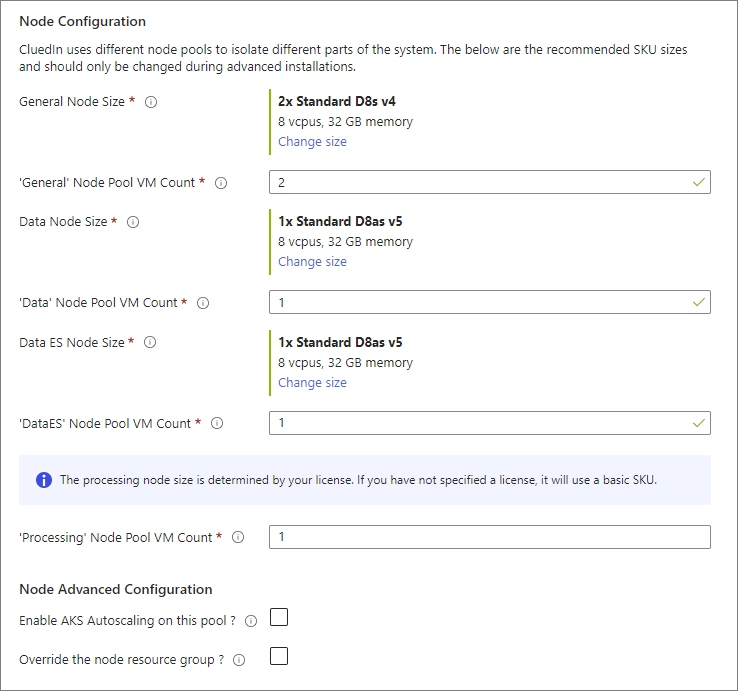
You can enable auto-scaling for the processing node pool. It means that when CPU pressure (high workload) builds up in this node pool, AKS can start up new nodes to compensate for the increase in load. When the load returns to normal, the extra nodes will be shut down. However, be aware that there are additional infrastructure and licensing costs associated with scaling up. For more information about auto-scaling, contact CluedIn support.
You can enable auto-scaling after installation.
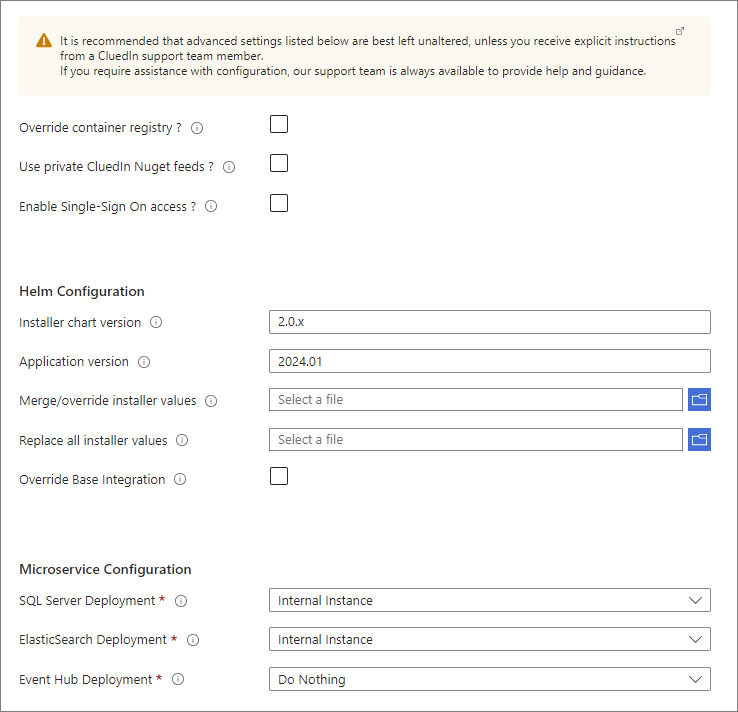
Review the Advanced tab
On the Advanced tab, you can find technical and debugging switches that are used by CluedIn support. Most of the options on this tab should not be adjusted. Any misconfiguration or changes to these options can cause the installation to fail.
You can make changes on this tab only with the advice of CluedIn support.
Bring Your Own Private DNS Zones (Optional)
You can enable the use of existing Private DNS Zones during installation.
If you choose to bring your own zones, the deployment will reference them instead of creating new ones.
Note: The following DNS zones must already exist:
privatelink.blob.core.windows.netprivatelink.file.core.windows.netprivatelink.vaultcore.azure.netprivatelink.database.windows.net
Prerequisites
-
Virtual Network Link
Each of the above DNS zones must have a virtual network link established with the Virtual Network (VNet) that will be used during the installation process. -
Access Control
The user-assigned managed identity used for deployment must be granted the following roles:- Private DNS Zone Contributor on the respective Private DNS Zones.
- Network Contributor on the target virtual network.
Installation Configuration
As part of the deployment workflow, ensure that the “Use Existing Private DNS Zones” option is enabled in the installer interface.
This instructs the deployment process to reference the provided DNS zones rather than creating new ones.
Jumpbox (Optional)
You can enable the Jumpbox feature during installation. This deploys a secure virtual machine inside your virtual network to provide administrative access for installation and troubleshooting.
- The Jumpbox comes pre-installed with all required tools—no additional setup is needed.
- You must provide a valid Jumpbox Admin Username and Password to access the VM.
Bastion (Optional)
You can also choose to enable Azure Bastion for secure, browser-based RDP or SSH access to the Jumpbox (or other VMs) without exposing any public IPs.
Note: If you are bringing your own virtual network, ensure that a separate subnet named
AzureBastionSubnethas already been created in that VNet.
This is a prerequisite for enabling Azure Bastion.
For more information about using Jumpbox or Bastion, contact CluedIn Support.
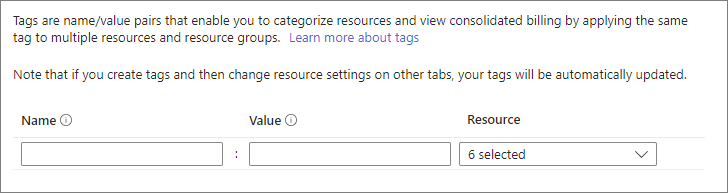
Review the Tags tab
On the Tags tab, you can add tags to categorize your resources and view consolidated billing by applying the same tag to multiple resources and resource groups.
Tags do not get applied to the managed application resource itself. This may cause issues if you have comprehensive tagging policies in place.
Complete the Review + Create tab
On the Review + Create tab, review and accept the terms and conditions. To start the deployment process in your own cloud environment, select Create.
Results
You have CluedIn running in your own cloud environment.
Next steps
Customize CluedIn to meet your organization’s needs as described in our Post-installation guide.