Power Apps configuration guide

On this page

In this guide, you will learn how to configure Power Apps integration in CluedIn.

Make sure that you have completed all of the actions described in Power Apps pre-configuration guide.

Basic Power Apps configuration

Basic Power Apps configuration is required to establish connection between your CluedIn instance and your Power Apps environment.

To configure Power Apps in CluedIn

  1. In CluedIn, go to Administration > Settings, and then scroll down to find the Power Apps section.

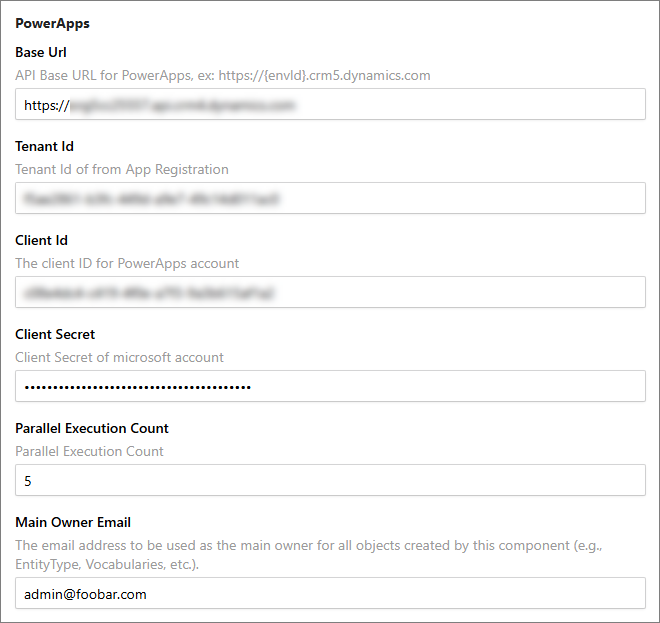
  2. In Base URL, enter the root address used to access resources within your Power Apps environment. You can find this value in your Power Apps environment: in the upper-right corner of the Power Apps page, select the settings icon, and then select Developer Resources. Copy the value in Web API endpoint and paste it to the URL field in CluedIn. You do not need to copy the version of the API (/api/data/v9.2).

    dev-resources-base-url.png

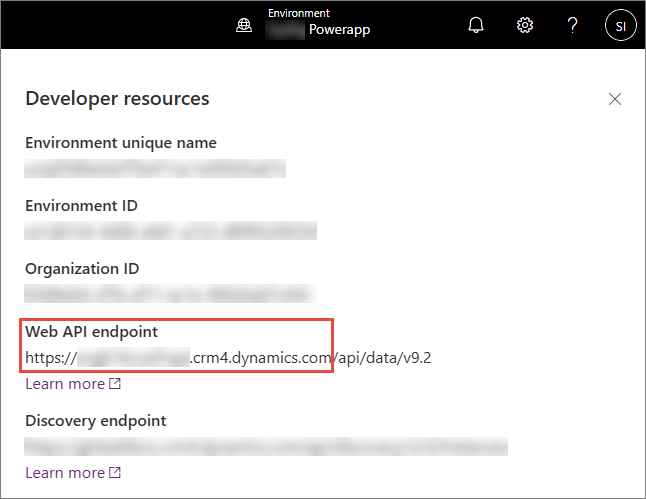
  3. In Tenant Id, enter a unique identifier for your Microsoft Entra ID tenant in which your application is registered. This is the application that you created during the pre-configuration stage in Register a new application. You can find this value in Directory (tenant) ID.

  4. In Client Id, enter a unique identifier assigned to an application when you registered it in Microsoft Entra ID. This is the application that you created during the pre-configuration stage in Register a new application. You can find this value in Application (client) ID.

  5. In Client Secret, enter a string value that your application uses to prove its identity when requesting a token. This is the client secret that you created during the pre-configuration stage in Create a client secret

  6. In Environment Id, enter a unique identifier assigned to you Power Apps environment. This is the environment ID that you found during the pre-configuration stage in Find your environment ID

    cluedin-power-apps.png

  7. In the upper-right corner, select Save.

    Proceed to the next section to configure Power Apps integration features that you want to use.

Features of Power Apps integration

Power Apps integration offers a variety of features for syncing data between CluedIn and Dataverse.

To configure specific features of Power Apps integration

  1. If you want to sync multiple CluedIn entity types to Dataverse tables, specify the Parallel Execution Count. This is the number of entity types that can be simultaneously synced with Dataverse. Be default, this number is 5.

  2. If you want to sync CluedIn entity types to Dataverse tables:

    1. Turn on the toggle next to Sync CluedIn Entity Types Dataverse Table.

    2. Enter the entity types that you want to sync. If you want to sync multiple entity types, separate them with a comma (for example, /Type1,/Type2,/Type3).

      sync-entity-types.png

      Each entity type will be synced into a separate Dataverse table. For more information, see Sync entity types to Dataverse tables.

  3. If you want to sync Dataverse tables and columns to CluedIn entity types and vocabulary keys:

    1. Turn on the toggle next to Sync Dataverse Table/Columns to CluedIn Entity Types and Vocabulary.

    2. Enter the name of the Dataverse table that you want to sync. This should be the logical name of the Dataverse table. If you want to sync multiple tables, separate them with a comma (for example, logical_name1,logical_name2,logical_name3).

      sync-dataverse-table.png

      Each table will be synced into a separate CluedIn entity type and vocabulary associated with that entity type. The columns from the table will be synced into the vocabulary keys of the vocabulary associated with the entity type. For more information, see Sync Dataverse tables to CluedIn entity types and vocabularies.

  4. If you want to automate the ingestion of data from Dataverse to CluedIn:

    1. Turn on the toggle next to Create workflow to Ingest Data to CluedIn.

    2. If you want to allow specific users to view the workflow in Power Apps, add the email addresses of those users in Workflow Access Users List.

    3. Enter the Dataverse Connection ID. This is the ID that you found during the pre-configuration stage in Create a connection.

      ingestion-workflow.png

      For more information, see Create ingestion endpoint workflow.

  5. If you want to create a stream to export golden records from CluedIn to a Dataverse table:

    1. Make sure you have the Dataverse export target installed in your CluedIn instance. It should be available in the list of export targets (Consume > Export Targets > Add Export Target). You do not need to configure the Dataverse export target because it will be configured automatically.

    2. Make sure you have enabled Sync CluedIn Entity Types to Dataverse Table for entity types of golden records that you want to export to a Dataverse table.

    3. Turn on the toggle next to Create CluedIn Stream.

      create-stream.png

      For more information, see Create streams.

  6. In the upper-right corner, select Save.

Next steps

Explore different features that are available as part of Power Apps integration in CluedIn.